Hey, all! Valentine's Day is tomorrow and I have a FREE pattern for you to celebrate with! I know it's hopelessly late and you won't be able to make one for this year, but I knew that if I waited until next year, I'd end up being just as late. So, go ahead and make one early in time for NEXT Valentine's Day!
I actually published this pattern three years ago, and it was my first ever free pattern and one of my first blog posts! So rather than being redundant and writing it all out again, to get to the pattern check out the original post HERE.
What makes this version unique is that I've added FREE Valentine's Day printable cards to go along with the bears making them perfect to give to your loved ones or make a bunch for your child's school!
I did the same thing for my Baby Honey Bee pattern two years ago and you can check that out HERE.
But this time, we've got some fun bear puns!
Once again, check out the FREE pattern for these baby bears HERE. If you would like to support me monetarily (so I can keep producing free content) by buying the ad-free, concise PDF version of the pattern, you can do so HERE.
Download the FREE Valentine's Day printables below. There are six different cards available, so you'll be sure to find one that is just right!
I hope you enjoy making these cuties! Be sure and tag me in your posts if you decide to make one! I'm @storyland_amis on Instagram and Storyland Amis on Facebook!
]]>
https://storylandamis.com/blogs/blog/free-pattern-musical-eighth-note2019-10-04T23:00:00-06:002024-06-26T22:00:13-06:00Free Pattern: Musical Eighth NoteHolly Lanier
HERE.]]>
https://storylandamis.com/blogs/blog/free-pattern-chen-the-panda-bear-with-furls-crochet2019-09-08T23:00:00-06:002021-10-08T18:15:32-06:00Free Pattern: Chen the Panda Bear with Furls CrochetHolly Lanier
Hello, all!
Back in March, I collaborated with Furls Crochet for an amigurumi crochet-along! For March's crochet-along, I designed Chen the Panda Bear.
Meet Chen the Panda Bear! In Chinese Chen’s name means “break of day” which suits him perfectly because he loves to get up early and watch the sunrise! Chen loves to eat bamboo and relax in the sunshine. He’s also very fond of snuggles and would love to be your friend!
Now that the crochet-along is over, Chen's pattern is available for free on the Furls Crochet website! Find it HERE.
To make Chen, I used the white and rose gold Odessey hook by Furls in size F (3.75mm). You can find the one I used HERE. They have a ton of other really gorgeous hooks you should check out too!
And as always, please feel free to share pictures of your finished projects with me! I absolutely love to see what you make using my patterns!
]]>
https://storylandamis.com/blogs/blog/extreme-amigurumi-finding-yarn-a-hook2019-08-30T23:00:00-06:002021-10-08T18:15:01-06:00Extreme Amigurumi: Finding Yarn & a HookHolly Lanier
First, we'll talk about yarn, where to find it and what hook size goes with it. Exactly what type of yarn you'll need will depend on just how extreme you want to go. Below are a few options.
Wool Roving
This was what I made my giant fox and sloth with. Those were the first two extreme amis I ever made. You can read more about them HERE and HERE.
Pros:If you're trying to go as extreme as possible, this is the yarn to go with! You can't go much bigger than this, (and honestly, you don't really want to). It's really nice and soft and it's going to create a very impressive ami! Also, because it's pure wool, you can use a felting needle to felt the ends together and reduce waste! You can also use felting to add detail to your ami.
Cons:It's really thick and so your hook is going to be massive. If you have trouble with fatigue while crocheting, you might want to reconsider using this yarn and go for a lighter option. Because this yarn is so thick, it's very difficult to add a lot of detail to your ami without it looking bulky and weird. If you use it, remember that less is more. It's also very expensive because it's pure wool and at $28 a pound, you could spend up to $200 just on the yarn.
Where to find this yarn:You can find wool roving HERE and HERE. These are both wonderful and reputable brands that I highly recommend.
What hook to use: I used a 40mm hook with this yarn which is the recommended hook size. I bought mine from Wool Couture Company HERE.
Couture Jazz (Jumbo 7 weight)
Couture Jazz by Premier Yarns is the yarn I used to make my giant unicorn, bunny, and owl. Those were by far my favorite to make and if I were to recommend any yarn over another, this would be it. You can read more about them in my previous posts HERE, HERE, and HERE.
Pros:It's very lightweight while still having the thickness needed to create an extreme ami. It's a woven/knit yarn (kind of like a cheesecloth texture) and is made into a tube so that it has a hollow middle. Because of this, you can fold the messy ends into the middles and then sew the ends together to create a clean yarn join when adding more yarn. It comes in lots of great colors and I personally feel like it's just the right weight for making extreme amis. Not too thick, but not too thin.
Cons:Because they come in such small skeins, you have to buy a lot of yarn meaning it's not going to be a cheap project. To make one of the extreme amis I made, you would spend around $200 just for the yarn. But thankfully, Premier Yarns offers a discount for bulk purchases so you won't have to spend quite that much! (Also, it's free shipping!)
Where to find this yarn:You can find Premier Yarns Couture Jazz yarn HERE. Joann's also sells Premier Yarns yarns online HERE, although the color options are more limited. I've seen Walmart and Joann's carry this yarn instore.
What hook to use: I used a 25mm crochet hook which was the hook size recommended. You can find one HERE. I also spotted a 25mm crochet hook at JoAnn's the other day!
Extreme acrylic
EDIT: This yarn is not available any longer.
This is a specialty yarn that I used to make my giant penguin. This would be my second favorite yarn for making extreme amigurumis.
Pros: It's acrylic, so it's cheaper than wool! It's not as thick as wool roving so it's a lot easier to manage. It's about 1/3 to 1/2 the thickness. It's also very soft.
Cons:As far as I know, it's only available online as a specialty yarn at Mama Knows Luxury's Etsy shop and only available in eight colors so you'd be limited in what you made. If you pull too hard, it tears easily, so you have to be careful when sewing pieces together that you don't pull too hard.
Where to find this yarn:You can find this yarn in Mama Knows Luxury's Etsy shop HERE. (You can also find my extreme penguin crochet kit there as well. Find it HERE.)
What hook to use: I used a P/Q (15mm) hook. I bought a Clover Amour hook and you can find it HERE. You'll also be able to find this size in local craft stores such as JoAnn's, Hobby Lobby, and Michael's.
Bernat Blanket yarn (Super bulky 6 weight):
This is a super easy option for making extreme amigurumis. I've never personally used it to make an extreme ami, but a few people have used my giraffe and sloth patterns using this yarn and come up with some very impressive amis!
Pros:It's readily available and cheap compared to the other options! You can find it in almost every craft store and online. It's fun and easy to work with and super soft. It's also very durable and comes in a ton of different colors! You can take almost any pattern and use this yarn instead of worsted weight and come up with a bigger ami!
Cons: Your ami won't be quite as extreme because it's not nearly as thick as the other yarn options discussed.
Where to find this yarn: You can find this yarn at almost any craft store and online just about everywhere. Find it HERE.
What hook to use: You can use any size from an H to a K hook just depending on how tight you want your stitches to be.
Other options:
If you want to look for other yarns on your own, I would recommend looking for a Jumbo 7 weight yarn. This yarn usually requires a 20-25mm crochet hook and I think it's the perfect weight for making extreme amis! It's not too thick so that it's difficult to manage, but it's also not too thin so that you have to increase your stitch count to get an ami that's extreme. It's just the right weight and works up quickly so you're not working on your project forever.
It's amazing how many jumbo yarn options there are out there if you really start looking! Just search for "jumbo 7" or "super bulky" on any yarn site and you'll get results.
Here are few other yarns I've seen around (that are readily available) that look like they'd be perfect for extreme amigurumi. I haven't yet personally tried any of these so I can't give you a personal recommendation, but if I try them in the future, I'll post an update here.
Meet Theodore the Bunny and his cousin, Walter! Theodore and Walter love carrots and are often scolded for snitching carrots from the garden. They are the best of friends and do everything together. Spring is their favorite time of the year and they love nothing more than being able to romp around in the fresh green grass!
Make one or two (or a dozen!) of these little bunnies for Easter this year! Imagine how cute they'd look in an Easter basket!
Dimensions: 3 in. (7.5 cm.) long & 2 in. (5 cm.) tall
Difficulty: Easy! This pattern is perfect for beginners.
Materials:
– Size F (3.75mm) crochet hook (I use Clover Amour HERE)
– Worsted weight (4 ply) yarn in any color (I used Red Heart Super Saver in colors "Warm Brown" and "Cafe Latte".)
– 9mm safety eyes (I buy mine online HERE or HERE)
– 20mm Pom Pom maker (I purchased mine at JoAnn's but you can find a similar one HERE.)
– Polyfil (or your stuffing or choice)
– Tapestry/yarn needle (I love these Clover Bent Chibi needles HERE)
– Small amount of pink embroidery floss (for mouth)
R10-13: Sc in
all 24 sts (4 rounds total – 24 sts)
Insert eyes between R8 & 9, 7 sts apart. (Hint: insert the 1st eye. Count 7 sts from the hole where you inserted the 1st eye and insert the 2nd eye.) Using pink embroidery floss and your embroidery needle, embroider a nose approx. one row down from the bottom of his eyes. Create a triangle, then fill it in until the yarn doesn’t show through anymore.
R14: *Sc 2,
dec* rep 6 times (18 sts)
R15: *Sc 1,
dec* rep 6 times (12 sts)
Stop and begin stuffing
R16: *Dec*
rep 6 times (6 sts)
Finish off. Finish stuffing head firmly and use tail to
sew up hole, then weave in your end.
Body (using any color yarn)
R1: Ch 2, 6
sc in 2nd ch from hook
R2: *Inc*
rep 6 times (12 sts)
R3: *Sc 1,
inc* rep 6 times (18 sts)
R4: *Sc 2,
inc* rep 6 times (24 sts)
R5-11: Sc in
all 24 sts (7 rounds total – 24 sts)
Finish off leaving long tail for sewing. Stuff firmly
and sew it to the head using the long tail we made and your tapestry needle
over R7-15 of the head approx. (See pics. #10 & #11.)
Straight
ears (make 2 using any color yarn)
Ch 8, starting in 3rd ch from hook, dc 2, hdc
2, sc 2, now turn and in the front loops of the chain, inc 1, sc 1, hdc 2, dc 2
8 chains
First side of ear done
Turn and crochet in the front loops of the chain as indicated by the arrows.
Finish off leaving long tail for sewing. Sew the ear to
the head at a slight angle over R13 and 14. Do the same for the 2nd ear. Ears
are spaced about 4 sts apart from each other. Weave in all ends.
Floppy
ears (make 2 using any color yarn)
Ch 13, starting in 2nd ch from hook, hdc 1 in each of the next 11 chs, make 2 hdc in the last ch, now turn and in the front loops of the chain, make 2 hdc in the next ch, hdc 1 in each of the next 11 chs
13 chains
First side of ear done
Crocheting in the front loops of the chain
Completed!
Finish off leaving long tail for sewing. Sew the ears to
either side of the head on about R15 of the head. Weave in all ends.
Front
feet (make 2 using any color yarn)
R1: Ch 2, 5
sc in 2nd ch from hook
R2-3: Sc in
all 5 sts (2 rounds total – 5 sts)
Finish off leaving long tail for sewing. Do not stuff. Pinch the opening closed on the foot and sew it closed using the tail we left and your tapestry needle. Set aside until back feet are completed.
Back feet (make 2 using any color yarn)
R1: Ch 2, 6
sc in 2nd ch from hook
R2-4: Sc in
all 6 sts (3 rounds total—6 sts)
R5: *Sc 2,
inc* rep 2 times (8 sts)
R6: Sc
around (8 sts)
Finish off leaving long tail for sewing. Do not stuff. Pinch the opening closed on the foot and sew it closed using the tail we left and your tapestry needle.
Pin your feet in place before sewing them on using straight pins to get the placement right.
Now sew the front feet to R8 of the body approx. with the end that is sewn closed pointing toward the back of the body.
Sew a couple of stitches from the sides of the front feet to the side of the body so that they don’t flop around.
Sew the back feet to about R3-4 of the body or so that the front of the back foot touches the back of the front foot.
Then weave your tail to the tip of the back foot’s front and tack it down to the body so that it doesn’t flop around.
Tail (using any color yarn)
For my tail I used a 20mm pom pom maker which you can find HERE. If you don’t know how to use one, check out this great tutorial HERE. I trimmed mine down considerably so it would be small enough.
https://www.youtube.com/watch?v=W7tb_9YKoMU
And you’re done! I hope you had fun making him! Please share pictures of your project with me through Instagram, Facebook, or email (hello@storylandamis.com). I love seeing what you create!
This pattern is an original design by Storyland Amis. This written pattern is for personal use only. Please do NOT sell or redistribute this pattern in part or in whole. If you wish to share this pattern you may link to this post, but please do not claim it as your own.
You MAY sell the finished product, but please credit Storyland Amis as the designer. If you sell your finished items online I would appreciate it if you’d link back to my blog! You may not mass-produce items made from this pattern. Thank you for your understanding and respect.
]]>
https://storylandamis.com/blogs/blog/free-pattern-baby-lamb-farm-animal2019-03-04T23:00:00-07:002024-06-10T21:42:58-06:00Free Pattern: Baby Lamb Farm AnimalHolly Lanier
HERE.]]>
https://storylandamis.com/blogs/blog/free-pattern-rooster-farm-animal2018-12-30T23:00:00-07:002024-07-15T11:19:23-06:00Free Pattern: Rooster Farm AnimalHolly Lanier
FREE rooster pattern HERE.]]>
https://storylandamis.com/blogs/blog/extreme-amigurumi-bubbles-the-unicorn-crochet-kit2018-11-12T23:00:00-07:002021-10-08T18:15:19-06:00Extreme Amigurumi: Bubbles the Unicorn Crochet KitHolly Lanier
Premier Yarns, but I still have one more member to introduce to you! I figured better late than never, right?
And now that Christmas is just around the corner, wouldn't these extreme amis make the ultimate Christmas gifts? And the kits would surely make the best Christmas gifts for the crocheters in your life! You can find all three kits HERE.
Also, read about Blossom the Bunny and Owen the Owl HERE and HERE.
So finally, here is the third and final addition to the three extreme amis I designed for Premier Yarns!
Meet Bubbles the Unicorn! Bubbles belongs to a rare species of pastel rainbow unicorns who spend their time eating cupcakes with sprinkles and drinking raspberry lemonade.
You can find Bubbles' kit available HERE and it's on sale right now!
When I posted Bubbles on Instagram and Facebook, she was by far the most popular of the three! Everyone loves unicorns, so a giant crocheted unicorn was very well received.
The kit to make Bubbles comes with all the yarn you need plus the 25mm crochet hook required and a beautifully formatted pattern! The only extra materials you will need are 40mm safety eyes, a weaving needle for sewing parts together, and stuffing! (Crocheted eyes could be substituted for safety ones.)
I designed each of the extreme amis with beginners in mind, so they are quite easy to make even if you have no experience in extreme crocheting! So don't be intimidated by their size!
To read more about the yarn I used, check out my first post about Owen the Owl HERE.
Once again, you can find Bubbles' kit HERE.
Be sure and check out the other extreme amigurumi kits I have available:
Freddy the FoxDanny the PenguinOwen the OwlBlossom the Bunny
~Holly :)
Follow my blog with Bloglovin or subscribe via email
]]>
https://storylandamis.com/blogs/blog/extreme-amigurumi-blossom-the-bunny-crochet-kit2018-08-07T23:00:00-06:002021-10-08T18:15:24-06:00Extreme Amigurumi: Blossom the Bunny Crochet KitHolly Lanier
Premier Yarns! Meet Blossom the Bunny!
When Blossom was a baby, the other bunnies used to make fun of her because her ears were so long. After a while, Blossom learned to ignore what the other bunnies thought about her and embraced her uniqueness. (A lesson we all need to learn!)
Blossom's amigurumi kit is now available on the Premier Yarns website HERE. It's on sale right now and only available in limited quantities, so hurry!
As I mentioned in my post about Owen the Owl, which you can read HERE, I designed these extreme amigurumis with beginners in mind and so they are very easy to make! They require minimal crocheting skills. Blossom's pattern only uses single crochets and half double crochets. Owen the Owl only requires single crochets! Even if you're a beginner, you can make these!
The kit to make Blossom comes with all the yarn you need plus the 25mm crochet hook required and a beautifully formatted pattern! The only extra materials you will need are 40mm safety eyes, a weaving needle for sewing parts together, and stuffing! (Crocheted eyes could be substituted for safety ones.)
It's a fabulous deal, really, because if the kit wasn't available, buying the yarn and hook separately would cost you forty to fifty dollars more.
So, buy it now while it's on sale!! (Have I convinced you yet? I hope so!) Again, you can find it HERE.
As always, if you have any questions about extreme amigurumi, feel free to write me! I'm always happy to help!
Be sure and check out the other extreme amigurumi kits I have available:
Freddy the FoxDanny the PenguinOwen the OwlBubbles the Unicorn
~Holly :)
Follow my blog with Bloglovin or subscribe via email
]]>
https://storylandamis.com/blogs/blog/extreme-amigurumi-owen-the-the-owl-crochet-kit2018-08-03T23:00:00-06:002021-10-08T18:14:42-06:00Extreme Amigurumi: Owen the the Owl Crochet KitHolly Lanier
Premier Yarns. His kit can be found HERE.
When Premier Yarns contacted me and asked if I'd like to design three patterns using their Couture Jazz yarn I jumped at the chance.
Premier Yarns sells their yarn at JoAnn's and it was so surreal going there and seeing all their yarn available!
We settled on three designs that I would make. An owl, a bunny, and a unicorn.
Pretty soon I received a giant box of yarn in the mail!
This is Couture Jazz, ladies, and gents! And it's the BEST jumbo yarn I've used to make extreme amis so far! I absolutely loved working with! It's super soft and really strong and durable. And it comes in some fantastic colors!
It's made with a kind of knit/mesh texture as you can see below. This is what makes it really durable and allows for lots of frogging if need be. It's 81% acrylic and 19% polyamide and is classified as a number 7 jumbo weight. I used a 25mm crochet hook to work with it, which is the suggested hook size.
I got started on the owl design right away. I decided to go with a purple and beige owl with white and yellow details.
I used colors, "Lavander Gray", "Beige", "Milk", and "Tender Yellow".
And here he is!
I'm thrilled with how he turned out! He's one of my favorite extreme amis for sure!
And the most exciting part is that Premier Yarns put together a kit for Owen so that you can make one too! Find it HERE! The kit comes with a beautifully formatted pattern, all the yarn you need to make him, and a 25mm crochet hook. The only extra materials you will need are 40mm safety eyes, a weaving needle for sewing parts together, and stuffing! (Crocheted eyes could be substituted for safety ones.)
And his kit is currently on sale right now! There are only limited quantities available too, so if you've been wanting to give extreme amigurumi a try, this is the time!
Honestly, this is extreme ami making at its easiest! I designed these patterns with beginners in mind and they are easy to make and have well-explained instructions!
I hope you'll consider giving extreme amigurumi a try! It's really helped shape me as a designer and crocheter and each extreme ami I've made has been a special and unique experience.
Let me know if you have any questions regarding Owen or extreme amigurumi in general! I'm always happy to help!
If you liked this, you might want to check out my other extreme amigurumis!
Danny the PenguinFreddy the FoxZippy the Sloth
~Holly :)
Follow my blog with Bloglovin or subscribe via email
]]>
https://storylandamis.com/blogs/blog/free-pattern-baby-pig-farm-animal2018-06-14T23:00:00-06:002021-10-08T18:15:00-06:00Free Pattern: Baby Pig Farm AnimalHolly Lanier
**NOTE: You can find an ad-free, beautifully formatted and concise version of this pattern available in my shop HERE. Supporting my website in this way ensures that I'll be able to release many more free patterns in the future! :)
Hey, all! I'm super excited to bring you another free pattern! This time I'll be releasing a whole series of baby farm animals over the next few months. The first one I'll be sharing is this baby pig.
Last year I had a custom order from a long-time customer for eight mini farm animals. At the time, I promised to share their patterns with you all. Now I'm finally getting around to doing just that!
So meet Billy the Baby Pig! He loves everything about his life. The mud, the grubs, the leftover scraps, the sunshine, the fresh air - Billy loves life on the farm! And he loves spending time with his many brothers and sisters. Although they don't always get along, as is the case with all siblings, at the end of the day they're able to make up and start fresh the next morning.
Now you can make your own Billy! And don't forget to make a piggy companion or two for him!
Dimensions: 3 in. (7.5 cm.) long & 2 in. (5 cm.) tall
Difficulty: Easy! This pattern is perfect for beginners.
Materials:– Size E (3.50mm) crochet hook (I use Susan Bates HERE)
– Worsted weight (4 ply) yarn in light pink, dark pink, and black (I used Hobby Lobby’s brand, “I Love This Yarn” in "Pink" and "Soft Pink" .)
– 9mm safety eyes (I buy mine online HERE or HERE)
– Polyfil (or your stuffing or choice)
– Tapestry/yarn needle
– Small amount of black embroidery floss (for mouth)
– Stitch marker (I highly recommend these HERE)
The Pattern
Head (using light pink yarn)R1: Ch 2, 6 sc in 2nd ch from hook
R2: *Inc* rep 6 times (12 sts)
R3: *Sc 1, inc* rep 6 times (18 sts)
R4: *Sc 2, inc* rep 6 times (24 sts)
R5: *Sc 3, inc* rep 6 times (30 sts)
R6-8: Sc in all 30 sts (3 rounds total - 30 sts)
R9: *Sc 3, dec* rep 6 times (24 sts)
R10-13: Sc in all 24 sts (4 rounds total - 24 sts)
Insert eyes between R8 & 9, 7 sts apart. (Hint: insert the 1st eye. Count 7 sts from the hole where you inserted the 1st eye and insert the 2nd eye.)
R14: *Sc 2, dec* rep 6 times (18 sts)
R15: *Sc 1, dec* rep 6 times (12 sts)
Stop and begin stuffing
R16: *Dec* rep 6 times (6 sts)
Finish off. Finish stuffing head firmly and use tail to sew up hole, then weave in your end.
Muzzle (using dark pink yarn)R1: Ch 5, starting in 2nd ch from hook, sc 4, turn and sc 4 in the front loops of the ch (8 sts)
This is called a foundation chain and is a great way to start a piece that you want to be more oval than round. After crocheting through the top loops of the chain, you turn your work around and crochet in the bottom loops of the chain. The first round is complete! Now you just continue as you normally would.
R2: Inc 1, sc 2, inc 2, sc 2, inc 1 (12 sts)
R3: Sc 1, inc 1, sc 2, *sc 1, inc* rep 2 times, sc 3, inc 1 (16 sts)
R4: Sc 1, sl st (we won't be completing this round.)
Finish off leaving long tail for sewing. Sew to the front of the head over R3-7.
Optionally you can stitch two nostrils onto his muzzle using black yarn.
Ears (make 2 using light pink yarn)R1: Ch 4, starting in 2nd ch from hook, sc 3, ch 1, turn
R2: Dec 1, sc 1 (2 sts), ch 1, turn
R3: Dec 1 (1 st), ch 1, turn
R4: Sc 1 (1 st)
Finish off leaving long tail for sewing. Neatly weave the tail down to the bottom corner of the ear. Now using that same tail, sew the ear to the head on R14. Do the same for the 2nd ear.
Body (using pink yarn)R1: Ch 2, 6 sc in 2nd ch from hook
R2: *Inc* rep 6 times (12 sts)
R3: *Sc 1, inc* rep 6 times (18 sts)
R4: *Sc 2, inc* rep 6 times (24 sts)
R5-10: Sc in all 24 sts (6 rounds total - 24 sts)
Finish off leaving long tail for sewing. Stuff firmly and sew it to the head using the long tail we made and your tapestry needle over R8-15 of the head approx.
Feet (make 4 starting in black yarn)R1: Ch 2, 5 sc in 2nd ch from hook
Switch to light pink yarnR2-3: Sc in all 5 sts (2 rounds total - 5 sts)
Finish off leaving long tail for sewing. Sew the two front feet to R8-10 of the body and the two back feet to R4-7 of the body.
Tail (using light pink yarn)
Ch 10, starting in 2nd ch from hook, sl st 1 in every other ch until you reach the end. (Skipping every other st will make the tail curly.) At the end, you should have 5 sl sts.
Finish off leaving long tail for sewing. Sew to the back of the body onto R3. Weave in both tails.
And you’re done! I hope you had fun making him! Please share pictures of your project with me through Instagram, Facebook, or email (hello@storylandamis.com). I love seeing what you create!
This pattern is an original design by Storyland Amis. This written pattern is for personal use only. Please do NOT sell or redistribute this pattern in part or in whole. If you wish to share this pattern you may link to this post, but please do not claim it as your own. You MAY sell the finished product, but please credit Storyland Amis as the designer. If you sell your finished items online I would appreciate it if you’d link back to my blog! You may not mass-produce items made from this pattern. Thank you for your understanding and respect.
~Holly :)
Follow my blog with Bloglovin or subscribe via email!]]>
https://storylandamis.com/blogs/blog/extreme-penguin-amigurumi-kit2018-06-03T23:00:00-06:002021-10-08T18:15:04-06:00Extreme Penguin Amigurumi KitHolly Lanier
HERE.
Most of the other materials that you will need you probably already have on hand. The few specialty items you might not have include 40mm safety eyes, a P/Q (15mm) crochet hook, and a weaving/loom needle. I've provided links to each item below.
40mm safety eyesP/Q (15mm) crochet hookWeaving/loom needle (I bought the 10 cm. one.)
See a complete list of materials needed HERE.
The good news is that Danny's kit is 20% off right now! So I would suggest splurging so that you can make yourself a huggable, cuddly Danny!
Be sure and let me know if you buy a kit! I hope to see some giant Danny's start to pop up!
Until next time! :)
Oh, and keep an eye out because I've got more giant amigurumi projects coming up!
~Holly :)
Follow my blog with Bloglovin or subscribe via email!
]]>
https://storylandamis.com/blogs/blog/pattern-writing-my-process2018-05-28T23:00:00-06:002021-10-08T18:17:59-06:00Pattern Writing - My ProcessHolly Lanier
Design the animal
First, of course, you have to come up with an awesome sauce design. One that people are going to love and beg you to publish a pattern for. Actually, even if they don't beg you for the pattern, you'll want to publish your awesome sauce design anyway. Because it's awesome. (Need a few tips on designing? Check out my design series HERE.)
As I design my animal, I write down the pattern in a little notebook. Trust me, you will want to do this. Don't ever think, "Oh, I'll remember this pattern. There's no way I could forget it." Just give it a few days. You'll forget it. I speak from painful personal experience. And going back and dissecting the animal so you can write the pattern down after you forget it just isn't as easy as it sounds.
Write it out
Now we have the pattern written down in a notebook and a truly delightful design. What's next? Transfer that pattern to the computer! And by transfer, I mean type it out in a Word document.
This is one of my personal favorite steps because I LOVE typing! I'm a Touch Typist and I find typing to be extremely relaxing.
How do you format your pattern, though? There are so, so many ways you can do this that there is literally no wrong or right way. Whatever works best for you, whatever you feel comfortable with. Go for it and don't feel like your pattern format is inferior to others. Be confident.
Take step-by-step photos
Once you have it written out in your bea-ootiful format it's time to take some step-by-step photos.
Now, I know that some people take their step-by-step photos while they're designing the animal but I've only done that a few times when I'm on a super tight time crunch. There are a couple of reasons that I don't.
First, I'm super impatient and taking photos while designing would just delay finishing the animal. Second, (and most importantly), making a second animal to take photos of the process gives me time to tweak the pattern and redesign anything I didn't like about the first one. I think it's really important to make a second animal before publishing so that you can make sure your design is extra perfect.
How detailed should you be in capturing the process with pictures? It depends on how complex the pattern is. There are certain pictures I'll always add regardless of complexity. Those would include a picture of the head with just the eyes, a picture of the muzzle/face once it's completed, a picture of the body once attached to the head, a picture of how I sew the arms closed and one of me sewing the arm to the body. Same with the legs. Any other pictures would be for things unique to the pattern that could be confusing if they were only written out.
Send it to testers
Now it's time to send your masterpiece to testers! Are testers really necessary? I don't want to say that you couldn't publish a pattern without using testers, but I will say that your pattern is going to be WAY better if you do send it to testers. Here is why I believe that.
To you, your pattern is perfect. You've been staring at it for days and you've grown used to all the inconsistencies and problems. When you send it to testers, you'll be giving fresh eyes a chance to catch those issues. And they'll also be able to tell you if what you've written makes sense to them and is easy to follow. Finding testers is really easy too! If you've got an Instagram or Facebook page, just put the word out that you're looking for testers and you'll have *way* more than you need in a matter of hours!
I always give my testers two weeks to complete testing, but the time you give your testers is totally up to you. Just make sure you're both on the same page.
Publish it!
Yes! This is the best part! The pattern has come back from testers and all the mistakes are fixed. Your masterpiece is perfect. All that remains is to publish it. So do it!
Now post all over your social media accounts about your new pattern!
Sit back. Relax. Repeat the above steps.
That's all for now! I hope you enjoyed going through my process! Make sure to tell me what your pattern writing process is! I'd really love to hear!
~Holly :)
Follow my blog with Bloglovin or subscribe via email!]]>
https://storylandamis.com/blogs/blog/extreme-penguin-amigurumi2018-04-18T23:00:00-06:002021-10-08T18:14:37-06:00Extreme Penguin AmigurumiHolly Lanier
Mama Knows Luxury asked if I'd like to make something with her extreme acrylic yarn. Staying true to my theme of only amigurumi, I decided that I would make a giant version of my penguin. You can see my original Cuddle-Sized Penguin pattern HERE.
Sarah sent me the nicest box full of her extreme acrylic yarn and an adorable needle felting kit as an extra bonus! She generously included six skeins of each color - black, gray, and white. You can find the yarn I used HERE. It works up quickly and beautifully! I used a P/Q (15mm) hook which made the stitches nice and tight. Perfect for amigurumi! You can find the hook I used HERE.
Sarah actually sent me this yarn back in August of last year, but I didn't have the time to complete it until this month. It took me about two weeks to finish him once I finally got started.
I knew that if I made giant Danny using my cuddle-sized pattern he'd turn out too big, so I completely redesigned the pattern so that he'd be just the right size.
Whenever I design something new I always start with the head. Then I make everything else and pin it all together to see how it will look before I actually sew anything in place. No exception with giant amigurumi, so the first thing I made was his head!
Next, I made his eye patches, body, beak, wings, feet, and tail.
Everyone likes pictures, so I'll show you in pictures the process.
I used a hot glue gun to secure the eyes since the eye patches were much too thick to attach them using the washers. I found that hot glue works better than fabric glue.
At this point he was looking very weird.
I think sewing the eyes on was probably the hardest part of making this penguin.
The body and head had the same number of stitches on their last rounds, so all I had to do was match up the stitches and sew them together! And yes, stuffing the head and body took a long time!
This is probably my fave picture! ^^
Break time!
How cute is he here?!
All finished! And well-loved!
I had a lot of people asking me how much yarn I used for this penguin so here are the details on materials:
I used approx. 4 1/2 skeins of the black
A little under 4 skeins of the gray
And a little under 1 skein of the white. Again, you can find the yarn HERE.
I used about 32 oz. of stuffing for the entire penguin.
Other odds and ends required would be 40mm black safety eyes which you can find HERE, and a large-eyed tapestry needle. The larger the better! And of course, an appropriately sized crochet hook. As I mentioned before I used a P/Q (15mm) hook that you can find HERE.
And I know you're all wondering - how much does he weigh?
This cutie weighs a whopping 6.5 pounds! A workout just taking the photos! But he really is so huggable and cuddly! More so than any of the other extreme amis I've made in the past. And he's a lot more durable too. Can you tell I'm in love with this penguin?
So, why use this yarn? Because it's the affordable option if you want to make an extreme amigurumi. The yarn is 100% acrylic making it much less expensive than wool roving. Your ami won't turn out as large if you don't use wool roving, since this yarn isn't as thick, but you'll get more detail because of that, and attaching all the parts will be WAY easier because you'll be able to sew them together and it won't require felting or special sewing techniques as seen HERE. It's also super soft which is a huge plus!
Since posting pictures of giant Danny on Instagram, I've received lots of questions about making extreme amigurumi and lots of requests for tutorials on the subject. If you're interested in the making of my giant fox ami, you can take a look at this post HERE and this one HERE. They give details on how I made him, including the written pattern if you're brave enough to make one yourself. You can read about the giant sloth HERE. (Sorry, no pattern for him!)
In the future, I will be writing another post about upsizing your amigurumi projects. Trust me, it will be so simple that you'll be making giant versions of all your patterns!
Will Danny's pattern be available? Yes! And Sarah at Mama Knows Luxury will also be making his pattern into a kit! Stay tuned for that!
So, what do you think of Danny? Will you be giving extreme amigurumi a try?
Until next time!
~Holly :)
Follow my blog with Bloglovin or subscribe via email!
]]>
https://storylandamis.com/blogs/blog/free-pattern-burt-the-baby-honey-bee2018-02-11T23:00:00-07:002024-07-08T09:34:10-06:00Free Pattern: Burt the Baby Honey BeeHolly Lanier
HERE.]]>
https://storylandamis.com/blogs/blog/turbotax-inspired-teddy-bear2018-02-08T23:00:00-07:002021-10-08T18:15:43-06:00TurboTax Inspired Teddy BearHolly Lanier
I'm all for romantic surprises, so I said yes right away!
First a little background in case you have no idea what the TurboTax teddy bear is, go ahead and watch this short commercial HERE. Or just take a look at him in the picture below.
Image via Google search
I knew I could make my teddy bear look almost exactly like the one in the ad, but I also knew it was going to be a bit of a challenge. Especially since I wouldn't be creating in my exact style. (Also, the teddy bear in the commercial is knitted, and I would be crocheting.)
The first thing I did was pick the colors! For his main color, I decided to go with Red Heart Super Saver yarn in the color "Buff". You can find the exact color HERE.
When I posted this bear on Instagram everyone loved his green sweater! I used Hobby Lobby's brand "I Love This Yarn" in the colors "Forest Green" and "Mid Green".
This little bear required a lot of shaping, especially on his head. On the TurboTax bear, his little nose is sticking out a bit and I definitely wanted to replicate that on my bear. I decided to go with a little optical illusion and instead of increasing to create the slope, I decreased and then on the next round, added those stitches back with some increases. This kept the head from getting too big.
On his eyes, I indented them so that they were nestled further back in his face, also helping with the optical illusion of his nose being further out. Indenting eyes is a whole tutorial in and of itself so I will write up a blog post about that in the future!
I made sure to stuff the head very lightly because I wanted to retain the shaping and I also wanted him to look squishy and huggable like the TurboTax one.
The TurboTax bear has a plump little tummy, so of course, I wanted to make mine like that as well. Because I didn't want his body to get too big with a cluster of increases, I used the same principle that I used for the head and decreased on one round of the body, then on the next round, added those stitches back in with increases on top of the decreases. No stitches lost, no stitches gained. But it made it look like his stomach was pooching out and his legs were further back.
The sweater was crocheted into the body (i.e. I didn't make the sweater separately), except for the collar. The collar actually has a knit look, doesn't it? I achieved this by crocheting in rows using half double crochets and only crocheting into the back loops.
The arms and ears were easy peasy compared to the rest of the bear and in no time my little teddy was finished!
One of the greatest joys of doing custom orders is hearing back from the customer after they receive their order and I was thrilled to hear that they were both very happy with the bear!
So is there a pattern coming for this little bear? Yes! It probably won't be available for a few more months, but keep an eye out (and keep bugging me), and I'll publish it eventually! (Also, I won't be marketing him as a TurboTax teddy bear, so don't worry.)
What do you think of my teddy bear? Would you be interested in making one yourself?
~Holly :)
Follow my blog with Bloglovin or subscribe via email!
The post “ TurboTax Inspired Teddy Bear” first appeared on Storyland Amis
]]>
https://storylandamis.com/blogs/blog/part-2-how-to-design-your-own-amigurumi-finding-the-you-in-your-style2018-01-28T23:00:00-07:002021-10-08T18:11:31-06:00Part 2 How to Design Your Own Amigurumi: Finding the YOU in Your StyleHolly Lanier
HERE.
Welcome to part 2 of my new design series! As promised last week, today's subject is about how to find your own unique style. One that is different from everyone else's.
I don't know about you, but one of my greatest struggles was finding my own unique amigurumi style apart from everyone else's. After all, no one likes a copycat, right?
Before we begin, let me just say this:
The truth is, we ALL have our own unique style whether we know it or not.
It's true! Have you ever observed that if you give the same crochet pattern to five different people, they will all come up with slightly different results? This has become even more evident to me in the past year since I started selling my crochet patterns. Nobody can get pattern perfect results except for the designer. And when I say "pattern perfect" I don't mean that no one can get their ami to look as cute as the pattern suggests. On the contrary! As I mentioned last week, some people have a special gift for making their amigurumi turn out way cuter than the pattern calls for. I just mean that no one's amigurumi is going to look exactly like the one in the pattern. And that's okay. That's just your own unique style coming out!
Pretty cool, huh?
"Okay," you say, "that's all fine and dandy, but I still want to know how to design my own unique amis."
Fair enough! I just wanted to share that very cool fact with you!
It all takes time
While I was discovering my style, I would look at other people's amis and think, "Wow, they all have such a unique style, even if the designer wasn't specified I would still be able to tell it was their design."
And then there are some designers who add something to all their designs that single them out from all others, making their work instantly recognizable.
I wanted that so bad, but I didn't know how to go about doing it. I wanted my work to be instantly recognizable too and have people think, "I'll bet Storyland Amis designed that!"
I struggled with this desire, going back and forth with my design style. Changing this, changing that.
It was discouraging.
But what I didn't realize was that while I was changing things and getting discouraged, I was actually discovering my very own style!
I didn't know it, but people were already beginning to recognize my work when they saw it. They could see ME in it. What do I mean by that?
About a year ago I designed a custom order chameleon that wasn't at all like anything else I had designed in the past. I posted it on Instagram and someone left a comment saying, "I love him! He's different than a lot of your other designs but still has your style. I love all of your creations."
Hmm. . . and it made me think, "Hey, there's more to this designing thing than head shaping and arm length!"
Truly there is and I don't even know how to best describe it. If each animal is so different in their own respect, then how can it still be obvious that they were made by the same person? It's almost as if you're putting a bit of your very own personality into each ami you make. And that goes for whether you're using your own or someone else's pattern. I really don't know any better way to explain it.
My insecurities didn't quite end with that one comment, but it did make me think.
Let's get practical
Practically, though, how do I design my amis? How do I figure out what body, head, arms, legs, etc. to use?
When I first started designing I felt like the only way my animals would be unique from everyone else's, while at the same time instantly recognizable, would be to find one basic design and then just change certain things about it to make new animals.
One basic head design, one basic body design, etc. Just change the ears and muzzle when necessary, and voila!
What's wrong with this method, you say? Actually, nothing's wrong with it. If that's what you want to do, then that's perfectly alright! It looks like you just found your style!
But I wasn't happy with that. The problem with me is that I felt like I had to design that way. How else could my designs be branded as my style?
Well, I finally learned something and now I don't worry about how similar or dissimilar each design is from each other. Now I do what works best for each animal. Instead of forcing a certain style on each design, I let the design create its own style. I can't tell you how freeing this has been for me!
Instead of telling myself that because the elephant and the bear have round heads or short arms the giraffe and frog have to have round heads and short arms, I imagine what would look best for each design, regardless of what my other animals have looked like in the past.
I'm so excited to share this with you all because if you've struggled with feeling inferior with your own style like me, this was such an eye-opener!
Of course, if you want all your animals to have the same head shape and the same arm and leg design, then by all means, go right ahead and do that! That's just one more way you can express your own unique style. Just do what's best for each design.
Design how you want to design, not how you think everyone else wants you to design.
Practice makes perfect and sometimes it just takes time to find your style. Remember when I said that while I was changing this and that with my designs I was actually discovering my own style? That's true for you too! It takes time to perfect anything.
Don't think it's not normal to be ripping the same body part out over and over. That is part of being a designer. You will get discouraged and it will be hard, but in the end, it's worth it!
Don't worry, I'm going to be sharing practical tips on designing in future posts. Just think about what I've said and remember to stay true to your own style and do what you feel is best for each design.
Also remember that even if you can't see your style, other people likely do. Sometimes we're too used to ourselves.
There is so much I could say about this subject! What do you think about it? I'd love to hear your thoughts!
~Holly :)
Follow my blog with Bloglovin or subscribe via email!
The post “ Part 2 How to Design Your Own Amigurumi – Finding the You in Your Style” first appeared on Storyland Amis
]]>
https://storylandamis.com/blogs/blog/part-1-how-to-design-your-own-amigurumi-you-dont-have-to-design-your-own-patterns2018-01-14T23:00:00-07:002021-10-08T18:13:00-06:00Part 1 How to Design Your Own Amigurumi: You Don't Have to Design Your Own PatternsHolly Lanier
have to design your own patterns.
I told you it might surprise you that the first article in my design series is about how you don't have to design your own patterns, but I really feel like before we delve into how to design, we need to talk about why we design and if we should design. And also help you feel secure in what you can and can't do.
I see people on social media frequently commenting on how they don't know how people design and they could never do that. And I also see people replying to those comments and saying something like, "Oh, I'm sure you could! Everyone can design!"
I just want to go on record today as saying, that is not really true. I'm sorry folks, but not everyone can design. And that's okay. That's okay!
In this culture of "you can be whatever you want to be", we often feel unnecessary pressure when we realize that we can't do whatever we want to do. Not everyone was meant to design their own patterns. Why do you think people like me and other designers make patterns in the first place? So that people who can't or don't want to design can still have access to hundreds of great designs!
We can't all be designers
If everybody designed patterns, who would ever make those designs?
I know people who do absolutely amazing jobs taking other people's patterns, following them and coming up with results even better than the designer themselves! They just have that knack, that gift, if you will, of taking a pattern and working their creative magic on it. (I'm not making this up, I really do know people like this.)
Some people do better at following and those people are just as important as the designers.
And so, I sincerely want to encourage you to be secure in your own abilities and to know that it is okay if you just aren't able to design.
It's also okay if you don't want to design your own patterns. Don't think that just because everyone else is doing it you have to too. Don't jump on the bandwagon if you don't want to.
Please don't beat yourself up because you struggle to design. Maybe you will someday. Maybe you won't. The important thing is that you are secure in your own abilities right now and that you love to crochet! That's the most important thing, right?
The Good News
Let me tell you a little story. Before I started designing and selling my own patterns, I focused all my time and effort on making ready-made items that I could sell in my Etsy shop and on taking custom orders.
Once I started selling my patterns I didn't have time anymore to take custom orders and could only do an occasional shop restock.
Now, I'm not saying that everyone who decides to design their own amis is also going to be selling those patterns - some people just like to have their own unique designs. But if that was your intention in designing, the good news for you is that if you aren't designing your own patterns, you'll have plenty of time to supply your customers with adorable handmade plushies! And believe me, there are plenty of customers out there.
The other piece of good news is that there are literally thousands of amazing amigurumi patterns out there that you can choose from - many of them free!
So whether you've decided to design your own amigurumis or use someone else's design, don't forget why you crochet in the first place. If you're like me, you crochet because you love creating something with your hands. You love being able to share that creation with others. And you love being able to sit down and relax with a current project.
Whether you design or not, just don't stop crocheting. Keep creating, and keep being you! You have something great to offer to the crochet community. If it's a great design, then share it. If it's an encouraging word, then share it. Whatever it is, don't be ashamed of it. Be proud of who you are. Don't try to be like everyone else. Be you.
As the famous quote by Oscar Wilde goes, "Be yourself, everyone else is already taken."
Okay, now we have that out of the way! And here's a little disclaimer: I'm not saying that you're unable to design because I don't know you. You can't even say that about yourself until you try. Maybe you have a hidden talent you don't even know about. Do I recommend you try? Absolutely! Why do you think I'm writing this series? By all means, give it a try!
Next week we'll talk about finding the YOU in your design style. This was the top question I received and I'm looking forward to helping you find a style that's different from everyone else's. Stay tuned!
What are your thoughts on this subject? Do you think you tend to be a designer or do you enjoy using others patterns best?
~Holly :)
Follow my blog with Bloglovin or subscribe via email!
The post “ Part 1 How to Design Your Own Amigurumi - You Don't Have to Design Your Own Patterns” first appeared on Storyland Amis]]>
https://storylandamis.com/blogs/blog/how-long-does-it-take-you-to-make-that-solved-spm-and-other-curious-crochet-questions2018-01-03T23:00:00-07:002021-10-08T18:12:52-06:00“How Long Does it Take You to Make That?” Solved, SPM, and Other Curious Crochet QuestionsHolly Lanier
PhotoCred: Pinterest
Other popular questions include,
"How did you learn to make that?"
"What do you put inside there to make it fluffy?"
"Can you make me one?" closely followed by, "How much do you charge." (Just as an interesting side note, almost all the guys I talk to tell me I'm not charging enough. Is it just a guy thing? Hmm...)
And, "What are you going to do with it when you finish it?"
Do any of these questions sound familiar to you?
Another very common question crocheters get asked is, "How long does it take you to make one of those?"
This has to be one of the most difficult questions to answer. At least for me, personally.
I mean, there are few times when I sit down and crochet an entire animal in one sitting whilst timing myself at the same time. And then there's also stuffing and assembling to count in as well. I always find it hard to give a confident answer to this question and I know I'm not the only one!
Well, thanks to a little math, gone are the days of hesitation when answering these kinds of questions! I have come up with an almost fool-proof way of mathematically figuring out how long it takes to make any given amigurumi! (This can also apply to wearable and household crochet items as well.)
Now you can figure out how long it takes to make your favorite project with just one minute of crocheting and a little bit of math!
Disclaimer: This method is not completely accurate, but sure takes a lot of guesswork out and makes for some fun facts!
Let's Figure it Out
First, you need to know some basic arithmetic. Are you able to do simple adding, subtracting, multiplying, and dividing? Good! Let's take it one step at a time. (I really feel like this should be a WikiHow article.)
1.) Grab an already existing crochet project. Get a stopwatch and a stitch marker. Crochet a stitch and mark it with your stitch marker. Now start your stopwatch and crochet as many stitches as you can in the space of a minute. (Don't rush your work, just crochet as you normally would.) Stop the stopwatch when the minute is up. Now counting from where your stitch marker is, how many stitches did you make in the space of a minute? Write this number down for future reference. We'll call this number our SPM (Stitches Per Minute.)
Extra credit activity (not required for this project): Want to know how many stitches you can crochet in an hour? Just take your SPM and multiply that number by 60. Voila! Now you can brag to everyone that you can crochet X amount of stitches per minute!
2.) Grab your favorite crochet pattern . . .
3.) . . . And a calculator
4.) Now here's the part that takes the most time. You know the number in parentheses that should be after every round in your pattern? Yup, you're going to add all those numbers up. Starting with the first piece, (in my case, the head), add all these numbers up. 6 + 12 + 18 + 24 + 30 etc. Don't forget when you have multiple rounds with the same stitch count to add every round. Do this quickly by multiplying the number of rounds by the stitch count (ex. 5 rounds x 30 = 150). After each body part, write it down on a piece of paper. At the end, we'll add all these numbers up and get our total!
5.) When you're done adding up all the stitches, enter this grand total in the calculator. Now divide that number by your SPM (stitches per minute) number. Now take that number that you just got and divide it by 60. What did you come up with? That is how many hours it takes you to crochet your amigurumi! (If you have to decide on rounding up or rounding down, always round up.)
6.) For number 6, we have to do a little bit of guesswork. We now know exactly how long it takes to crochet all the pieces, but we still haven't added in time for assembly and stuffing. Depending on the size and complexity of your project, this could be anywhere from a half an hour to two hours. It's your guess! Guess wisely! ;)
7.) Now go post on your favorite social media and let the world know the facts!
Want to know MY facts?
My SPM is 20 . . .
. . . Which means I can crochet about 1,200 stitches an hour . . .
. . . Gerald the Giraffe takes a whopping 3,930 stitches to complete . . .
. . . Which means he takes approx. 3 hours and 27 minutes to finish crocheting . . .
. . . Add an extra 1.5 to 2 hours for assembly and stuffing and he takes about 5.5 hours to make.
Hmm, I don't know about you, but it sure makes me appreciate the value of handmade items more than ever!
What about you?? I'm dying to hear what your SPM is! How long does it take you to crochet your favorite project? What questions do people ask you while you're crocheting?
~Holly :)
Follow my blog with Bloglovin or subscribe via email!
The post “ “How Long Does it Take You to Make That?” Solved, SPM, and Other Curious Crochet Questions" first appeared on Storyland Amis]]>
https://storylandamis.com/blogs/blog/simply-crochet-feature-giveaway2017-09-13T23:00:00-06:002021-10-08T18:11:48-06:00Simply Crochet Feature & GiveawayHolly Lanier
Simply Crochet Magazine Issue 61! I was so thrilled and honored when they asked me if I'd like to be featured in a mini profile. If you follow me on Instagram you probably saw my post from last month about it when it first came out. But just today I finally got my hands on a hard copy. Three actually! And so to celebrate I'm going to GIVE AWAY one of those copies along with the special crochet hook that came with it!
There's my "mini profile" featuring my giant sloth, baby sloth, gingerbread twins, and Gerald Giraffe! (The Gingerbread Twins were especially excited to be featured in the issue, that's why they're helping me promote this giveaway!) ;)
In this issue of Simply Crochet, you will run into many other familiar faces including Stephanie of All About Ami, Jessica of The Hook Nook, Vincent of Knot Bad, Stacey of Fresh Stitches, Ilaria of Airali Design, and many more! It was truly an honor to be mentioned alongside these other amazing designers!
There are over 25 patterns in this issue alone including a cute little "sleepy sloth" ami design by Ilaria Caliri.
And to make it all extra special, there is a pretty polymer crochet hook included! It's a size G (4.mm), which is a size I use frequently, so I'm excited to make something using it.
Now for the GIVEAWAY! In this giveaway you will win:
Issue 61 of Simply Crochet Magazine
Size G (4mm) polymer crochet hook (not the gingerbread man, sorry! He's just here to promote.)
***To ENTER follow these rules:
Comment on this post and let me know what you're most excited about winning: the magazine with all the patterns, or the hook!
That’s it! Oh, and you can also enter this giveaway on Instagram to increase your chances of winning!
Giveaway is open to residents of the U.S., Canada, U.K., and Australia only and will end on Saturday, September 16th at 8 p.m. MDT. One winner will randomly be chosen out of all the entries.
~Holly :)
Follow my blog with Bloglovin or subscribe via email!]]>
https://storylandamis.com/blogs/blog/pattern-baby-jellyfish-amigurumi2017-08-21T23:00:00-06:002021-10-08T18:12:27-06:00Pattern: Baby Jellyfish AmigurumiHolly Lanier
Honestly, though, there are so many fun things you could try with these cuties! Why not try different facial expressions? Super long tentacles? Bowtie? I only wish I had the time to try all the ideas I could come up with! But I hope you'll indulge my whims and try them for me!
These jellyfishes are so easy to make that I would certainly recommend them for a beginner! You can make one in an hour or less!
I originally designed Sherry the Jellyfish for my giveaway with Just Travel Shop and made that particular one into a backpack clip! You could also make your jellyfishes useful by adding a backpack clip or key chain to them!
Let's get started!
Dimensions: 2.5 in. (6.5 cm.) for the short one and 3.5 (9 cm.) for the long one
Materials:- Size F (3.75mm) & C (2.75mm) crochet hook (the C hook is for the heart bow)
- Worsted weight (4 ply) yarn in any color and also a small amount of sport weight yarn for the heart bow (I used "I Love This Yarn" brand from Hobby Lobby)
- 7.5mm safety eyes (I buy mine online HERE or HERE)
- Polyfil (or your stuffing or choice)
- Tapestry/yarn needle
- Small amount of black embroidery floss (for mouth and eyelashes)
- Stitch marker (I highly recommend these HERE)
Top of JellyfishR1: Ch 2, 6 sc in 2nd ch from hook
R2: *Inc 1* rep 6 times (12 sts)
R3: *Sc 1, inc 1* rep 6 times (18 sts)
R4: *Sc 2, inc 1* rep 6 times (24 sts)
R5: *Sc 3, inc 1* rep 6 times (30 sts)
R6-9: Sc in all 30 sts (4 rounds total - 30 sts)
R10: On this round, we will be working in the FLO (front loops only) for the slip stitches. *Ch 3, sl st 2* rep 15 times (there should be 15 little waves created by the 3 chains.)
Finish off. Insert your safety eyes between R7 & 8, exactly 6 sts apart. (Hint: Insert 1st eye, count 6 whole sts from the hole you inserted the first eye into, insert 2nd eye.) Do NOT attach the backings just yet if you plan to embroider eyelashes on your jelly.
For eyelashes take your black embroidery floss and embroider two little lines on the side of the eye, each about a stitch wide.
Now you can attach the safety eye backings. Embroider a small little smile directly between her eyes. Set aside the jellyfish top until the rest of the parts are completed.
Bottom of JellyfishR1: Ch 2, 6 sc in 2nd ch from hook
R2: *Inc 1* rep 6 times (12 sts)
R3: *Sc 1, inc 1* rep 6 times (18 sts)
R4: *Sc 2, inc 1* rep 6 times (24 sts)
R5: *Sc 3, inc 1* rep 6 times (30 sts)
Finish off leaving long tail for sewing. Do NOT sew to the top until the tentacles are completed.
Straight outer tentacles (make 6)
Start with a long tail
Loosely ch 14, starting in 2nd ch from hook, sl st 13
(For short and stubby tentacles: Ch 8, starting in 2nd ch from hook, sl st 7).
Finish off leaving a tail.
Curly inner tentacles (make 3)
Start with a long tail
Loosely ch 10, starting in 2nd ch from hook, sc 2 in each st down (increasing in each st will create the curly effect.)
(For short and stubby tentacles: Ch 6, starting in 2nd ch from hook, sc 2 in each st down)
Finish off leaving a tail.
Now we will attach the tentacles to the bottom before sewing the bottom to the top. Instead of sewing the tentacles on, we will be knotting them on. This is a quick and easy method that will eliminate the need for sewing (and weaving) all those ends in!
In the picture below, you will see where I attached my straight outer tentacles between the fourth and fifth rounds. I spaced them evenly every 6 sts, right beside the increase st. For the curly inner ones, I spaced them evenly between the first and second rounds.
We will attach the curly tentacles first and then the straight ones.
Take your tapestry needle and thread both loose ends of the tentacle through. Now pull your needle through the jelly bottom and tie the two ends together with a knot. Once you have all the tentacles attached, you can trim the ends.
With all the tentacles attached.
Now that the tentacles are all attached, we will sew the bottom to the top of the jelly. Using your tapestry needle and long tail we left, whip stitch the bottom to the top. I used the front loops of the bottom piece and the back loops left from the top piece. Just before you finish sewing it up, stuff the body.
Heart bow (using your C hook and sport weight yarn)
Ch 2, in 2nd ch from the hook, sc 2, hdc 1, dc 3, sl st 1, (now work on the bottom side of the chain), sl st 1, dc 3, hdc 1, sc 2
To finish off, sl st in first sc made. Sew the heart bow to your jelly's head.
And you’re done! I hope you had fun making her! Please share pictures of your project with me through Instagram, Facebook, or email (storylandamis@gmail.com). I love seeing what you create!
For a nice, concise version of this pattern, you can get a free PDF at LoveCrochet.com, or here at Craftsy. The PDF does not include as many pictures as this post, so make sure to refer to this post if you have trouble with something.
This pattern is an original design by Storyland Amis. This written pattern is for personal use only. Please do NOT sell or redistribute this pattern in part or in whole. If you wish to share this pattern you may link to this post, but please do not claim it as your own. You MAY sell the finished product, but please credit Storyland Amis as the designer. If you sell your finished items online I would appreciate it if you’d link back to my blog! You may not mass-produce items made from this pattern. Thank you for your understanding and respect.
~Holly :)
Follow my blog with Bloglovin]]>
https://storylandamis.com/blogs/blog/pattern-extreme-amigurumi-fox2017-08-11T23:00:00-06:002021-10-08T18:11:42-06:00Pattern: Extreme Amigurumi FoxHolly Lanier
Extreme Freddy Fox has been made into a crochet kit on Wool Couture Company here. If you're looking to make your own extreme fox you won't find a better deal than this! The kit is extremely affordable and it comes with all the wool you'll need plus a 40mm crochet hook. And Claire of Wool Couture has graciously given me a 10% off coupon code especially for you all. (Use code We-love-Freddy at checkout to receive the discount.)
Claire has also agreed to let me post Freddy's pattern for free here on my blog! So if you prefer to buy just the wool and not the kit, you can still have access to his pattern.
So here is Freddy's pattern! For more in depth discussion on techniques and materials see my first post about him here.
Materials you will need:- 9.5 lbs. of wool roving/giant or extreme yarn. 7 lbs. (3 kg.) of orange, 1 lb. (0.5 kg.) of black, and 1.5 lbs. (0.75 kg.) of cream. You can purchase this wool at Wool Couture Company HERE I used color numbers "1" for cream, "23" for orange, and "72" for black.
- 6 yds. of worsted weight yarn for sewing. 5 yds. of orange & 32 in. of cream.
- 40mm crochet hook (if you buy the kit this is included. Otherwise you can purchase one HERE)
- 40mm black safety eyes (you can purchase them HERE)
- Fabric glue for attaching the eyes. I used, “Speed Sew” and I highly recommend this glue!
- Fiberfill (or your stuffing of choice)
- Large yarn/tapestry needle
- Scissors
- Stitch marker (recommended but not required) If you're looking for good stitch markers I always use Clover Amour brand HERE and can't recommend them enough! They're the best quality and I use them all the time.
- Needle felting tool (I used Clover Amour brand and purchased mine HERE)
Head (starting in orange yarn)R1: Ch 2, 6 sc in 2nd ch from hook
R2: *Inc 1* rep 6 times (12 sts)
R3: *Sc 1, inc 1* rep 6 times (18 sts)
R4-5: Sc in all 18 sts (2 rounds total—18 sts)
R6: *Sc 2, inc 1* rep 6 times (24 sts)
On this next round, we will be changing colors. You will change colors just like you normally would on any amigurumi, but instead of tying the two ends together, we will felt them together, using our felting tool, to save on wool.
R7-8:in orange Sc 13, change yarn and in white sc 11 (2 rounds total—24 sts)
R9: BLO in orange *Sc 2, dec 1* rep 3 times, sc 1, in white sc 1, dec 1, *sc 2, dec 1* rep 2 times (18 sts) this is the only round you will crochet in the back loops
Switch to orange yarnR10:In orange *Sc 1, dec 1* rep 3 times, sc 1, change yarn and in white dec 1, *sc 1, dec 1* rep 2 times (12 sts)
Finish off. We won’t finish closing up the head all the way so that we can conserve wool. Stuff head using fiberfill.
Muzzle (using cream yarn)R1: Ch 2, 4 sc in 2nd ch from hook
R2: *Inc 1, sc 1* rep 2 times (6 sts)
R3: *Inc 1, sc 2* rep 2 times (8 sts)
Finish off but do NOT leave a tail for sewing. We will sew all the body parts on with regular worsted weight yarn later. For the black nose, take about 8 in. of black roving, splice it in two and stuff each end into either side of the muzzle. Then needle felt it down over the nose to secure it. Set aside until assembly.
Now take your 40mm eyes and your fabric glue and spread a generous amount on the back of the eye. Carefully place the eyes onto R7 of the head about 5-6 sts apart making sure there’s enough room for the muzzle in between.
Ears (starting in black yarn)R1: Ch 2, 4 sc in 2nd ch from hook
Switch to orange yarnR2: *Inc 1, sc 1* rep 2 times (6 sts)
R3: Sc in all 6 sts (6 sts)
Finish off, but again, do not leave a tail for sewing. Do not stuff. Set aside until assembly.
Legs (make 2 starting in black yarn)R1: Ch 2, 4 sc in 2nd ch from hook
R2: *Inc 1, sc 1 * rep 2 times (6 sts)
Switch to orange yarnR3: Sc in all 6 sts (6 sts)
Finish off on the 1st foot. Do NOT finish off or cut the yarn on the 2nd foot; we will now join the feet together and start making the body. The right foot is the one we finished off on, the left foot is the one still attached to the yarn that we did not finish off.
Body (continuing in orange yarn)R4: Join left foot to right foot with a sc in the 1st st of the last round you made on the right foot, now sc 5 on the right foot, then finish joining the feet together by making a sc in the next st on the left foot, then sc 5 (12 sts)
R5-7: Sc in all 12 sts (3 rounds total—12 sts)
Finish off but do NOT leave a tail for sewing. Stuff body using fiberfill. Set aside until assembly.
Arms (make 2 using orange yarn)
Ch 4, starting in 2nd ch from hook sl st 3
Finish off but do NOT leave a tail for sewing. Cut the ends that are left very short and felt them down to the arm so that there are no loose ends. Set aside until assembly.
Tail (starting in cream yarn)R1: Ch 2, 4 sc in 2nd ch from hook
R2: *Inc 1, sc 1* rep 2 times (6 sts)
R3: Sc in all 6 sts (6 sts)
Switch to orange yarnR4: *Inc 1, sc 2* rep 2 times (8 sts)
R5: Sc in all 8 sts (8 sts)
R6: Dec 2, sc 4 (6 sts)
Finish off but do NOT leave a tail for sewing. Stuff tail with fiberfill. Since the opening is quite large, take a long strand (about 20 in.) of matching worsted weight yarn and weave it in and out of each stitch until you come around to the beginning again. Pull tight so that it’s something like a drawstring bag. Set aside until assembly.
Assembly: Now that we have all our pieces made, it’s time to put them all together!
First, we will sew the muzzle to the head. Take about 32 in. of cream colored worsted weight yarn and thread your tapestry needle with it. Grab a good-sized clump on the underside of the first stitch of the muzzle and sew it down to the head. Do this twice for every stitch around. (Twice, because each stitch is so large and this will help add extra security to it.) Tie a knot to secure it when finished.
Now sew the ears on the same way as the muzzle. You’ll need about 32 in. of orange worsted weight yarn for each ear. Sew them to R3-5 of the head. Secure with a knot. I also needle felted all the way around the ears to add extra security. This is optional, but I highly recommend it.
Now sew the body to the head using about 42 in. of orange worsted weight yarn. It will be easiest if you set him on his head to sew it on. Secure with a knot.
Next sew the arms to the sides of the body, just below the head. You’ll need less than 15 in. of orange yarn for each arm. Secure with a knot.
If you want his paws to be stuck together like mine, then needle felt the tips together.
Lastly, sew the tail to the back of the body using about 15 in. of orange yarn. Make sure you sew it on very securely, going around twice if necessary. Secure with a knot. I also needle felted around the whole tail for extra security.
And you’re done! I hope you had fun making him! Don't forget to check out my first post on him for more in depth discussion.
Also, please consider buying the kit HERE, and don't forget to use the coupon at checkout.
Please share pictures of your project with me through Instagram, Facebook, or email (storylandamis@gmail.com). I love seeing what you create!
~Holly :)
This pattern is an original design by Storyland Amis. This written pattern is for personal use only. Please do NOT sell or redistribute this pattern in part or in whole. If you wish to share this pattern you may link to this post, but please do not claim it as your own. You MAY sell the finished product, but please credit Storyland Amis as the designer. If you sell your finished items online I would appreciate it if you’d link back to my blog! You may not mass-produce items made from this pattern. Thank you for your understanding and respect.Disclaimer: The wool for this project was provided by Claire of Wool Couture, but all opinions expressed are 100% my own! :) This post contains Etsy and Amazon affiliate links.
]]>
https://storylandamis.com/blogs/blog/extreme-amigurumi-fox2017-07-23T23:00:00-06:002021-10-08T18:11:37-06:00Extreme Amigurumi FoxHolly Lanier
Shortly after I designed my extreme sloth, I was contacted by Claire of Wool Couture who offered to give me all the wool I needed if I would be willing to upsize my Freddy Fox. I, of course, said yes!
Claire sent me three beautiful colors of wool that were unbelievably perfect colors for my fox. She sent me 7 lbs. of the orange and a little over 2 lbs. of both the white and the black. HERE is the wool I received. Altogether, over 11 lbs. of soft, luscious wool! Once finished, Freddy weighed a whopping 10 lbs.! I used a 40mm crochet hook that you can purchase here on Claire's Etsy shop as well. It's still unbelievable to think that they have 50mm and 60mm ones available too! Can you imagine?
It took me quite a while to finally start working on him since I was so afraid that I wouldn't have enough wool to finish him, especially of the orange. But procrastinating won't make yarn magically multiply, so off I went!
The first thing I made was the head. One thing to remember when making amigurumi and working with super chunky yarns is that you must think small if you want to achieve big things! When I made my extreme sloth, I thought that if I used my miniature Zippy Sloth pattern it would work up just fine. But, in reality, I had to downsize the pattern even more so that it wouldn't be ridiculously big and make me broke with the amount of wool I would've had to buy. The same thing happened with the fox. I made a tiny fox prototype out of regular worsted weight yarn, but when I actually got around to making the extreme fox, it became clear to me that I would need to make the head pattern even smaller than I had originally planned. It's the wool and hook size that makes it big, not the stitch count.
Here is the head just before I started the decreases.
Next, I created the muzzle. For his black nose, I took about 8 inches of leftover wool roving, spliced it in two and needle felted it down over the center of the nose with my Clover Amour needle felter.
This needle felter was a life saver, and although I didn't use it as much with the fox as I did with the sloth, I still couldn't have done it without it. You can buy one here.
Ears were next, and these were not easy to get right. I wanted to make sure they were proportionally right and I had a hard time finding the appropriate stitch count for them.
Next was the body, then the arms, and finally the tail (which was another difficult challenge).
Here is the finished body. (Later on, I ended up adding one more round to it.)
He was finished, and I hadn't run out of yarn! In fact, I had 3.7 oz. of the orange leftover, 9.8 oz. of the cream, and over 1 lb. of the black.
Now it was time to put it all together! When I made the sloth, I needle felted all the body parts together, and needless to say, I ended up with a very delicate sloth that was hardly durable. I just knew there had to be some better way, though. And then my sister came home from college and she told me to sew the pieces together using regular worsted weight yarn (duh!). This actually worked out amazingly! I had worsted weight yarn in colors that matched the wool I had almost exactly. And it was way easier than trying to needle felt all the pieces down because that took forever and didn't last long. If I had wanted needle felting to work I would have had to felt each piece for hours. Thankfully that didn't happen.
To save wool, I didn't completely finish the head as you can see in the picture below. I stuffed him with hypoallergenic Poly-Fil. You might think that I used tons of this stuff, but I probably didn't use as much as you think. I didn't want to stuff it too firmly because I already loved the head shape I had achieved and stuffing it too much would have ruined that. Also, because the wool is so thick and has so much bulk to it, there wasn't a lot of empty space inside.
The first thing to go on were the eyes. Once again, I bought 40mm black safety eyes from Stacey's website, Fresh Stitches as they are the perfect size! You can read all about Fresh Stitches here. I knew I wouldn't be able to actually attach the safety eyes using the backings because the head was way too thick to allow for that. So instead, I used this special glue, Speed Sew, specially created for crafts and fabric! You can purchase it here or on Amazon here.
As you can see, I generously applied the glue to the back of the eye. (Warning: This glue smells like a stinky fish!)
I sewed the muzzle on with matching worsted weight yarn (I used acrylic in case you were wondering), making sure not to grab the entire stitch, just a good-sized clump near the bottom. This way it was hardly noticeable that I had used this method at all! I did the same thing for the ears, but I also needle felted them down a bit so that they would look more like a part of the head.
I stuffed the body and sewed it to the head. Poor Freddy!
Then I sewed the arms on. Because I wasn't going to be using the wool yarn tail for sewing, I cut both tails short and felted them down to the arm. Then, after sewing the arms to the body, I needle felted his paw tips together so he would look like my original Freddy.
Last of all was the tail and this had to be sewed on more securely than anything else because it would need extra support being so heavy. I also needle felted the tail down for extra security.
Since the opening of the tail was quite large, I took some worsted weight yarn and wove it in and out of each stitch to create something kind of like a drawstring bag.
Then I pulled tight and voilà!
And here he is!
It was such a privilege to be able to make this extreme fox and I'm so glad I did it! Though I think I'll take a little break before beginning work on any more extreme creations. After exploring one extreme to the other, I definitely prefer the in between! Still, it was an experience that I wouldn't have wanted to miss.
Please be sure and check out Claire's Etsy shop here or her website here as she has some wonderful supplies (and lots of DIY kits) available!
Will YOU be trying extreme crocheting with anything? Maybe bulkier yarns with amigurumi? I'd love to see if you do!
~Holly :)
Disclaimer: The wool for this project was provided by Claire of Wool Couture, but all opinions expressed are 100% my own! :) ]]>
https://storylandamis.com/blogs/blog/extreme-amigurmi2017-04-20T23:00:00-06:002021-10-08T18:11:20-06:00Extreme AmigurumiHolly Lanier
I decided that I was going to make a giant sloth because my Zippy the Baby Sloth had already been such a huge success! Plus, sloths are so popular right now.
I immediately started doing research on buying extreme yarn and extreme crochet hooks. Thankfully All About Ami had a very helpful blog post on extreme crochet and it made my searching a lot easier. My first step was to purchase a 40mm crochet hook. Yes, 40mm! I found a very affordable and good quality one at Wool Couture Company in the UK. Even with shipping, this crochet hook didn't break my budget! I purchased this listing here. It's amazing that they also offer 50mm and 60mm hooks as well! Can you imagine? I also purchased my wool roving from the same shop here, as it was the most affordable option for me. (I selected colors #2 and #9 if you're interested in the exact colors I bought.) Surprisingly it only took about a week or so to get to me which was really exciting! I ordered 2.2 lbs. or the brown and 1 lb. of the cream which wasn't nearly enough, so I had to make a second order after I realized my mistake. (More waiting, but it was worth it.)
Just look at the size of that crochet hook! It's just fun to hold it, and even more fun to crochet with it! Although I must admit, it was a lot harder than I thought it would be.
The wool came tightly packaged up in plastic.
It's so soft and luxurious!
You almost forget how to crochet when you first start working with it because each step is so deliberate. It's not a mindless, repetitious action like crocheting normally is. And it's actually exhausting if you do too much of it at a time!
When I posted pictures of my finished extreme sloth on my social media accounts everyone wanted to know how long it took me to make. I think that most people were thinking that it must have taken me forever because of the huge size! But using a crochet hook and "yarn" this big makes for a very quick project because it works up really quickly. I actually just used the same pattern I used for my miniature Zippy the Baby Sloth to make this giant sloth (with some slight modifications). But because the yarn and hook are so big, it, of course, comes out very large. In any case, if I was to calculate the time it took me to make him from start to finish (assuming there were no breaks), it would be around 5-6 hours.
I also got a lot of people asking me what I stuffed him with. Actually, I just used PolyFill. Hehe, if I ever did this again I don't think I would do that. I think a pillow form would be a better option, at least for the head.
Here's some of the mess I was making during this time. You can see my cuddle-sized Zippy Sloth to the right side of the sofa!
After finishing the crocheting part, it was time to add the eyes and the nose. I wanted my sloth to look as much like an amigurumi as possible and that meant I didn't really want to have to use buttons or felt for his eyes. So naturally, I was thrilled when I found out that Stacey Trock of Fresh Stitches sells 40mm safety eyes here! Have you ever seen such huge eyes!
I purchased some 100% wool felt from Felt on the Fly to use for the backings on his eyes. I cut out large ovals and then attached the safety eyes to the felt. It would have been impossible to attach them to the head because of the thickness, that's why I could finish the head and stuff it before doing the eyes. Since Zippy is made entirely out of wool (except for the stuffing), I was able to needle felt the felt onto the head instead of having to sew it on. This worked out great! I used my Clover Amour needle felting tool that I bought on Amazon here. This is actually how I attached all the body parts together. I'm no expert on wool or needle felting, so if there's a better way to do it, I haven't heard of it yet. Anyway, it worked for me, although it did take some time. I used some black wool yarn for his nose and felted that down as well.
I was proud of my little needle felting tool for not breaking during all the heavy felting.
And here's Zippy in pieces. (Please excuse the poor lighting, this picture was taken at night.) I just propped his head up on his body to get a better idea of what it was going to look like. His eyes weren't fully felted down at this time either.
After needle felting all his body parts together, he was finished!
As someone said, "Sloth hugs for days!" He's certainly cuddly and huggable! But you don't want to be standing up holding him for long. This "little" guy is two feet tall and weighs around 7 pounds! I know, right!
And last but not least, here are Jumbo Zippy, Cuddle-sized Zippy, and Baby Zippy!
So would I do this again? Probably not, just because it was so expensive. I'm definitely going to be trying out some chunkier amigurumi in the future though, even if they're not so extreme! It was an amazing experience though, and I'm so glad I did it!
What about you? Are YOU going to try extreme amigurumi? I hope you do!
~Holly :)]]>
https://storylandamis.com/blogs/blog/pattern-zippy-the-baby-sloth2017-03-08T23:00:00-07:002024-05-28T21:35:19-06:00Pattern: Zippy the Baby SlothHolly Lanier
HERE.]]>
https://storylandamis.com/blogs/blog/winston-the-baby-bear-pattern2017-02-13T23:00:00-07:002021-10-08T18:11:42-06:00Free Pattern: Winston the Baby BearHolly Lanier
I'm proud to introduce you to Winston, the Baby Bear! Now you can make your own baby Winston because I've written up the free pattern for him, and here it is!
I think these little bears look perfect paired with a bear pun Valentine’s Day card, so I’ve gone ahead and made up six different cards that you can download and print out below. Using yarn, tie your bear to the front of the card and give your Valentine something extra special this year!
If you would like to support me monetarily (so I can keep producing free content) by buying the ad-free, concise PDF version of the pattern, you can do so HERE. Otherwise, the free version is available below!
Download the FREE Valentine's Day printables below. There are six different cards available, so you'll be sure to find one that is just right! Print them out on a regular-sized sheet of paper and they'll be the perfect size for your little bear!
These are all the materials you will need to make your bear. For my dark brown Winston, I used Lion Brand Vanna's Choice yarn in the color "chocolate", and the light brown bear is made using Red Heart's yarn in the color "warm brown". But of course, you can use any color or brand of yarn that you'd like! I used 7.5mm eyes for him. You'll find that this is a rather scarce size and I've only been able to find them online at Amazon, here, or in this Etsy shop, 6060, here. I would recommend getting them at 6060 since they are a better deal and the ones on Amazon are frequently out of stock. You could also use 6mm eyes for him if you prefer, he just won't look quite as wide-eyed.
Materials:
-Worsted weight (4 ply) yarn in any color
-Size E (3.50mm) crochet hook
-7.5mm black safety eyes
-Fiberfill (or your stuffing of choice)
-A small amount of tan felt for the muzzle & some matching sewing thread
-Scissors
-Stitch marker
-Tapestry/yarn needle
Head
R1: Ch 2, 6 sc in 2nd ch from hook
R2: *Inc 1* rep 6 times (12 sts)
R3: *Sc 1, inc 1* rep 6 times (18 sts)
R4: *Sc 2, inc 1* rep 6 times (24 sts)
R5-6: Sc in all 24 sts (24 sts – 2 rounds total)
R7: *Sc 3, inc 1* rep 6 times (30 sts)
R8-9: Sc in all 30 sts (30 sts – 2 rounds total)
R10: *Sc 3, dec 1* rep 6 times (24 sts)
R11: *Sc 2, dec 1* rep 6 times (18 sts)
Insert safety eyes between R8 & 9, about 6 sts apart.
For the muzzle cut out an oval piece of tan felt and embroider several horizontal stitches across the center to create the nose. Then embroider a small stitch coming down from the middle of the nose.
Using sewing thread and a needle, sew the muzzle onto the face, right between the eyes.
Continue crocheting.
R12: *Sc 1, dec 1* rep 6 times (12 sts)
Stop and stuff head
R13: *Dec 1* rep 6 times (6 sts)
Finish off. Finish stuffing head firmly and use the tail to sew up hole, then weave in your end.
Body
R1: Ch 2, 6 sc in 2nd ch from hook
R2: *Inc 1* rep 6 times (12 sts)
R3-6: Sc in all 12 sts (12 sts – 4 rounds total)
Finish off leaving long tail for sewing. Stuff firmly and sew to head.
Ears
Ch 2, 6 sc in 2nd ch from hook
Don’t sl st into the first sc to finish off, instead just ch 1. This way we’ll have a flat edge for sewing.
Sew to head over R5-7. When there’s more than one yarn tail on any given piece, usually when you’re working in rows, I like to weave both ends into the body or head. That way there aren’t any ends popping out or fraying like they do when you just cut them.
Arms
Ch 3, starting in 2nd ch from hook, sl st 1 in each of the 2 chs (2 sts)
Finish off leaving long tail for sewing. Sew to sides of body, right up against neck (that would be R6 of body), and weave in all loose ends.
Legs
R1: Ch 2, 4 sc in 2nd ch from hook
R2: Sc in all 4 sts (4 sts)
Finish off leaving long tail for sewing. Sew legs to the front of the body over R2-4.
As you can see, I like to pin my pieces in place just to make sure everything is straight.
You’re done!! I hope you enjoyed making little Winston as much as I enjoyed designing him! (I really did have a blast designing this little guy!)
Please feel free share pictures with me of your projects as I would love to see them! I always try to respond to each and every one of you who writes me!
If you liked this pattern, help spread the word by pinning it to Pinterest!
This pattern is an original design by Storyland Amis. This written pattern is for personal use only. Please do NOT sell or redistribute this pattern in part or in whole. If you wish to share this pattern you may link to this post, but please do not claim it as your own.
You MAY sell the finished product, but please credit Storyland Amis as the designer. If you sell your finished items online I would appreciate it if you’d link back to my blog! You may not mass-produce items made from this pattern. Thank you for your understanding and respect.
]]>
https://storylandamis.com/blogs/blog/why-im-here2017-02-02T23:00:00-07:002021-10-08T18:11:17-06:00Why I'm HereHolly Lanier
All About Ami, Amigurumi To Go, and Amigurumei, just to name a few!
Those fabulous and amazingly talented people inspired me to start my Etsy shop, Storyland Amis and ultimately, this blog.
So why am I here? I'm truly passionate about what I do and I want to share my passion with others and inspire them to do what they love. Because I know how important it is to be inspired and encouraged, my desire is to be able to do the same for others while encouraging them at the same time to stay true to their own unique style. I'm here because of you, whether you were the one who inspired me or the one I hope to inspire.
I'm so thankful to God for giving me this creative outlet! He has blessed me beyond my wildest dreams and I still can't believe all the amazing people I've been able to connect with over the past year or all the opportunities He's given me.
God has given each of us talents that we can and should use for His glory and I sincerely believe that that is possible no matter what that talent is.
"Therefore, whether you eat or drink, or whatever you do, do all to the glory of God." - 1 Cor. 10:31
I'm so very excited to start this blog and I can't wait to share with you all my projects and patterns!
Thanks for reading!
~Holly
Follow my blog with Bloglovin]]>


 You can find Bubbles' kit available HERE and it's on sale right now!
When I posted Bubbles on Instagram and Facebook, she was by far the most popular of the three! Everyone loves unicorns, so a giant crocheted unicorn was very well received.
You can find Bubbles' kit available HERE and it's on sale right now!
When I posted Bubbles on Instagram and Facebook, she was by far the most popular of the three! Everyone loves unicorns, so a giant crocheted unicorn was very well received.
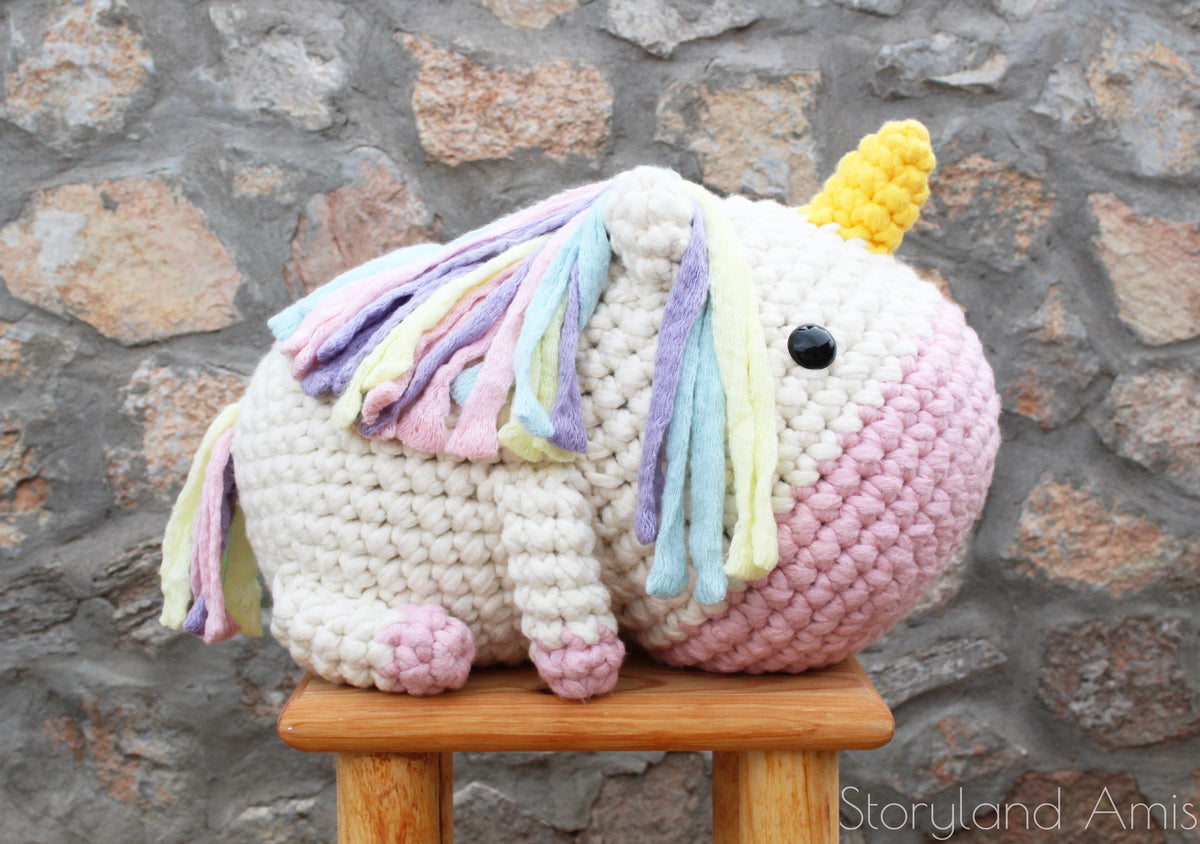 The kit to make Bubbles comes with all the yarn you need plus the 25mm crochet hook required and a beautifully formatted pattern! The only extra materials you will need are 40mm safety eyes, a weaving needle for sewing parts together, and stuffing! (Crocheted eyes could be substituted for safety ones.)
I designed each of the extreme amis with beginners in mind, so they are quite easy to make even if you have no experience in extreme crocheting! So don't be intimidated by their size!
To read more about the yarn I used, check out my first post about Owen the Owl HERE.
Once again, you can find Bubbles' kit HERE.
The kit to make Bubbles comes with all the yarn you need plus the 25mm crochet hook required and a beautifully formatted pattern! The only extra materials you will need are 40mm safety eyes, a weaving needle for sewing parts together, and stuffing! (Crocheted eyes could be substituted for safety ones.)
I designed each of the extreme amis with beginners in mind, so they are quite easy to make even if you have no experience in extreme crocheting! So don't be intimidated by their size!
To read more about the yarn I used, check out my first post about Owen the Owl HERE.
Once again, you can find Bubbles' kit HERE.
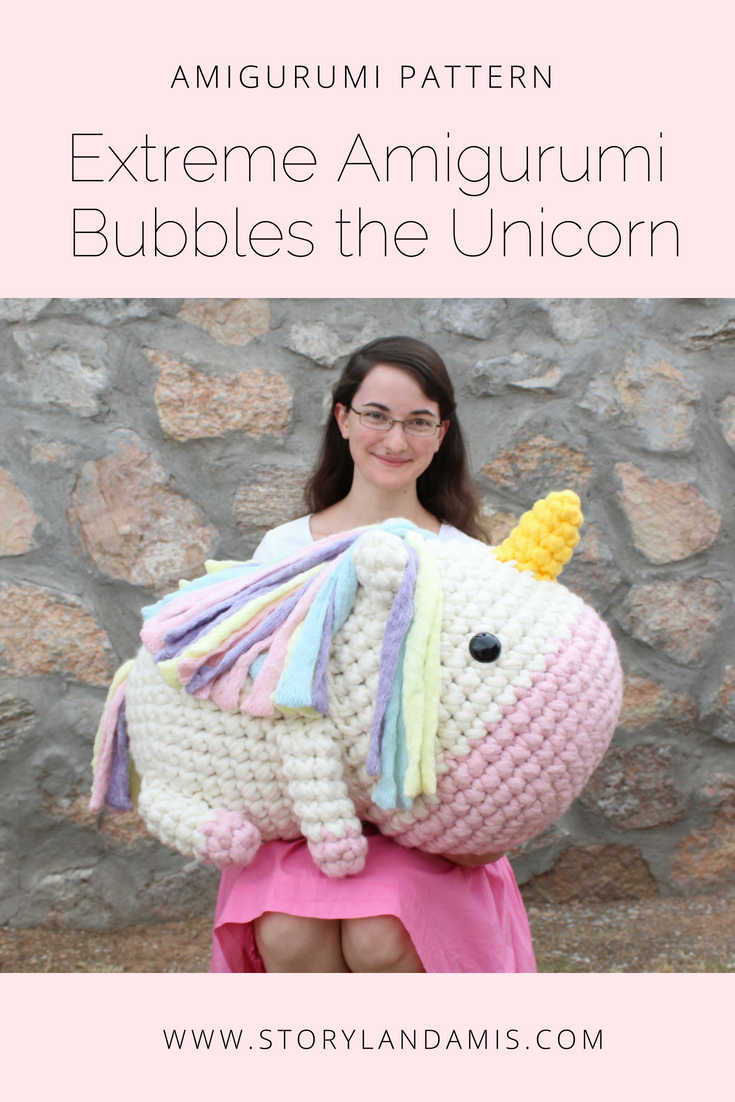 Be sure and check out the other extreme amigurumi kits I have available:
Freddy the Fox
Danny the Penguin
Owen the Owl
Blossom the Bunny
~Holly :)
Follow my blog with Bloglovin or subscribe via email
]]>
Be sure and check out the other extreme amigurumi kits I have available:
Freddy the Fox
Danny the Penguin
Owen the Owl
Blossom the Bunny
~Holly :)
Follow my blog with Bloglovin or subscribe via email
]]>

 As always, if you have any questions about extreme amigurumi, feel free to write me! I'm always happy to help!
 Be sure and check out the other extreme amigurumi kits I have available:
Freddy the Fox
Danny the Penguin
Owen the Owl
Bubbles the Unicorn
~Holly :)
Follow my blog with Bloglovin or subscribe via email
]]>
Be sure and check out the other extreme amigurumi kits I have available:
Freddy the Fox
Danny the Penguin
Owen the Owl
Bubbles the Unicorn
~Holly :)
Follow my blog with Bloglovin or subscribe via email
]]>
 It's made with a kind of knit/mesh texture as you can see below. This is what makes it really durable and allows for lots of frogging if need be. It's 81% acrylic and 19% polyamide and is classified as a number 7 jumbo weight. I used a 25mm crochet hook to work with it, which is the suggested hook size.
 I got started on the owl design right away. I decided to go with a purple and beige owl with white and yellow details.
I used colors, "Lavander Gray", "Beige", "Milk", and "Tender Yellow".
And here he is!
I got started on the owl design right away. I decided to go with a purple and beige owl with white and yellow details.
I used colors, "Lavander Gray", "Beige", "Milk", and "Tender Yellow".
And here he is!
 I'm thrilled with how he turned out! He's one of my favorite extreme amis for sure!
And the most exciting part is that Premier Yarns put together a kit for Owen so that you can make one too! Find it HERE! The kit comes with a beautifully formatted pattern, all the yarn you need to make him, and a 25mm crochet hook. The only extra materials you will need are 40mm safety eyes, a weaving needle for sewing parts together, and stuffing! (Crocheted eyes could be substituted for safety ones.)
And his kit is currently on sale right now! There are only limited quantities available too, so if you've been wanting to give extreme amigurumi a try, this is the time!
I'm thrilled with how he turned out! He's one of my favorite extreme amis for sure!
And the most exciting part is that Premier Yarns put together a kit for Owen so that you can make one too! Find it HERE! The kit comes with a beautifully formatted pattern, all the yarn you need to make him, and a 25mm crochet hook. The only extra materials you will need are 40mm safety eyes, a weaving needle for sewing parts together, and stuffing! (Crocheted eyes could be substituted for safety ones.)
And his kit is currently on sale right now! There are only limited quantities available too, so if you've been wanting to give extreme amigurumi a try, this is the time!
 Honestly, this is extreme ami making at its easiest! I designed these patterns with beginners in mind and they are easy to make and have well-explained instructions!
I hope you'll consider giving extreme amigurumi a try! It's really helped shape me as a designer and crocheter and each extreme ami I've made has been a special and unique experience.
Honestly, this is extreme ami making at its easiest! I designed these patterns with beginners in mind and they are easy to make and have well-explained instructions!
I hope you'll consider giving extreme amigurumi a try! It's really helped shape me as a designer and crocheter and each extreme ami I've made has been a special and unique experience.
 Let me know if you have any questions regarding Owen or extreme amigurumi in general! I'm always happy to help!
If you liked this, you might want to check out my other extreme amigurumis!
Danny the Penguin
Freddy the Fox
Zippy the Sloth
~Holly :)
Follow my blog with Bloglovin or subscribe via email
]]>
Let me know if you have any questions regarding Owen or extreme amigurumi in general! I'm always happy to help!
If you liked this, you might want to check out my other extreme amigurumis!
Danny the Penguin
Freddy the Fox
Zippy the Sloth
~Holly :)
Follow my blog with Bloglovin or subscribe via email
]]>
 Now you can make your own Billy! And don't forget to make a piggy companion or two for him!
Dimensions: 3 in. (7.5 cm.) long & 2 in. (5 cm.) tall
Difficulty: Easy! This pattern is perfect for beginners.
Materials:
– Size E (3.50mm) crochet hook (I use Susan Bates HERE)
– Worsted weight (4 ply) yarn in light pink, dark pink, and black (I used Hobby Lobby’s brand, “I Love This Yarn” in "Pink" and "Soft Pink" .)
– 9mm safety eyes (I buy mine online HERE or HERE)
– Polyfil (or your stuffing or choice)
– Tapestry/yarn needle
– Small amount of black embroidery floss (for mouth)
– Stitch marker (I highly recommend these HERE)
Now you can make your own Billy! And don't forget to make a piggy companion or two for him!
Dimensions: 3 in. (7.5 cm.) long & 2 in. (5 cm.) tall
Difficulty: Easy! This pattern is perfect for beginners.
Materials:
– Size E (3.50mm) crochet hook (I use Susan Bates HERE)
– Worsted weight (4 ply) yarn in light pink, dark pink, and black (I used Hobby Lobby’s brand, “I Love This Yarn” in "Pink" and "Soft Pink" .)
– 9mm safety eyes (I buy mine online HERE or HERE)
– Polyfil (or your stuffing or choice)
– Tapestry/yarn needle
– Small amount of black embroidery floss (for mouth)
– Stitch marker (I highly recommend these HERE)
 R14: *Sc 2, dec* rep 6 times (18 sts)
R15: *Sc 1, dec* rep 6 times (12 sts)
Stop and begin stuffing
R16: *Dec* rep 6 times (6 sts)
Finish off. Finish stuffing head firmly and use tail to sew up hole, then weave in your end.
Muzzle (using dark pink yarn)
R1: Ch 5, starting in 2nd ch from hook, sc 4, turn and sc 4 in the front loops of the ch (8 sts)
This is called a foundation chain and is a great way to start a piece that you want to be more oval than round. After crocheting through the top loops of the chain, you turn your work around and crochet in the bottom loops of the chain. The first round is complete! Now you just continue as you normally would.
R2: Inc 1, sc 2, inc 2, sc 2, inc 1 (12 sts)
R3: Sc 1, inc 1, sc 2, *sc 1, inc* rep 2 times, sc 3, inc 1 (16 sts)
R4: Sc 1, sl st (we won't be completing this round.)
Finish off leaving long tail for sewing. Sew to the front of the head over R3-7.
R14: *Sc 2, dec* rep 6 times (18 sts)
R15: *Sc 1, dec* rep 6 times (12 sts)
Stop and begin stuffing
R16: *Dec* rep 6 times (6 sts)
Finish off. Finish stuffing head firmly and use tail to sew up hole, then weave in your end.
Muzzle (using dark pink yarn)
R1: Ch 5, starting in 2nd ch from hook, sc 4, turn and sc 4 in the front loops of the ch (8 sts)
This is called a foundation chain and is a great way to start a piece that you want to be more oval than round. After crocheting through the top loops of the chain, you turn your work around and crochet in the bottom loops of the chain. The first round is complete! Now you just continue as you normally would.
R2: Inc 1, sc 2, inc 2, sc 2, inc 1 (12 sts)
R3: Sc 1, inc 1, sc 2, *sc 1, inc* rep 2 times, sc 3, inc 1 (16 sts)
R4: Sc 1, sl st (we won't be completing this round.)
Finish off leaving long tail for sewing. Sew to the front of the head over R3-7.


 Optionally you can stitch two nostrils onto his muzzle using black yarn.
 Ears (make 2 using light pink yarn)
R1: Ch 4, starting in 2nd ch from hook, sc 3, ch 1, turn
R2: Dec 1, sc 1 (2 sts), ch 1, turn
R3: Dec 1 (1 st), ch 1, turn
R4: Sc 1 (1 st)
Finish off leaving long tail for sewing. Neatly weave the tail down to the bottom corner of the ear. Now using that same tail, sew the ear to the head on R14. Do the same for the 2nd ear.
Ears (make 2 using light pink yarn)
R1: Ch 4, starting in 2nd ch from hook, sc 3, ch 1, turn
R2: Dec 1, sc 1 (2 sts), ch 1, turn
R3: Dec 1 (1 st), ch 1, turn
R4: Sc 1 (1 st)
Finish off leaving long tail for sewing. Neatly weave the tail down to the bottom corner of the ear. Now using that same tail, sew the ear to the head on R14. Do the same for the 2nd ear.


 Body (using pink yarn)
R1: Ch 2, 6 sc in 2nd ch from hook
R2: *Inc* rep 6 times (12 sts)
R3: *Sc 1, inc* rep 6 times (18 sts)
R4: *Sc 2, inc* rep 6 times (24 sts)
R5-10: Sc in all 24 sts (6 rounds total - 24 sts)
Finish off leaving long tail for sewing. Stuff firmly and sew it to the head using the long tail we made and your tapestry needle over R8-15 of the head approx.
Body (using pink yarn)
R1: Ch 2, 6 sc in 2nd ch from hook
R2: *Inc* rep 6 times (12 sts)
R3: *Sc 1, inc* rep 6 times (18 sts)
R4: *Sc 2, inc* rep 6 times (24 sts)
R5-10: Sc in all 24 sts (6 rounds total - 24 sts)
Finish off leaving long tail for sewing. Stuff firmly and sew it to the head using the long tail we made and your tapestry needle over R8-15 of the head approx.
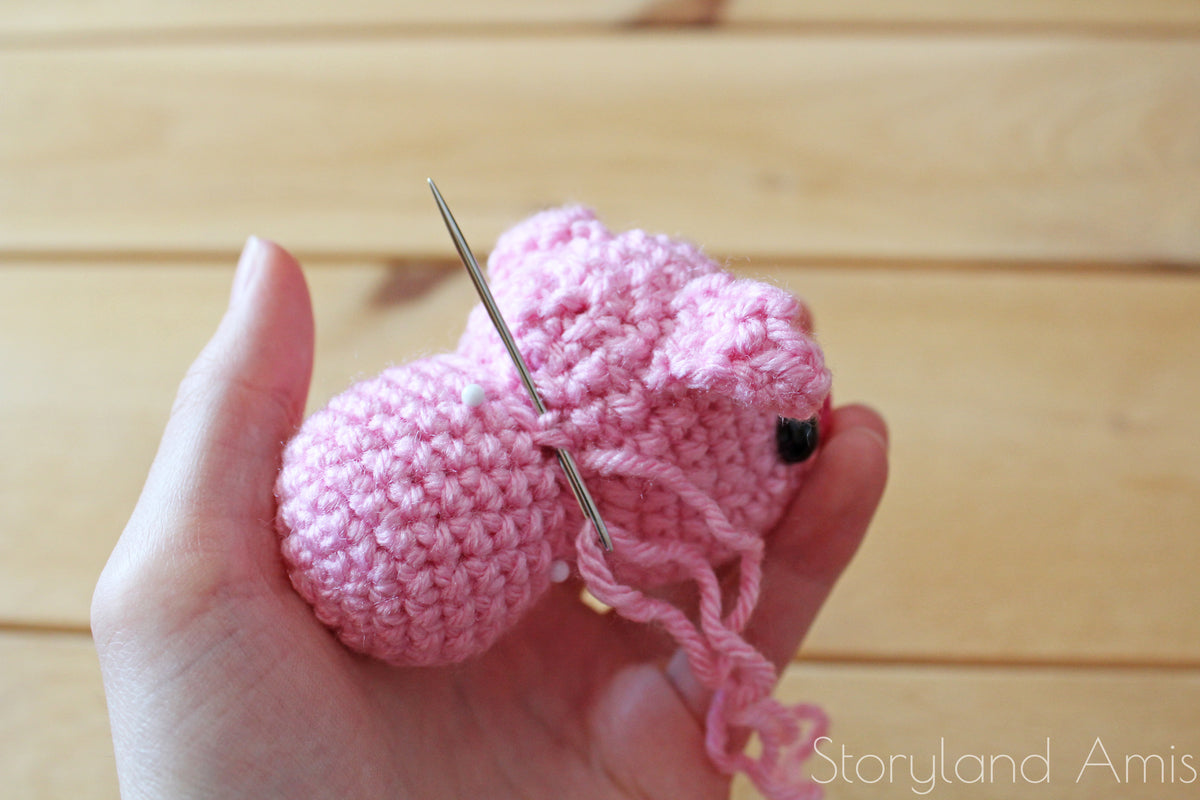


 Feet (make 4 starting in black yarn)
R1: Ch 2, 5 sc in 2nd ch from hook
Switch to light pink yarn
R2-3: Sc in all 5 sts (2 rounds total - 5 sts)
Finish off leaving long tail for sewing. Sew the two front feet to R8-10 of the body and the two back feet to R4-7 of the body.
Feet (make 4 starting in black yarn)
R1: Ch 2, 5 sc in 2nd ch from hook
Switch to light pink yarn
R2-3: Sc in all 5 sts (2 rounds total - 5 sts)
Finish off leaving long tail for sewing. Sew the two front feet to R8-10 of the body and the two back feet to R4-7 of the body.


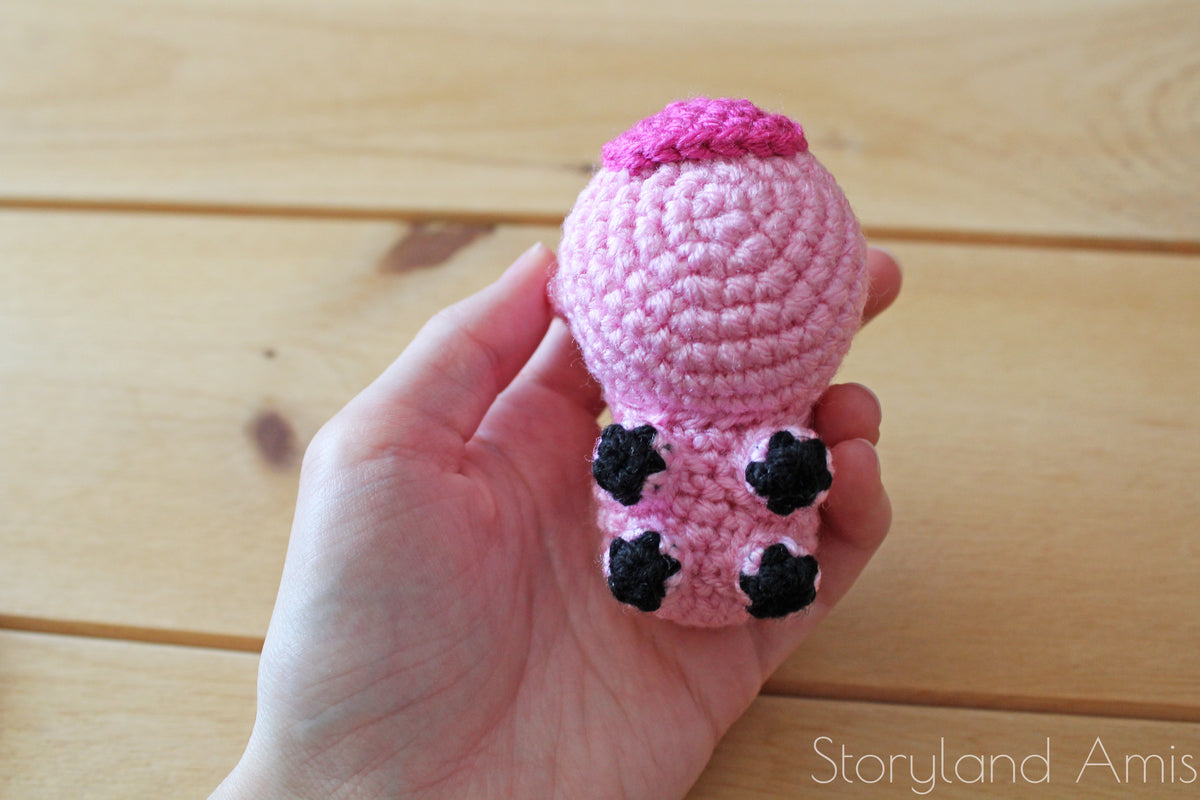
 Tail (using light pink yarn)
Ch 10, starting in 2nd ch from hook, sl st 1 in every other ch until you reach the end. (Skipping every other st will make the tail curly.) At the end, you should have 5 sl sts.
Finish off leaving long tail for sewing. Sew to the back of the body onto R3. Weave in both tails.
Tail (using light pink yarn)
Ch 10, starting in 2nd ch from hook, sl st 1 in every other ch until you reach the end. (Skipping every other st will make the tail curly.) At the end, you should have 5 sl sts.
Finish off leaving long tail for sewing. Sew to the back of the body onto R3. Weave in both tails.
 And you’re done! I hope you had fun making him! Please share pictures of your project with me through Instagram, Facebook, or email (hello@storylandamis.com). I love seeing what you create!


 This pattern is an original design by Storyland Amis. This written pattern is for personal use only. Please do NOT sell or redistribute this pattern in part or in whole. If you wish to share this pattern you may link to this post, but please do not claim it as your own.
You MAY sell the finished product, but please credit Storyland Amis as the designer. If you sell your finished items online I would appreciate it if you’d link back to my blog! You may not mass-produce items made from this pattern. Thank you for your understanding and respect.
~Holly :)
Follow my blog with Bloglovin or subscribe via email!]]>
This pattern is an original design by Storyland Amis. This written pattern is for personal use only. Please do NOT sell or redistribute this pattern in part or in whole. If you wish to share this pattern you may link to this post, but please do not claim it as your own.
You MAY sell the finished product, but please credit Storyland Amis as the designer. If you sell your finished items online I would appreciate it if you’d link back to my blog! You may not mass-produce items made from this pattern. Thank you for your understanding and respect.
~Holly :)
Follow my blog with Bloglovin or subscribe via email!]]>


 I used a hot glue gun to secure the eyes since the eye patches were much too thick to attach them using the washers. I found that hot glue works better than fabric glue.
 At this point he was looking very weird.

 I think sewing the eyes on was probably the hardest part of making this penguin.


 The body and head had the same number of stitches on their last rounds, so all I had to do was match up the stitches and sew them together! And yes, stuffing the head and body took a long time!
 This is probably my fave picture! ^^


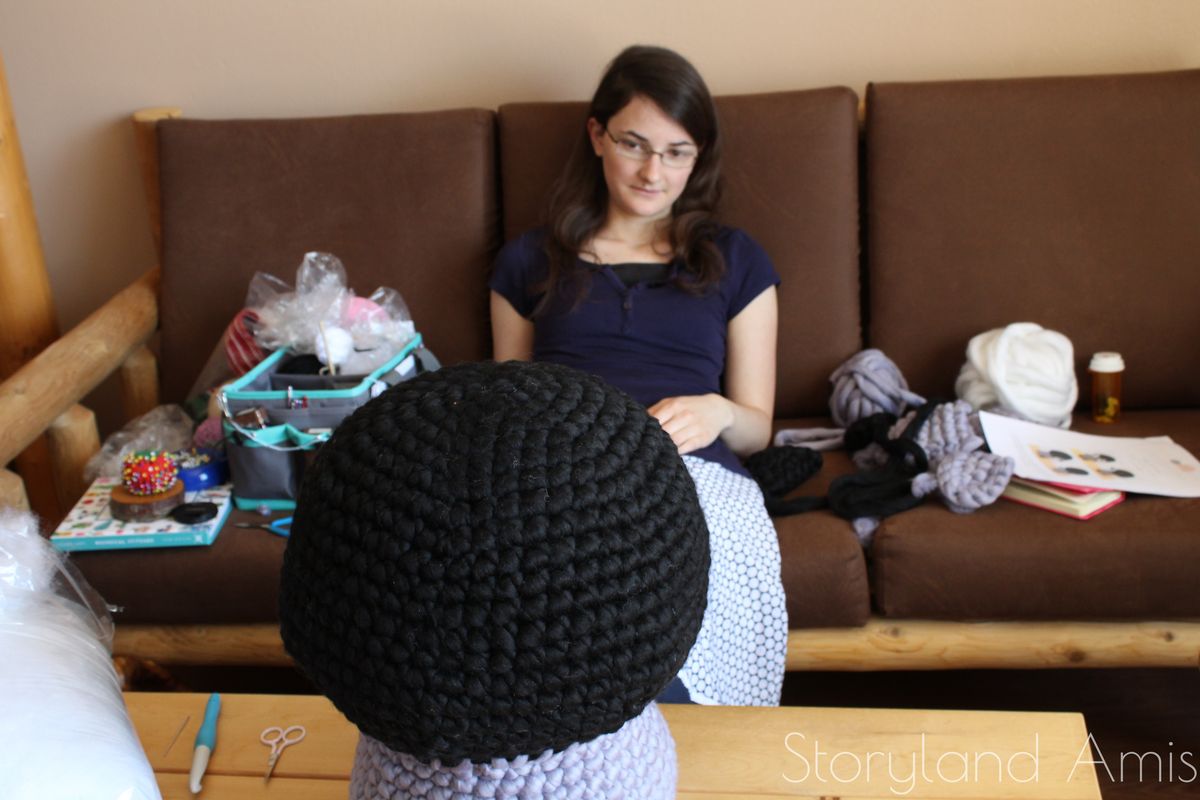 Break time!


 How cute is he here?!

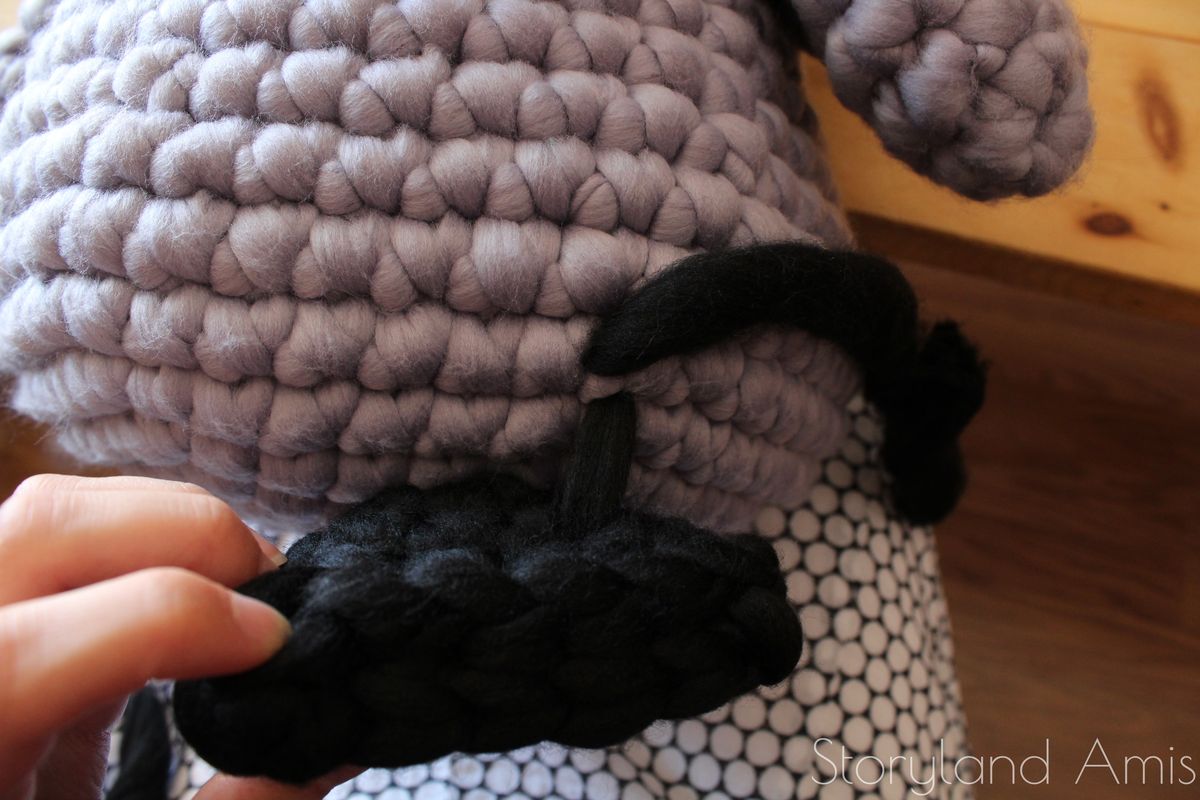
 All finished! And well-loved!
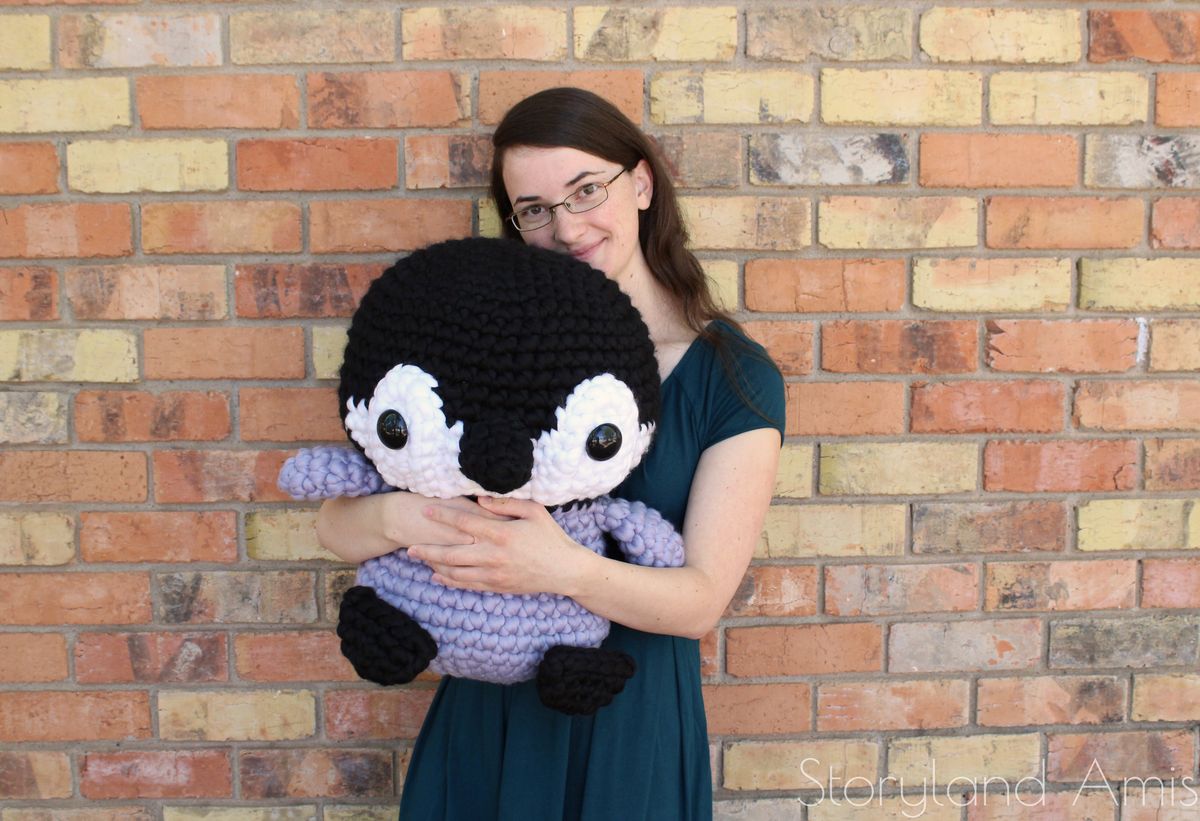 I had a lot of people asking me how much yarn I used for this penguin so here are the details on materials:
I used approx. 4 1/2 skeins of the black
A little under 4 skeins of the gray
And a little under 1 skein of the white. Again, you can find the yarn HERE.
I used about 32 oz. of stuffing for the entire penguin.
Other odds and ends required would be 40mm black safety eyes which you can find HERE, and a large-eyed tapestry needle. The larger the better! And of course, an appropriately sized crochet hook. As I mentioned before I used a P/Q (15mm) hook that you can find HERE.
And I know you're all wondering - how much does he weigh?
This cutie weighs a whopping 6.5 pounds! A workout just taking the photos! But he really is so huggable and cuddly! More so than any of the other extreme amis I've made in the past. And he's a lot more durable too. Can you tell I'm in love with this penguin?
So, why use this yarn? Because it's the affordable option if you want to make an extreme amigurumi. The yarn is 100% acrylic making it much less expensive than wool roving. Your ami won't turn out as large if you don't use wool roving, since this yarn isn't as thick, but you'll get more detail because of that, and attaching all the parts will be WAY easier because you'll be able to sew them together and it won't require felting or special sewing techniques as seen HERE. It's also super soft which is a huge plus!
Since posting pictures of giant Danny on Instagram, I've received lots of questions about making extreme amigurumi and lots of requests for tutorials on the subject. If you're interested in the making of my giant fox ami, you can take a look at this post HERE and this one HERE. They give details on how I made him, including the written pattern if you're brave enough to make one yourself. You can read about the giant sloth HERE. (Sorry, no pattern for him!)
In the future, I will be writing another post about upsizing your amigurumi projects. Trust me, it will be so simple that you'll be making giant versions of all your patterns!
Will Danny's pattern be available? Yes! And Sarah at Mama Knows Luxury will also be making his pattern into a kit! Stay tuned for that!
I had a lot of people asking me how much yarn I used for this penguin so here are the details on materials:
I used approx. 4 1/2 skeins of the black
A little under 4 skeins of the gray
And a little under 1 skein of the white. Again, you can find the yarn HERE.
I used about 32 oz. of stuffing for the entire penguin.
Other odds and ends required would be 40mm black safety eyes which you can find HERE, and a large-eyed tapestry needle. The larger the better! And of course, an appropriately sized crochet hook. As I mentioned before I used a P/Q (15mm) hook that you can find HERE.
And I know you're all wondering - how much does he weigh?
This cutie weighs a whopping 6.5 pounds! A workout just taking the photos! But he really is so huggable and cuddly! More so than any of the other extreme amis I've made in the past. And he's a lot more durable too. Can you tell I'm in love with this penguin?
So, why use this yarn? Because it's the affordable option if you want to make an extreme amigurumi. The yarn is 100% acrylic making it much less expensive than wool roving. Your ami won't turn out as large if you don't use wool roving, since this yarn isn't as thick, but you'll get more detail because of that, and attaching all the parts will be WAY easier because you'll be able to sew them together and it won't require felting or special sewing techniques as seen HERE. It's also super soft which is a huge plus!
Since posting pictures of giant Danny on Instagram, I've received lots of questions about making extreme amigurumi and lots of requests for tutorials on the subject. If you're interested in the making of my giant fox ami, you can take a look at this post HERE and this one HERE. They give details on how I made him, including the written pattern if you're brave enough to make one yourself. You can read about the giant sloth HERE. (Sorry, no pattern for him!)
In the future, I will be writing another post about upsizing your amigurumi projects. Trust me, it will be so simple that you'll be making giant versions of all your patterns!
Will Danny's pattern be available? Yes! And Sarah at Mama Knows Luxury will also be making his pattern into a kit! Stay tuned for that!
 So, what do you think of Danny? Will you be giving extreme amigurumi a try?
Until next time!
~Holly :)
Follow my blog with Bloglovin or subscribe via email!
]]>
So, what do you think of Danny? Will you be giving extreme amigurumi a try?
Until next time!
~Holly :)
Follow my blog with Bloglovin or subscribe via email!
]]>
 Image via Google search
 On his eyes, I indented them so that they were nestled further back in his face, also helping with the optical illusion of his nose being further out. Indenting eyes is a whole tutorial in and of itself so I will write up a blog post about that in the future!
I made sure to stuff the head very lightly because I wanted to retain the shaping and I also wanted him to look squishy and huggable like the TurboTax one.
The TurboTax bear has a plump little tummy, so of course, I wanted to make mine like that as well. Because I didn't want his body to get too big with a cluster of increases, I used the same principle that I used for the head and decreased on one round of the body, then on the next round, added those stitches back in with increases on top of the decreases. No stitches lost, no stitches gained. But it made it look like his stomach was pooching out and his legs were further back.
On his eyes, I indented them so that they were nestled further back in his face, also helping with the optical illusion of his nose being further out. Indenting eyes is a whole tutorial in and of itself so I will write up a blog post about that in the future!
I made sure to stuff the head very lightly because I wanted to retain the shaping and I also wanted him to look squishy and huggable like the TurboTax one.
The TurboTax bear has a plump little tummy, so of course, I wanted to make mine like that as well. Because I didn't want his body to get too big with a cluster of increases, I used the same principle that I used for the head and decreased on one round of the body, then on the next round, added those stitches back in with increases on top of the decreases. No stitches lost, no stitches gained. But it made it look like his stomach was pooching out and his legs were further back.
 The sweater was crocheted into the body (i.e. I didn't make the sweater separately), except for the collar. The collar actually has a knit look, doesn't it? I achieved this by crocheting in rows using half double crochets and only crocheting into the back loops.
The arms and ears were easy peasy compared to the rest of the bear and in no time my little teddy was finished!
The sweater was crocheted into the body (i.e. I didn't make the sweater separately), except for the collar. The collar actually has a knit look, doesn't it? I achieved this by crocheting in rows using half double crochets and only crocheting into the back loops.
The arms and ears were easy peasy compared to the rest of the bear and in no time my little teddy was finished!


 One of the greatest joys of doing custom orders is hearing back from the customer after they receive their order and I was thrilled to hear that they were both very happy with the bear!
So is there a pattern coming for this little bear? Yes! It probably won't be available for a few more months, but keep an eye out (and keep bugging me), and I'll publish it eventually! (Also, I won't be marketing him as a TurboTax teddy bear, so don't worry.)
One of the greatest joys of doing custom orders is hearing back from the customer after they receive their order and I was thrilled to hear that they were both very happy with the bear!
So is there a pattern coming for this little bear? Yes! It probably won't be available for a few more months, but keep an eye out (and keep bugging me), and I'll publish it eventually! (Also, I won't be marketing him as a TurboTax teddy bear, so don't worry.)
 ~Holly :)
Follow my blog with Bloglovin or subscribe via email!
The post “ Part 2 How to Design Your Own Amigurumi – Finding the You in Your Style” first appeared on Storyland Amis
]]>
~Holly :)
Follow my blog with Bloglovin or subscribe via email!
The post “ Part 2 How to Design Your Own Amigurumi – Finding the You in Your Style” first appeared on Storyland Amis
]]>
 ~Holly :)
Follow my blog with Bloglovin or subscribe via email!
The post “ Part 1 How to Design Your Own Amigurumi - You Don't Have to Design Your Own Patterns” first appeared on Storyland Amis]]>
~Holly :)
Follow my blog with Bloglovin or subscribe via email!
The post “ Part 1 How to Design Your Own Amigurumi - You Don't Have to Design Your Own Patterns” first appeared on Storyland Amis]]>
 PhotoCred: Pinterest
 5.) When you're done adding up all the stitches, enter this grand total in the calculator. Now divide that number by your SPM (stitches per minute) number. Now take that number that you just got and divide it by 60. What did you come up with? That is how many hours it takes you to crochet your amigurumi! (If you have to decide on rounding up or rounding down, always round up.)
6.) For number 6, we have to do a little bit of guesswork. We now know exactly how long it takes to crochet all the pieces, but we still haven't added in time for assembly and stuffing. Depending on the size and complexity of your project, this could be anywhere from a half an hour to two hours. It's your guess! Guess wisely! ;)
7.) Now go post on your favorite social media and let the world know the facts!
5.) When you're done adding up all the stitches, enter this grand total in the calculator. Now divide that number by your SPM (stitches per minute) number. Now take that number that you just got and divide it by 60. What did you come up with? That is how many hours it takes you to crochet your amigurumi! (If you have to decide on rounding up or rounding down, always round up.)
6.) For number 6, we have to do a little bit of guesswork. We now know exactly how long it takes to crochet all the pieces, but we still haven't added in time for assembly and stuffing. Depending on the size and complexity of your project, this could be anywhere from a half an hour to two hours. It's your guess! Guess wisely! ;)
7.) Now go post on your favorite social media and let the world know the facts!
 There's my "mini profile" featuring my giant sloth, baby sloth, gingerbread twins, and Gerald Giraffe! (The Gingerbread Twins were especially excited to be featured in the issue, that's why they're helping me promote this giveaway!) ;)
 In this issue of Simply Crochet, you will run into many other familiar faces including Stephanie of All About Ami, Jessica of The Hook Nook, Vincent of Knot Bad, Stacey of Fresh Stitches, Ilaria of Airali Design, and many more! It was truly an honor to be mentioned alongside these other amazing designers!
There are over 25 patterns in this issue alone including a cute little "sleepy sloth" ami design by Ilaria Caliri.
In this issue of Simply Crochet, you will run into many other familiar faces including Stephanie of All About Ami, Jessica of The Hook Nook, Vincent of Knot Bad, Stacey of Fresh Stitches, Ilaria of Airali Design, and many more! It was truly an honor to be mentioned alongside these other amazing designers!
There are over 25 patterns in this issue alone including a cute little "sleepy sloth" ami design by Ilaria Caliri.
 And to make it all extra special, there is a pretty polymer crochet hook included! It's a size G (4.mm), which is a size I use frequently, so I'm excited to make something using it.
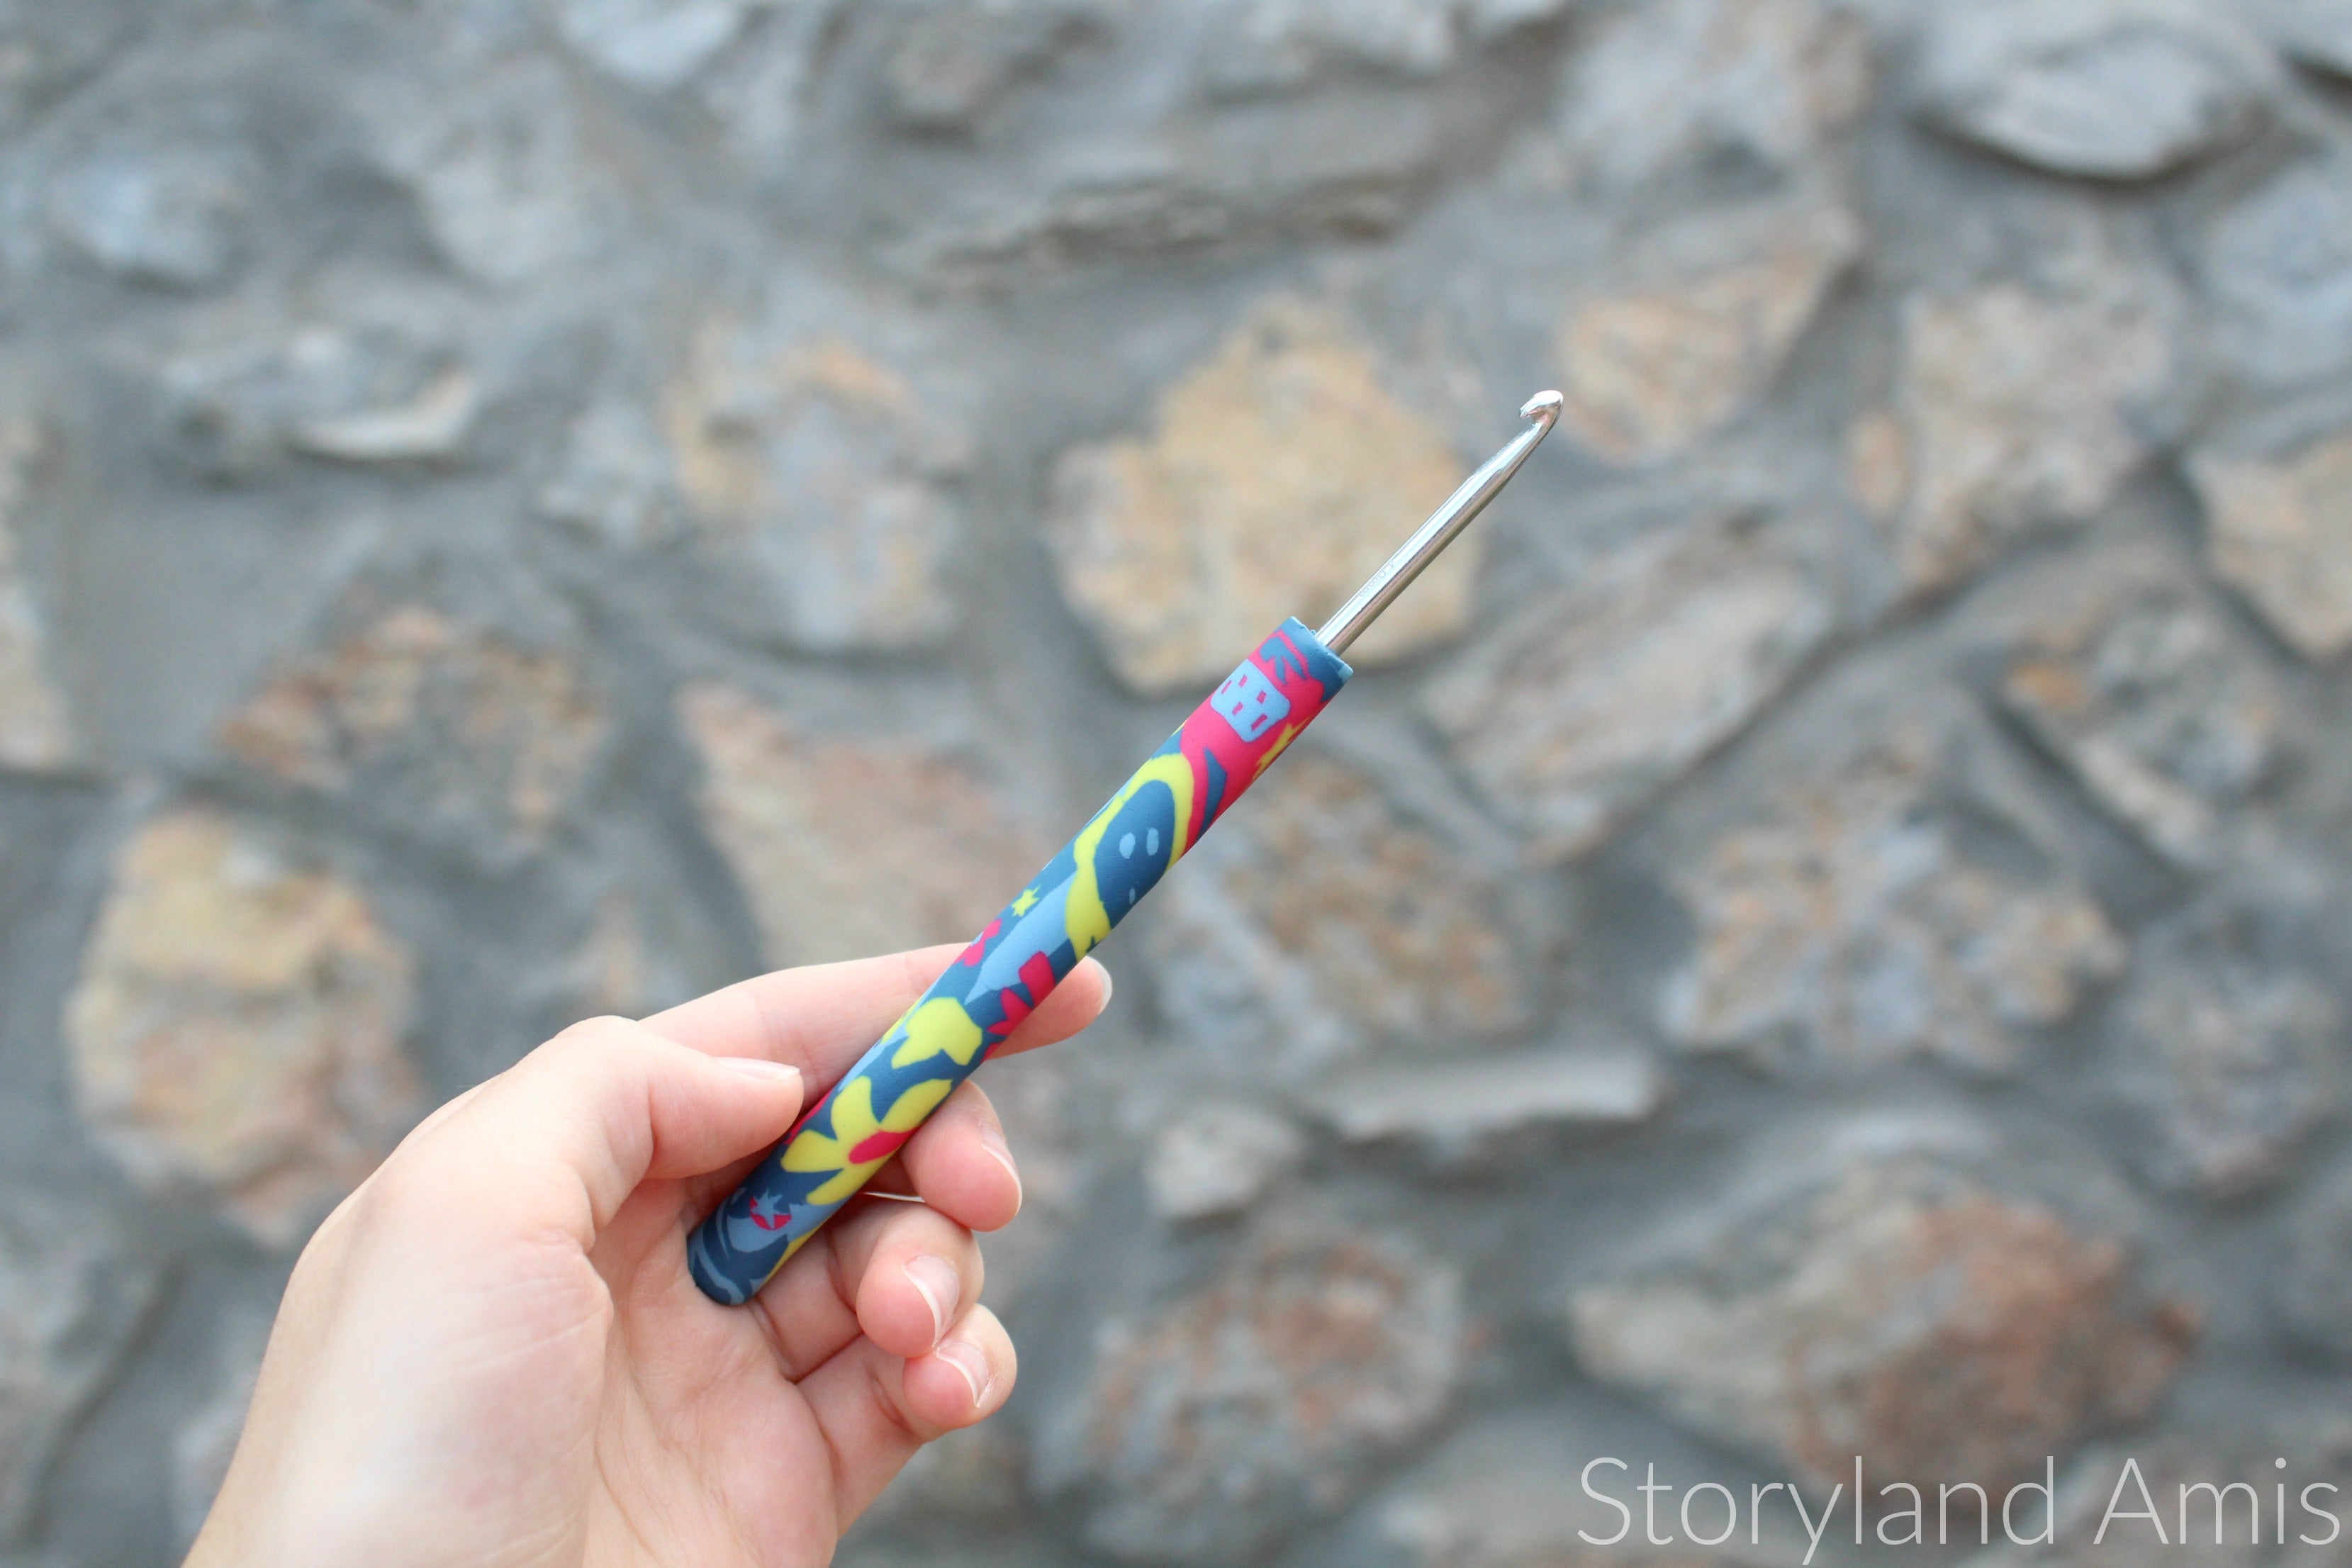 Now for the GIVEAWAY!
  Finish off. Insert your safety eyes between R7 & 8, exactly 6 sts apart. (Hint: Insert 1st eye, count 6 whole sts from the hole you inserted the first eye into, insert 2nd eye.) Do NOT attach the backings just yet if you plan to embroider eyelashes on your jelly.
For eyelashes take your black embroidery floss and embroider two little lines on the side of the eye, each about a stitch wide.
Finish off. Insert your safety eyes between R7 & 8, exactly 6 sts apart. (Hint: Insert 1st eye, count 6 whole sts from the hole you inserted the first eye into, insert 2nd eye.) Do NOT attach the backings just yet if you plan to embroider eyelashes on your jelly.
For eyelashes take your black embroidery floss and embroider two little lines on the side of the eye, each about a stitch wide.
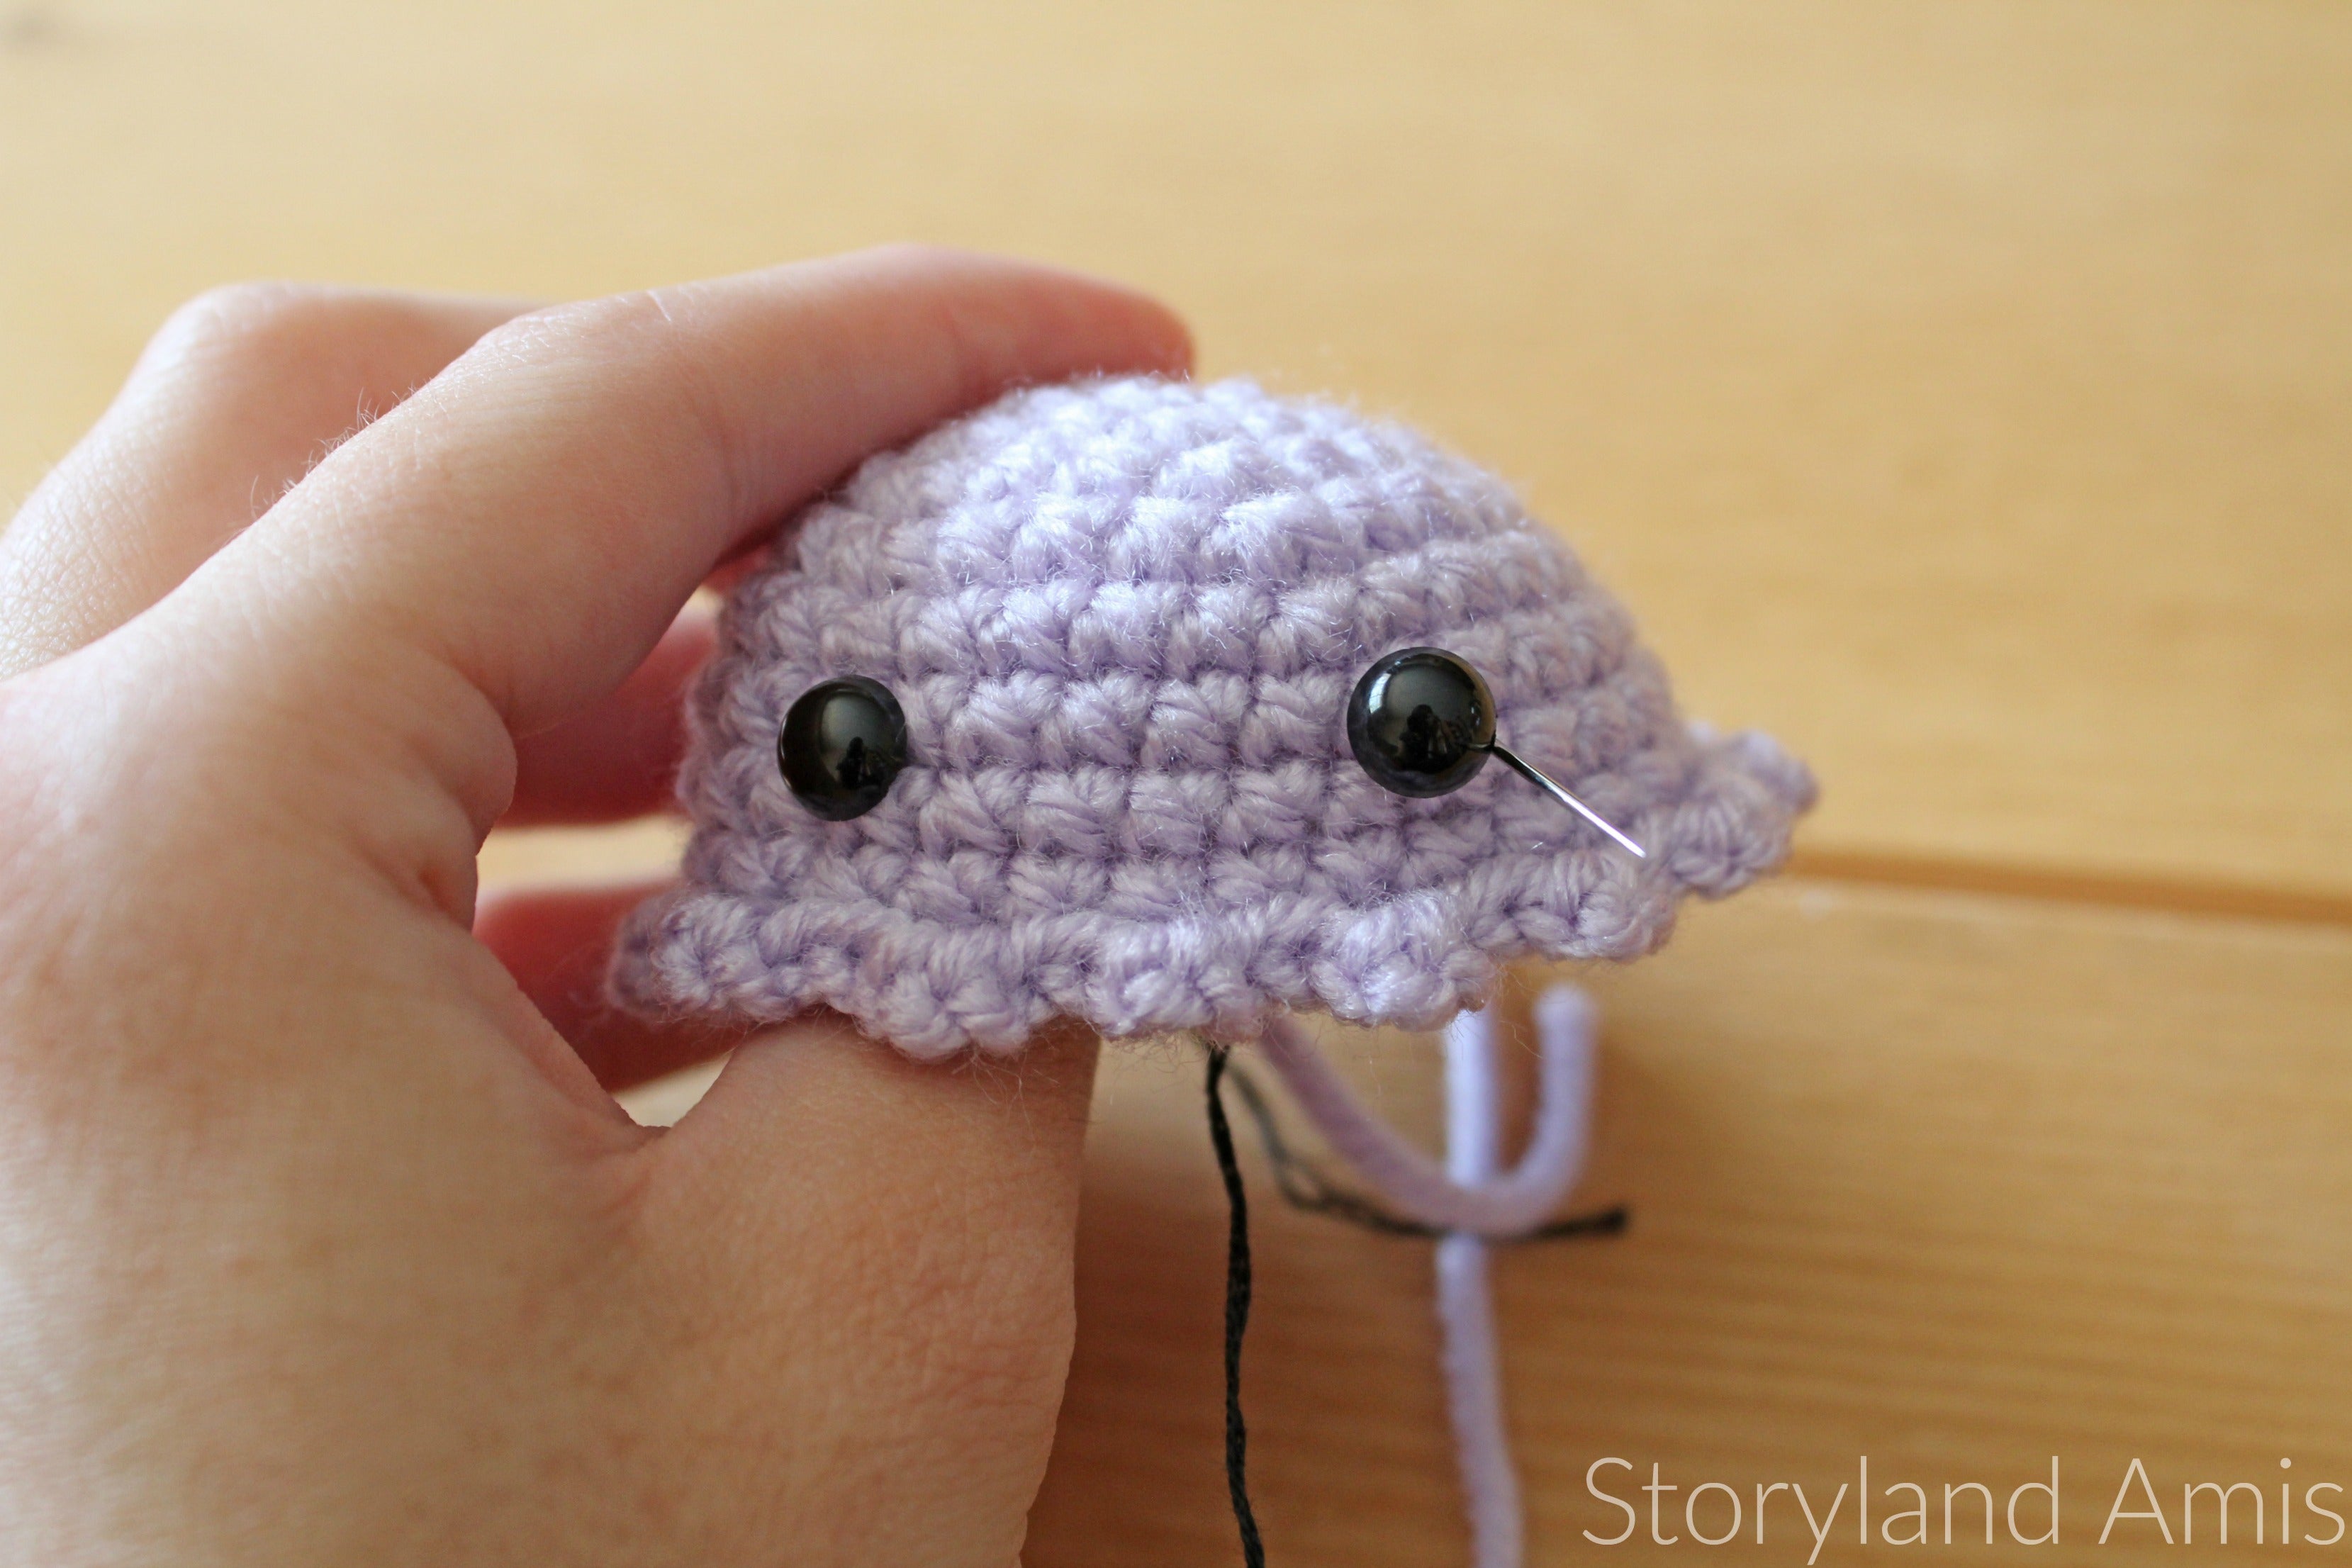
 Now you can attach the safety eye backings. Embroider a small little smile directly between her eyes. Set aside the jellyfish top until the rest of the parts are completed.
 Bottom of Jellyfish
R1: Ch 2, 6 sc in 2nd ch from hook
R2: *Inc 1* rep 6 times (12 sts)
R3: *Sc 1, inc 1* rep 6 times (18 sts)
R4: *Sc 2, inc 1* rep 6 times (24 sts)
R5: *Sc 3, inc 1* rep 6 times (30 sts)
Finish off leaving long tail for sewing. Do NOT sew to the top until the tentacles are completed.
Straight outer tentacles (make 6)
Start with a long tail
Loosely ch 14, starting in 2nd ch from hook, sl st 13
(For short and stubby tentacles: Ch 8, starting in 2nd ch from hook, sl st 7).
Finish off leaving a tail.
Bottom of Jellyfish
R1: Ch 2, 6 sc in 2nd ch from hook
R2: *Inc 1* rep 6 times (12 sts)
R3: *Sc 1, inc 1* rep 6 times (18 sts)
R4: *Sc 2, inc 1* rep 6 times (24 sts)
R5: *Sc 3, inc 1* rep 6 times (30 sts)
Finish off leaving long tail for sewing. Do NOT sew to the top until the tentacles are completed.
Straight outer tentacles (make 6)
Start with a long tail
Loosely ch 14, starting in 2nd ch from hook, sl st 13
(For short and stubby tentacles: Ch 8, starting in 2nd ch from hook, sl st 7).
Finish off leaving a tail.
 Now we will attach the tentacles to the bottom before sewing the bottom to the top. Instead of sewing the tentacles on, we will be knotting them on. This is a quick and easy method that will eliminate the need for sewing (and weaving) all those ends in!
In the picture below, you will see where I attached my straight outer tentacles between the fourth and fifth rounds. I spaced them evenly every 6 sts, right beside the increase st. For the curly inner ones, I spaced them evenly between the first and second rounds.
Now we will attach the tentacles to the bottom before sewing the bottom to the top. Instead of sewing the tentacles on, we will be knotting them on. This is a quick and easy method that will eliminate the need for sewing (and weaving) all those ends in!
In the picture below, you will see where I attached my straight outer tentacles between the fourth and fifth rounds. I spaced them evenly every 6 sts, right beside the increase st. For the curly inner ones, I spaced them evenly between the first and second rounds.
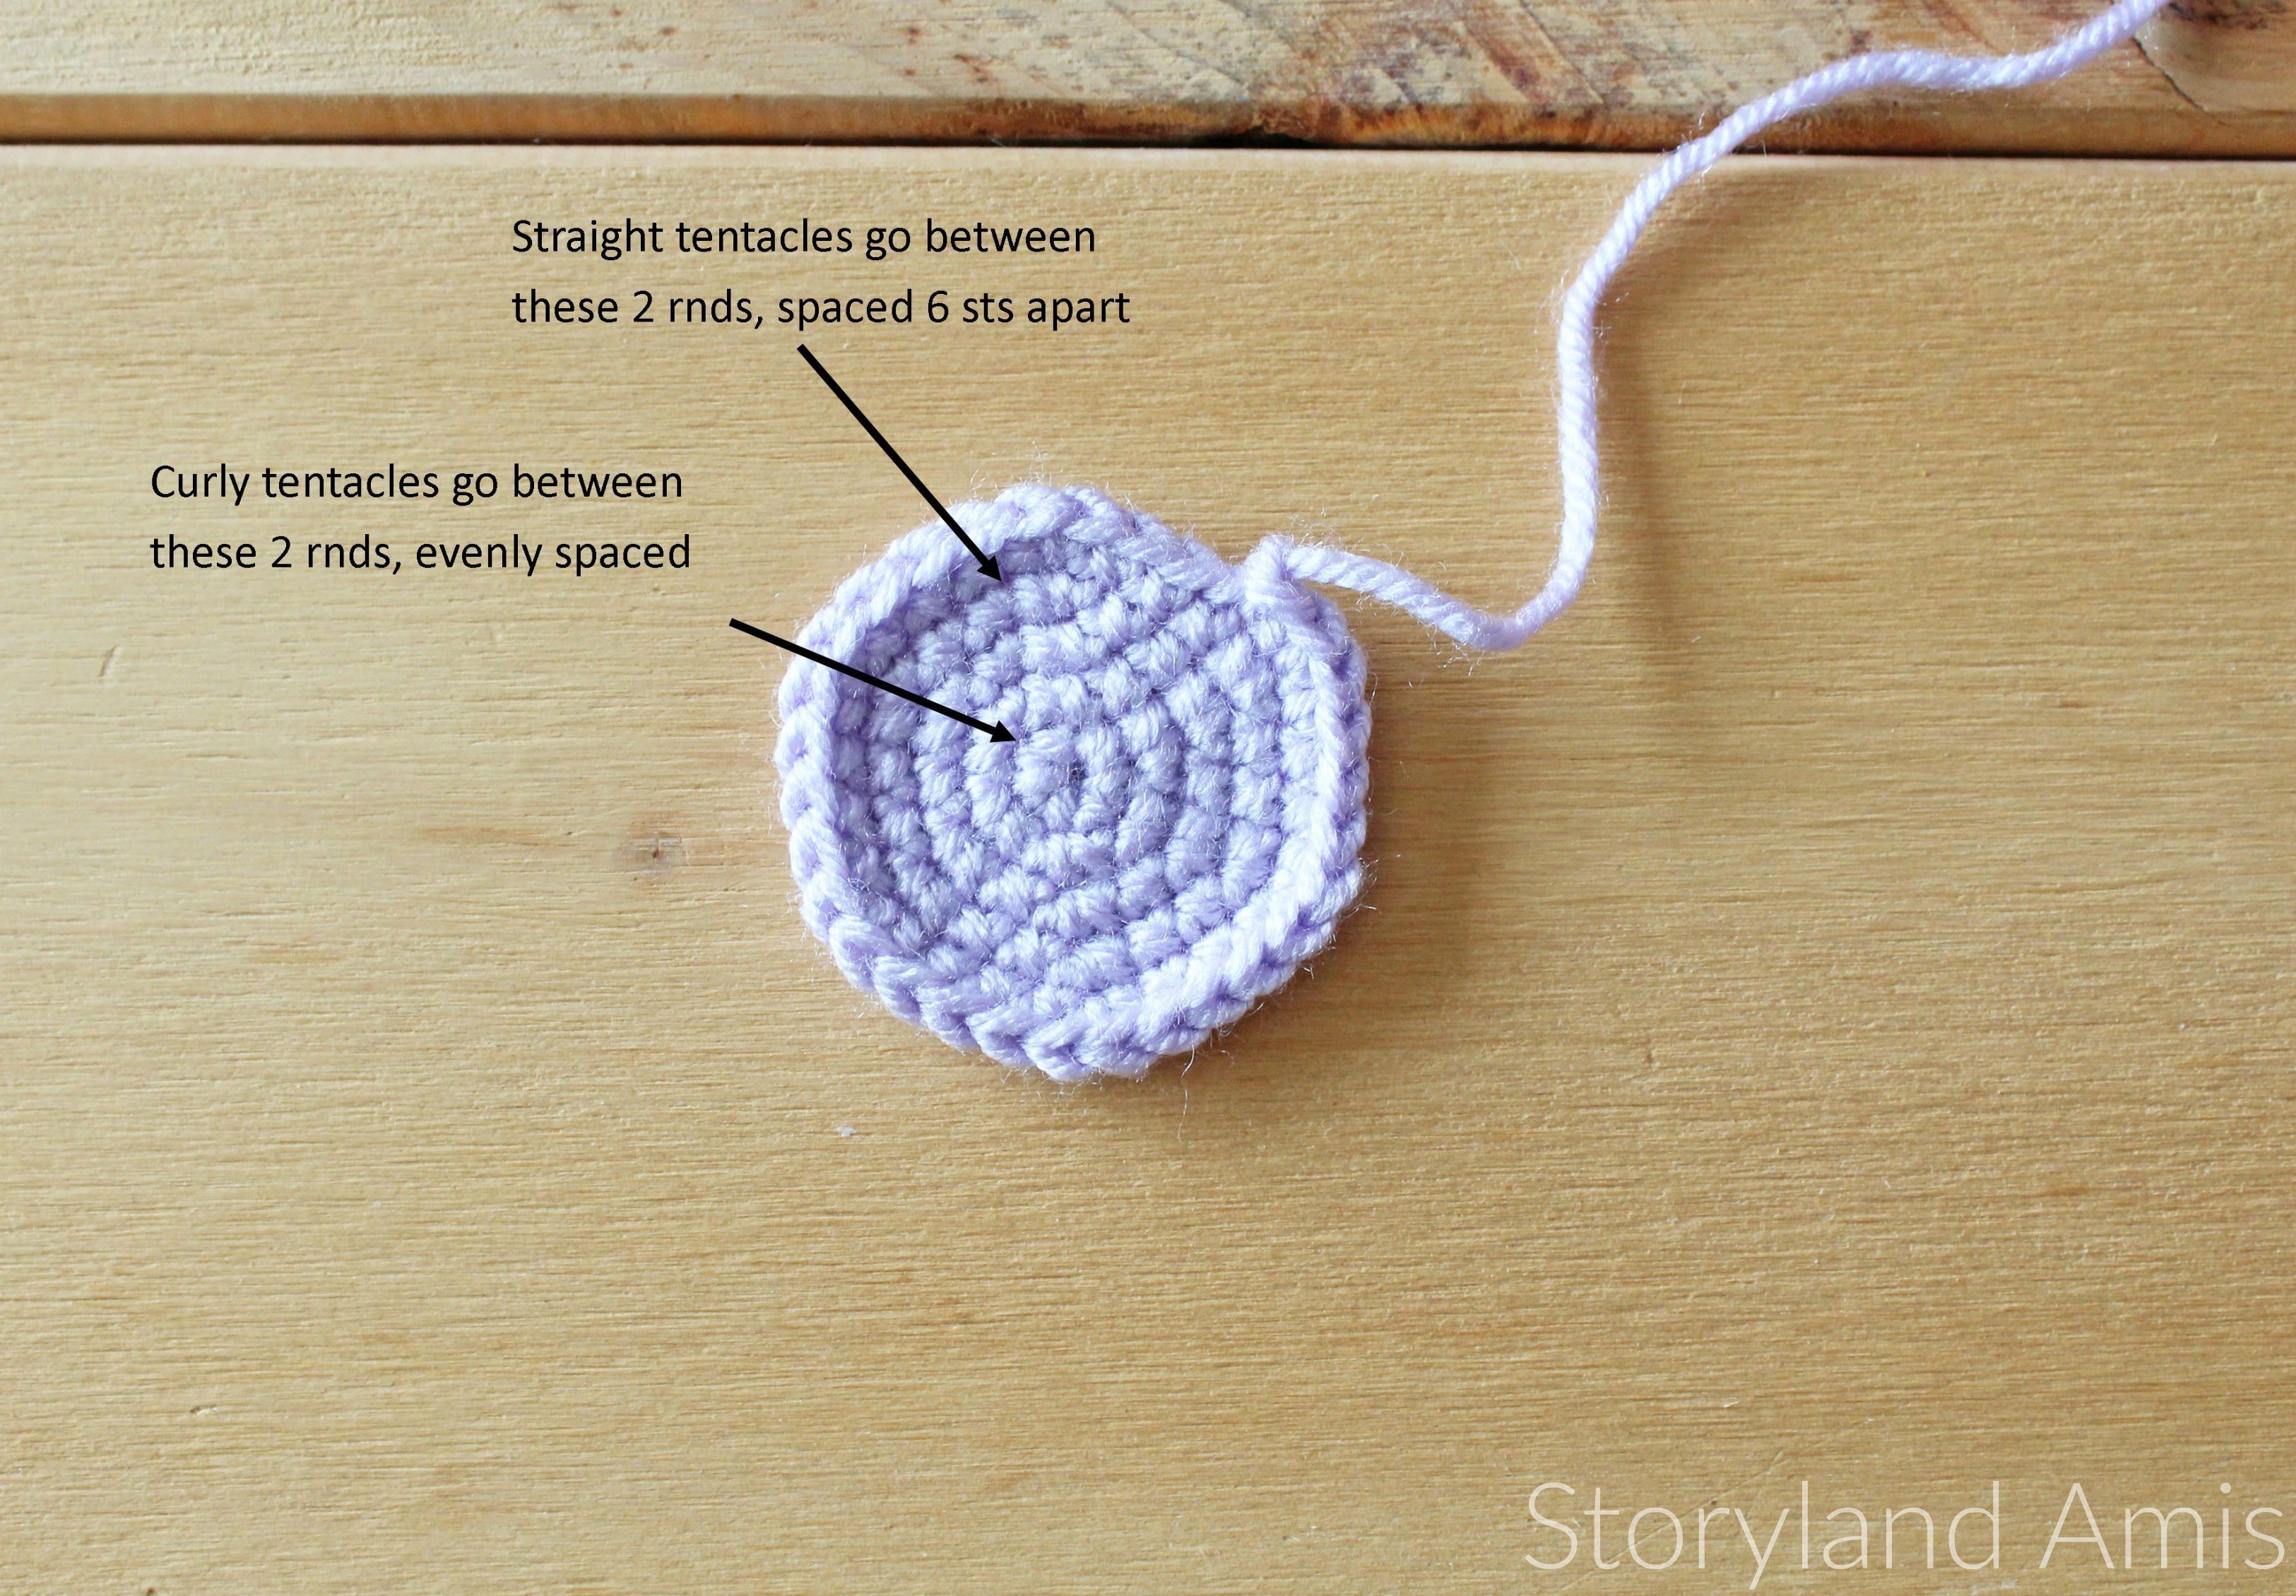 We will attach the curly tentacles first and then the straight ones.
Take your tapestry needle and thread both loose ends of the tentacle through. Now pull your needle through the jelly bottom and tie the two ends together with a knot. Once you have all the tentacles attached, you can trim the ends.
We will attach the curly tentacles first and then the straight ones.
Take your tapestry needle and thread both loose ends of the tentacle through. Now pull your needle through the jelly bottom and tie the two ends together with a knot. Once you have all the tentacles attached, you can trim the ends.
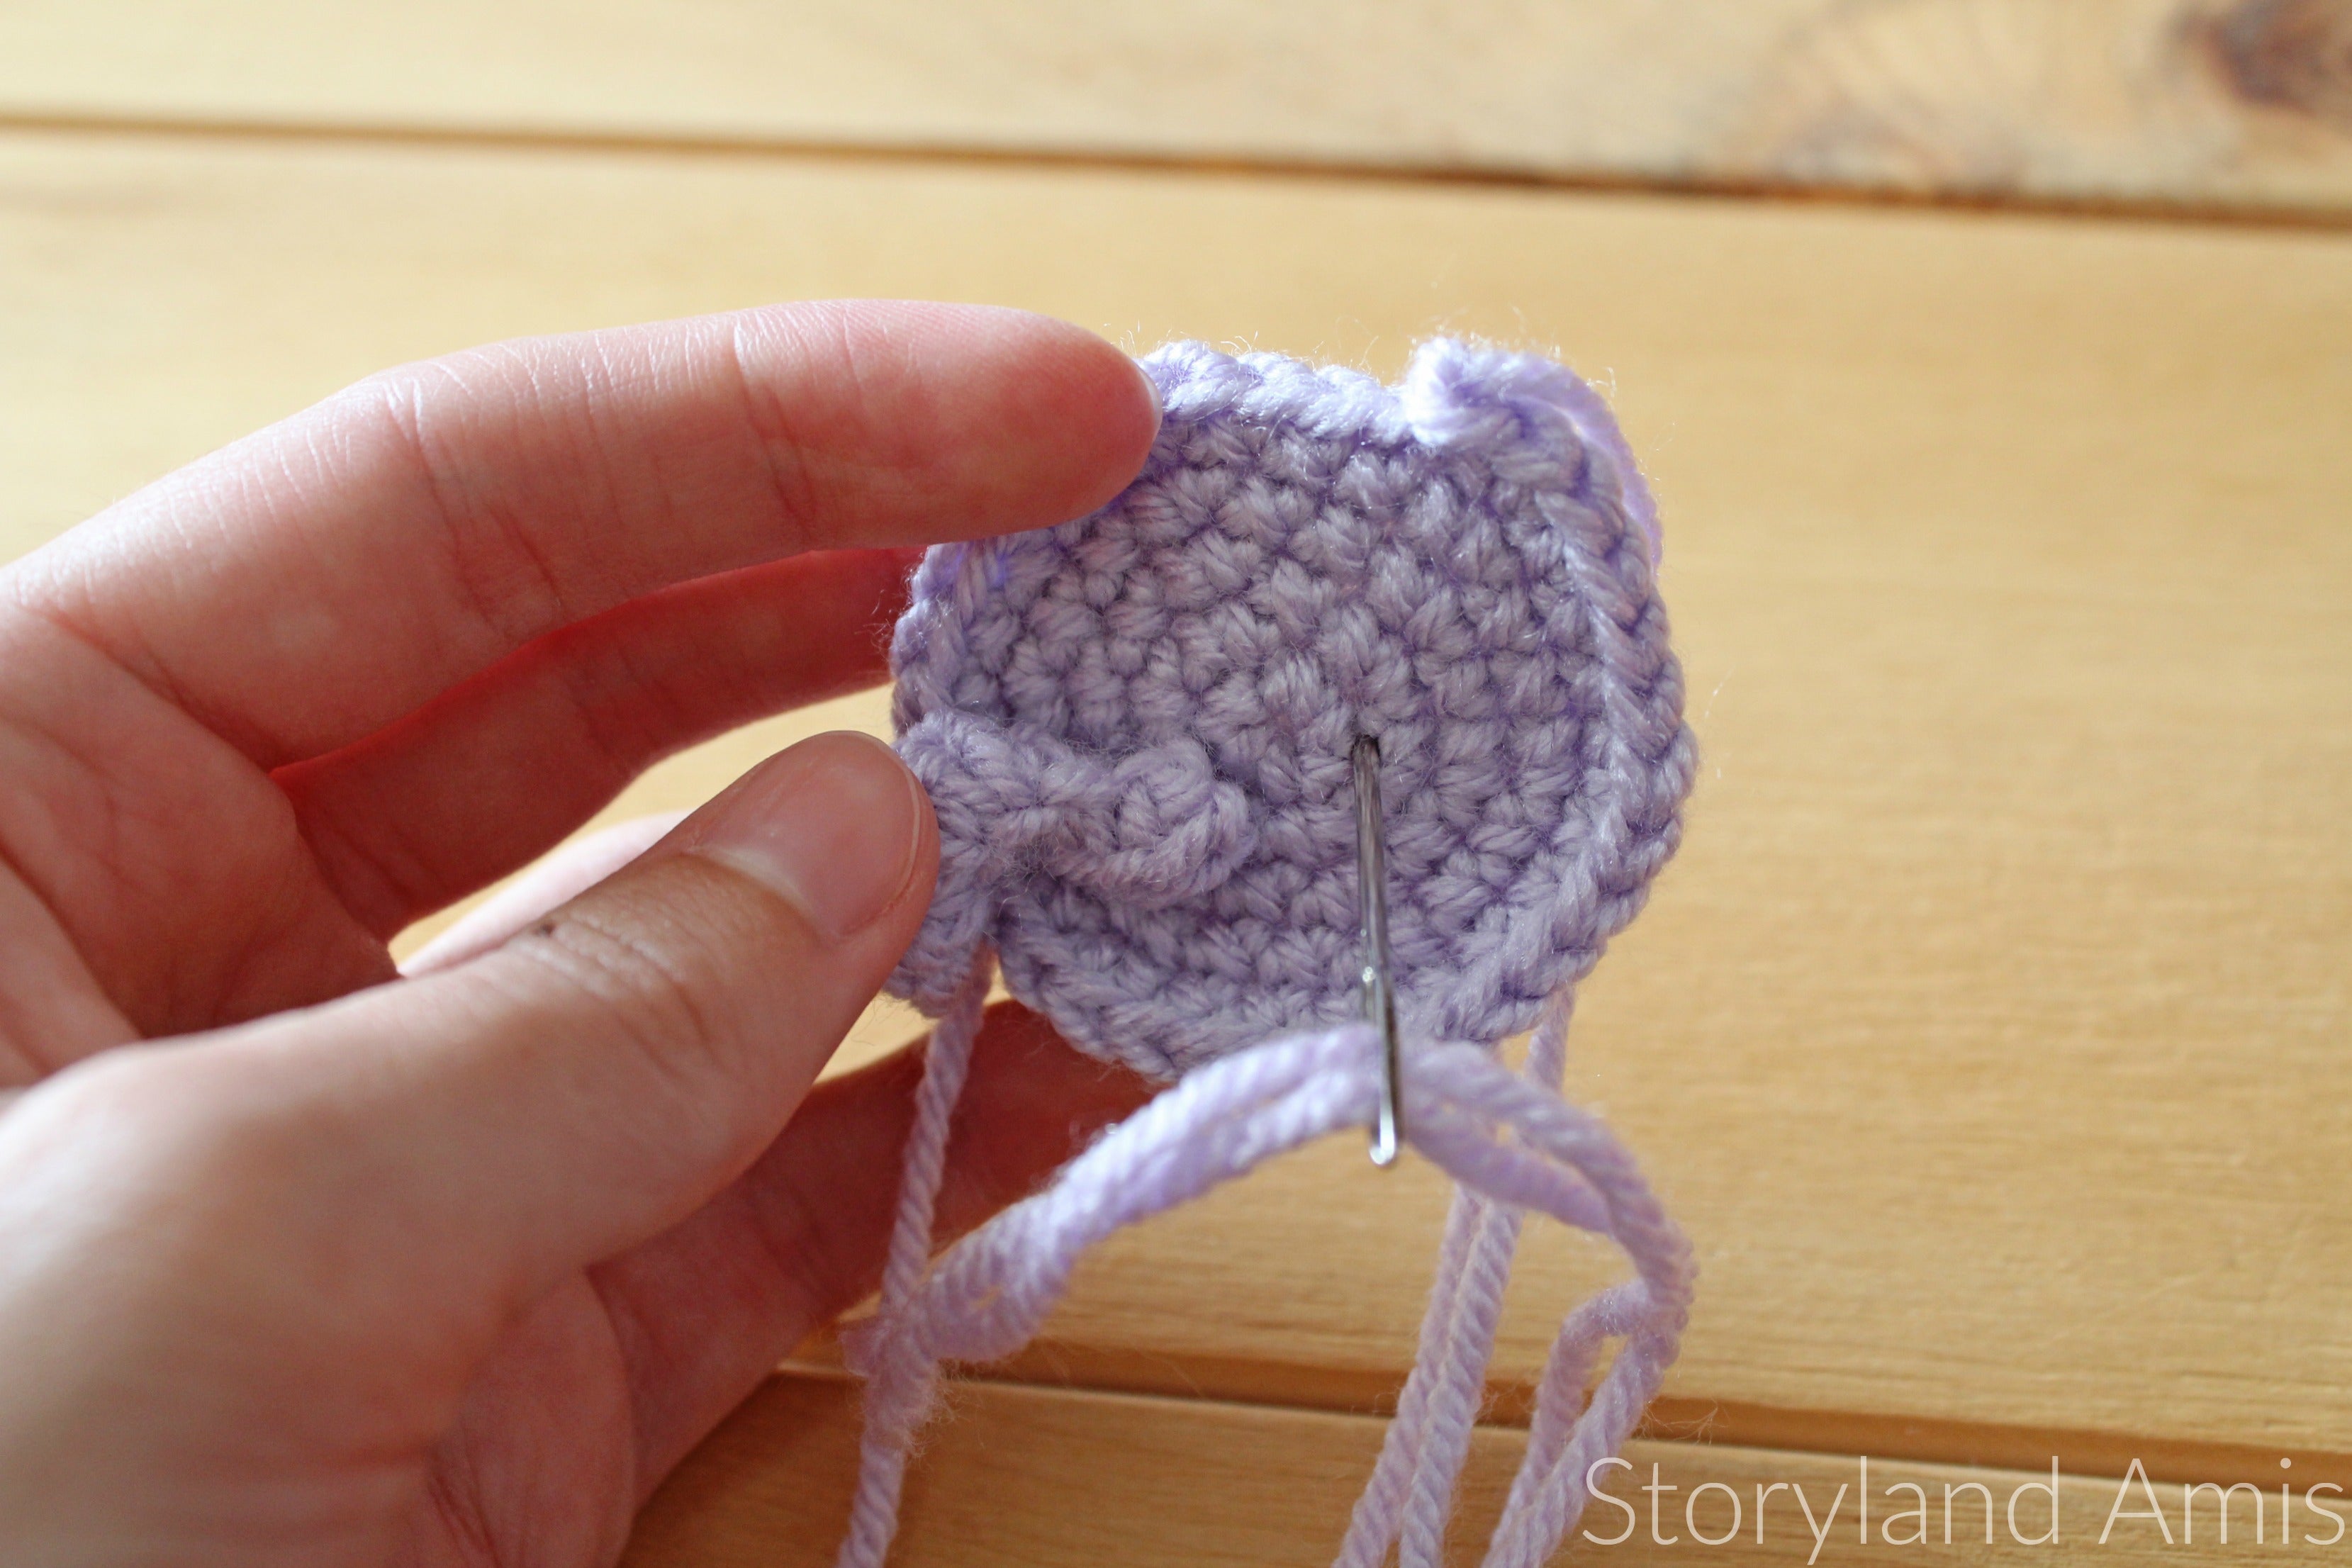

 With all the tentacles attached.
 Now that the tentacles are all attached, we will sew the bottom to the top of the jelly. Using your tapestry needle and long tail we left, whip stitch the bottom to the top. I used the front loops of the bottom piece and the back loops left from the top piece. Just before you finish sewing it up, stuff the body.
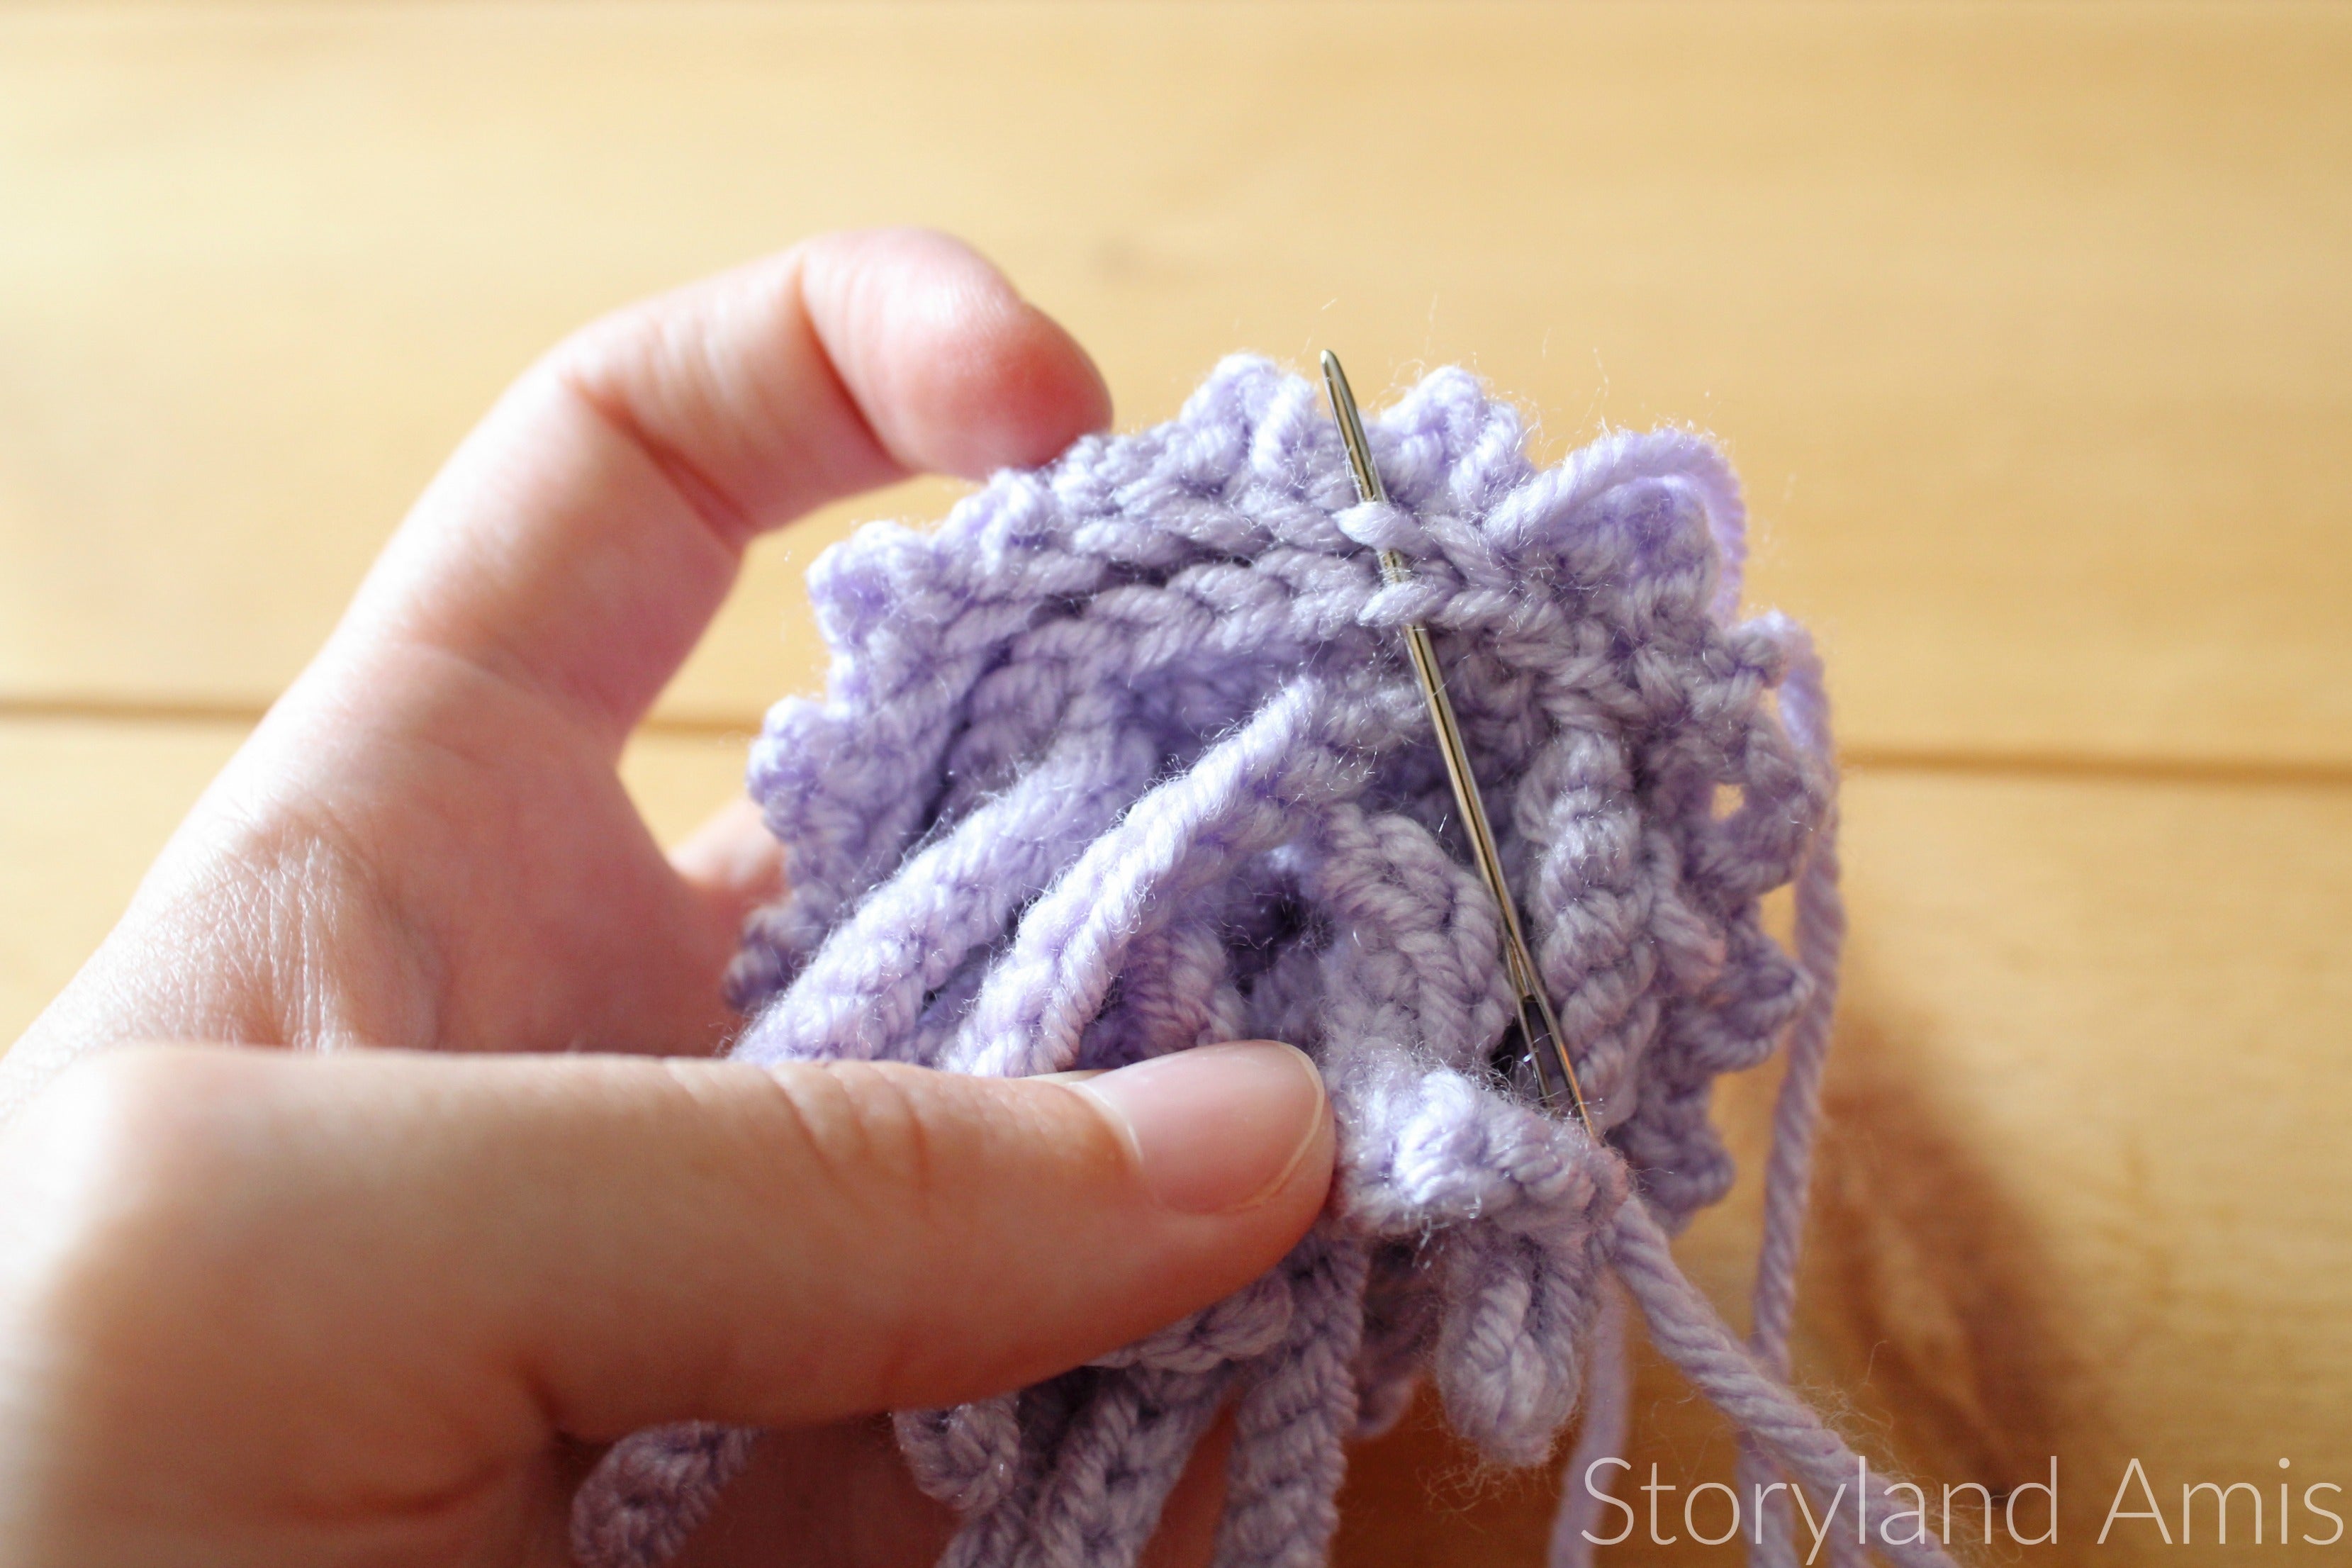 Heart bow (using your C hook and sport weight yarn)
Ch 2, in 2nd ch from the hook, sc 2, hdc 1, dc 3, sl st 1, (now work on the bottom side of the chain), sl st 1, dc 3, hdc 1, sc 2
To finish off, sl st in first sc made. Sew the heart bow to your jelly's head.
Heart bow (using your C hook and sport weight yarn)
Ch 2, in 2nd ch from the hook, sc 2, hdc 1, dc 3, sl st 1, (now work on the bottom side of the chain), sl st 1, dc 3, hdc 1, sc 2
To finish off, sl st in first sc made. Sew the heart bow to your jelly's head.
 And you’re done! I hope you had fun making her! Please share pictures of your project with me through Instagram, Facebook, or email (storylandamis@gmail.com). I love seeing what you create!


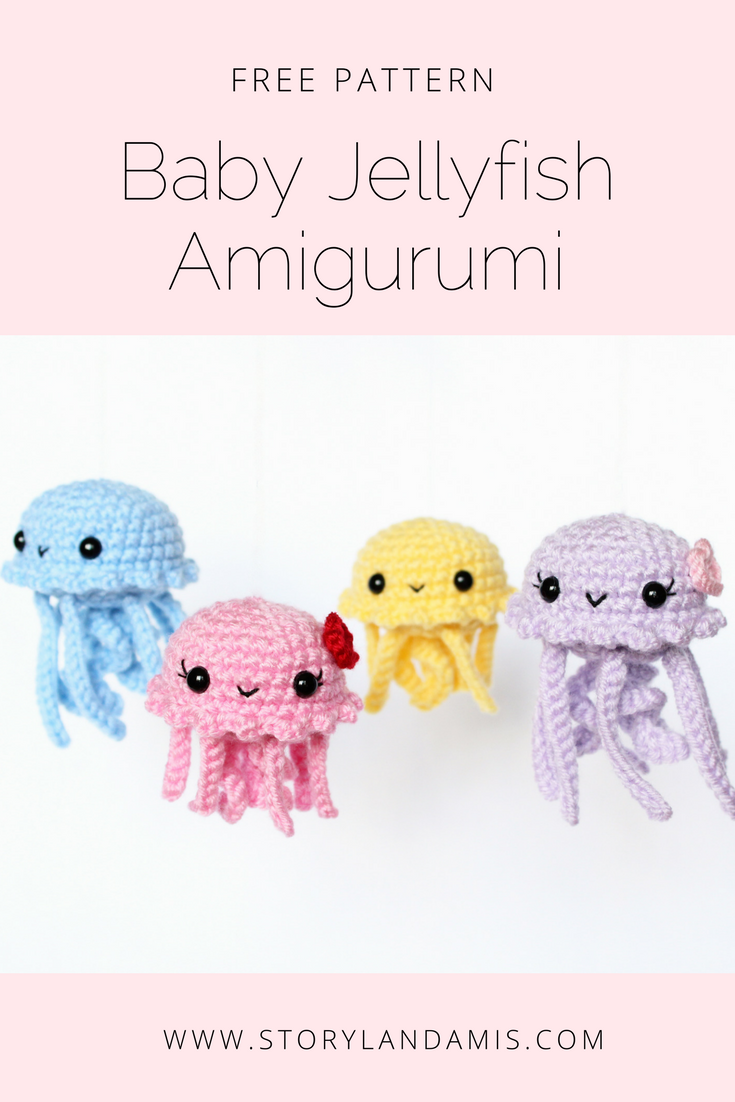 For a nice, concise version of this pattern, you can get a free PDF at LoveCrochet.com, or here at Craftsy. The PDF does not include as many pictures as this post, so make sure to refer to this post if you have trouble with something.
This pattern is an original design by Storyland Amis. This written pattern is for personal use only. Please do NOT sell or redistribute this pattern in part or in whole. If you wish to share this pattern you may link to this post, but please do not claim it as your own.
You MAY sell the finished product, but please credit Storyland Amis as the designer. If you sell your finished items online I would appreciate it if you’d link back to my blog! You may not mass-produce items made from this pattern. Thank you for your understanding and respect.
~Holly :)
Follow my blog with Bloglovin
For a nice, concise version of this pattern, you can get a free PDF at LoveCrochet.com, or here at Craftsy. The PDF does not include as many pictures as this post, so make sure to refer to this post if you have trouble with something.
This pattern is an original design by Storyland Amis. This written pattern is for personal use only. Please do NOT sell or redistribute this pattern in part or in whole. If you wish to share this pattern you may link to this post, but please do not claim it as your own.
You MAY sell the finished product, but please credit Storyland Amis as the designer. If you sell your finished items online I would appreciate it if you’d link back to my blog! You may not mass-produce items made from this pattern. Thank you for your understanding and respect.
~Holly :)
Follow my blog with Bloglovin R7-8: in orange Sc 13, change yarn and in white sc 11 (2 rounds total—24 sts)
 R9: BLO in orange *Sc 2, dec 1* rep 3 times, sc 1, in white sc 1, dec 1, *sc 2, dec 1* rep 2 times (18 sts) this is the only round you will crochet in the back loops
Switch to orange yarn
R10: In orange *Sc 1, dec 1* rep 3 times, sc 1, change yarn and in white dec 1, *sc 1, dec 1* rep 2 times (12 sts)
Finish off. We won’t finish closing up the head all the way so that we can conserve wool. Stuff head using fiberfill.
R9: BLO in orange *Sc 2, dec 1* rep 3 times, sc 1, in white sc 1, dec 1, *sc 2, dec 1* rep 2 times (18 sts) this is the only round you will crochet in the back loops
Switch to orange yarn
R10: In orange *Sc 1, dec 1* rep 3 times, sc 1, change yarn and in white dec 1, *sc 1, dec 1* rep 2 times (12 sts)
Finish off. We won’t finish closing up the head all the way so that we can conserve wool. Stuff head using fiberfill.
 Muzzle (using cream yarn)
R1: Ch 2, 4 sc in 2nd ch from hook
R2: *Inc 1, sc 1* rep 2 times (6 sts)
R3: *Inc 1, sc 2* rep 2 times (8 sts)
Finish off but do NOT leave a tail for sewing. We will sew all the body parts on with regular worsted weight yarn later. For the black nose, take about 8 in. of black roving, splice it in two and stuff each end into either side of the muzzle. Then needle felt it down over the nose to secure it. Set aside until assembly.
Muzzle (using cream yarn)
R1: Ch 2, 4 sc in 2nd ch from hook
R2: *Inc 1, sc 1* rep 2 times (6 sts)
R3: *Inc 1, sc 2* rep 2 times (8 sts)
Finish off but do NOT leave a tail for sewing. We will sew all the body parts on with regular worsted weight yarn later. For the black nose, take about 8 in. of black roving, splice it in two and stuff each end into either side of the muzzle. Then needle felt it down over the nose to secure it. Set aside until assembly.
 Now take your 40mm eyes and your fabric glue and spread a generous amount on the back of the eye. Carefully place the eyes onto R7 of the head about 5-6 sts apart making sure there’s enough room for the muzzle in between.
 Ears (starting in black yarn)
R1: Ch 2, 4 sc in 2nd ch from hook
Switch to orange yarn
R2: *Inc 1, sc 1* rep 2 times (6 sts)
R3: Sc in all 6 sts (6 sts)
Finish off, but again, do not leave a tail for sewing. Do not stuff. Set aside until assembly.
Legs (make 2 starting in black yarn)
R1: Ch 2, 4 sc in 2nd ch from hook
R2: *Inc 1, sc 1 * rep 2 times (6 sts)
Switch to orange yarn
R3: Sc in all 6 sts (6 sts)
Finish off on the 1st foot. Do NOT finish off or cut the yarn on the 2nd foot; we will now join the feet together and start making the body. The right foot is the one we finished off on, the left foot is the one still attached to the yarn that we did not finish off.
Body (continuing in orange yarn)
R4: Join left foot to right foot with a sc in the 1st st of the last round you made on the right foot, now sc 5 on the right foot, then finish joining the feet together by making a sc in the next st on the left foot, then sc 5 (12 sts)
Ears (starting in black yarn)
R1: Ch 2, 4 sc in 2nd ch from hook
Switch to orange yarn
R2: *Inc 1, sc 1* rep 2 times (6 sts)
R3: Sc in all 6 sts (6 sts)
Finish off, but again, do not leave a tail for sewing. Do not stuff. Set aside until assembly.
Legs (make 2 starting in black yarn)
R1: Ch 2, 4 sc in 2nd ch from hook
R2: *Inc 1, sc 1 * rep 2 times (6 sts)
Switch to orange yarn
R3: Sc in all 6 sts (6 sts)
Finish off on the 1st foot. Do NOT finish off or cut the yarn on the 2nd foot; we will now join the feet together and start making the body. The right foot is the one we finished off on, the left foot is the one still attached to the yarn that we did not finish off.
Body (continuing in orange yarn)
R4: Join left foot to right foot with a sc in the 1st st of the last round you made on the right foot, now sc 5 on the right foot, then finish joining the feet together by making a sc in the next st on the left foot, then sc 5 (12 sts)
 R5-7: Sc in all 12 sts (3 rounds total—12 sts)
Finish off but do NOT leave a tail for sewing. Stuff body using fiberfill. Set aside until assembly.
R5-7: Sc in all 12 sts (3 rounds total—12 sts)
Finish off but do NOT leave a tail for sewing. Stuff body using fiberfill. Set aside until assembly.
 Arms (make 2 using orange yarn)
Ch 4, starting in 2nd ch from hook sl st 3
Finish off but do NOT leave a tail for sewing. Cut the ends that are left very short and felt them down to the arm so that there are no loose ends. Set aside until assembly.
Arms (make 2 using orange yarn)
Ch 4, starting in 2nd ch from hook sl st 3
Finish off but do NOT leave a tail for sewing. Cut the ends that are left very short and felt them down to the arm so that there are no loose ends. Set aside until assembly.
 Tail (starting in cream yarn)
R1: Ch 2, 4 sc in 2nd ch from hook
R2: *Inc 1, sc 1* rep 2 times (6 sts)
R3: Sc in all 6 sts (6 sts)
Switch to orange yarn
R4: *Inc 1, sc 2* rep 2 times (8 sts)
R5: Sc in all 8 sts (8 sts)
R6: Dec 2, sc 4 (6 sts)
Finish off but do NOT leave a tail for sewing. Stuff tail with fiberfill. Since the opening is quite large, take a long strand (about 20 in.) of matching worsted weight yarn and weave it in and out of each stitch until you come around to the beginning again. Pull tight so that it’s something like a drawstring bag. Set aside until assembly.
Tail (starting in cream yarn)
R1: Ch 2, 4 sc in 2nd ch from hook
R2: *Inc 1, sc 1* rep 2 times (6 sts)
R3: Sc in all 6 sts (6 sts)
Switch to orange yarn
R4: *Inc 1, sc 2* rep 2 times (8 sts)
R5: Sc in all 8 sts (8 sts)
R6: Dec 2, sc 4 (6 sts)
Finish off but do NOT leave a tail for sewing. Stuff tail with fiberfill. Since the opening is quite large, take a long strand (about 20 in.) of matching worsted weight yarn and weave it in and out of each stitch until you come around to the beginning again. Pull tight so that it’s something like a drawstring bag. Set aside until assembly.
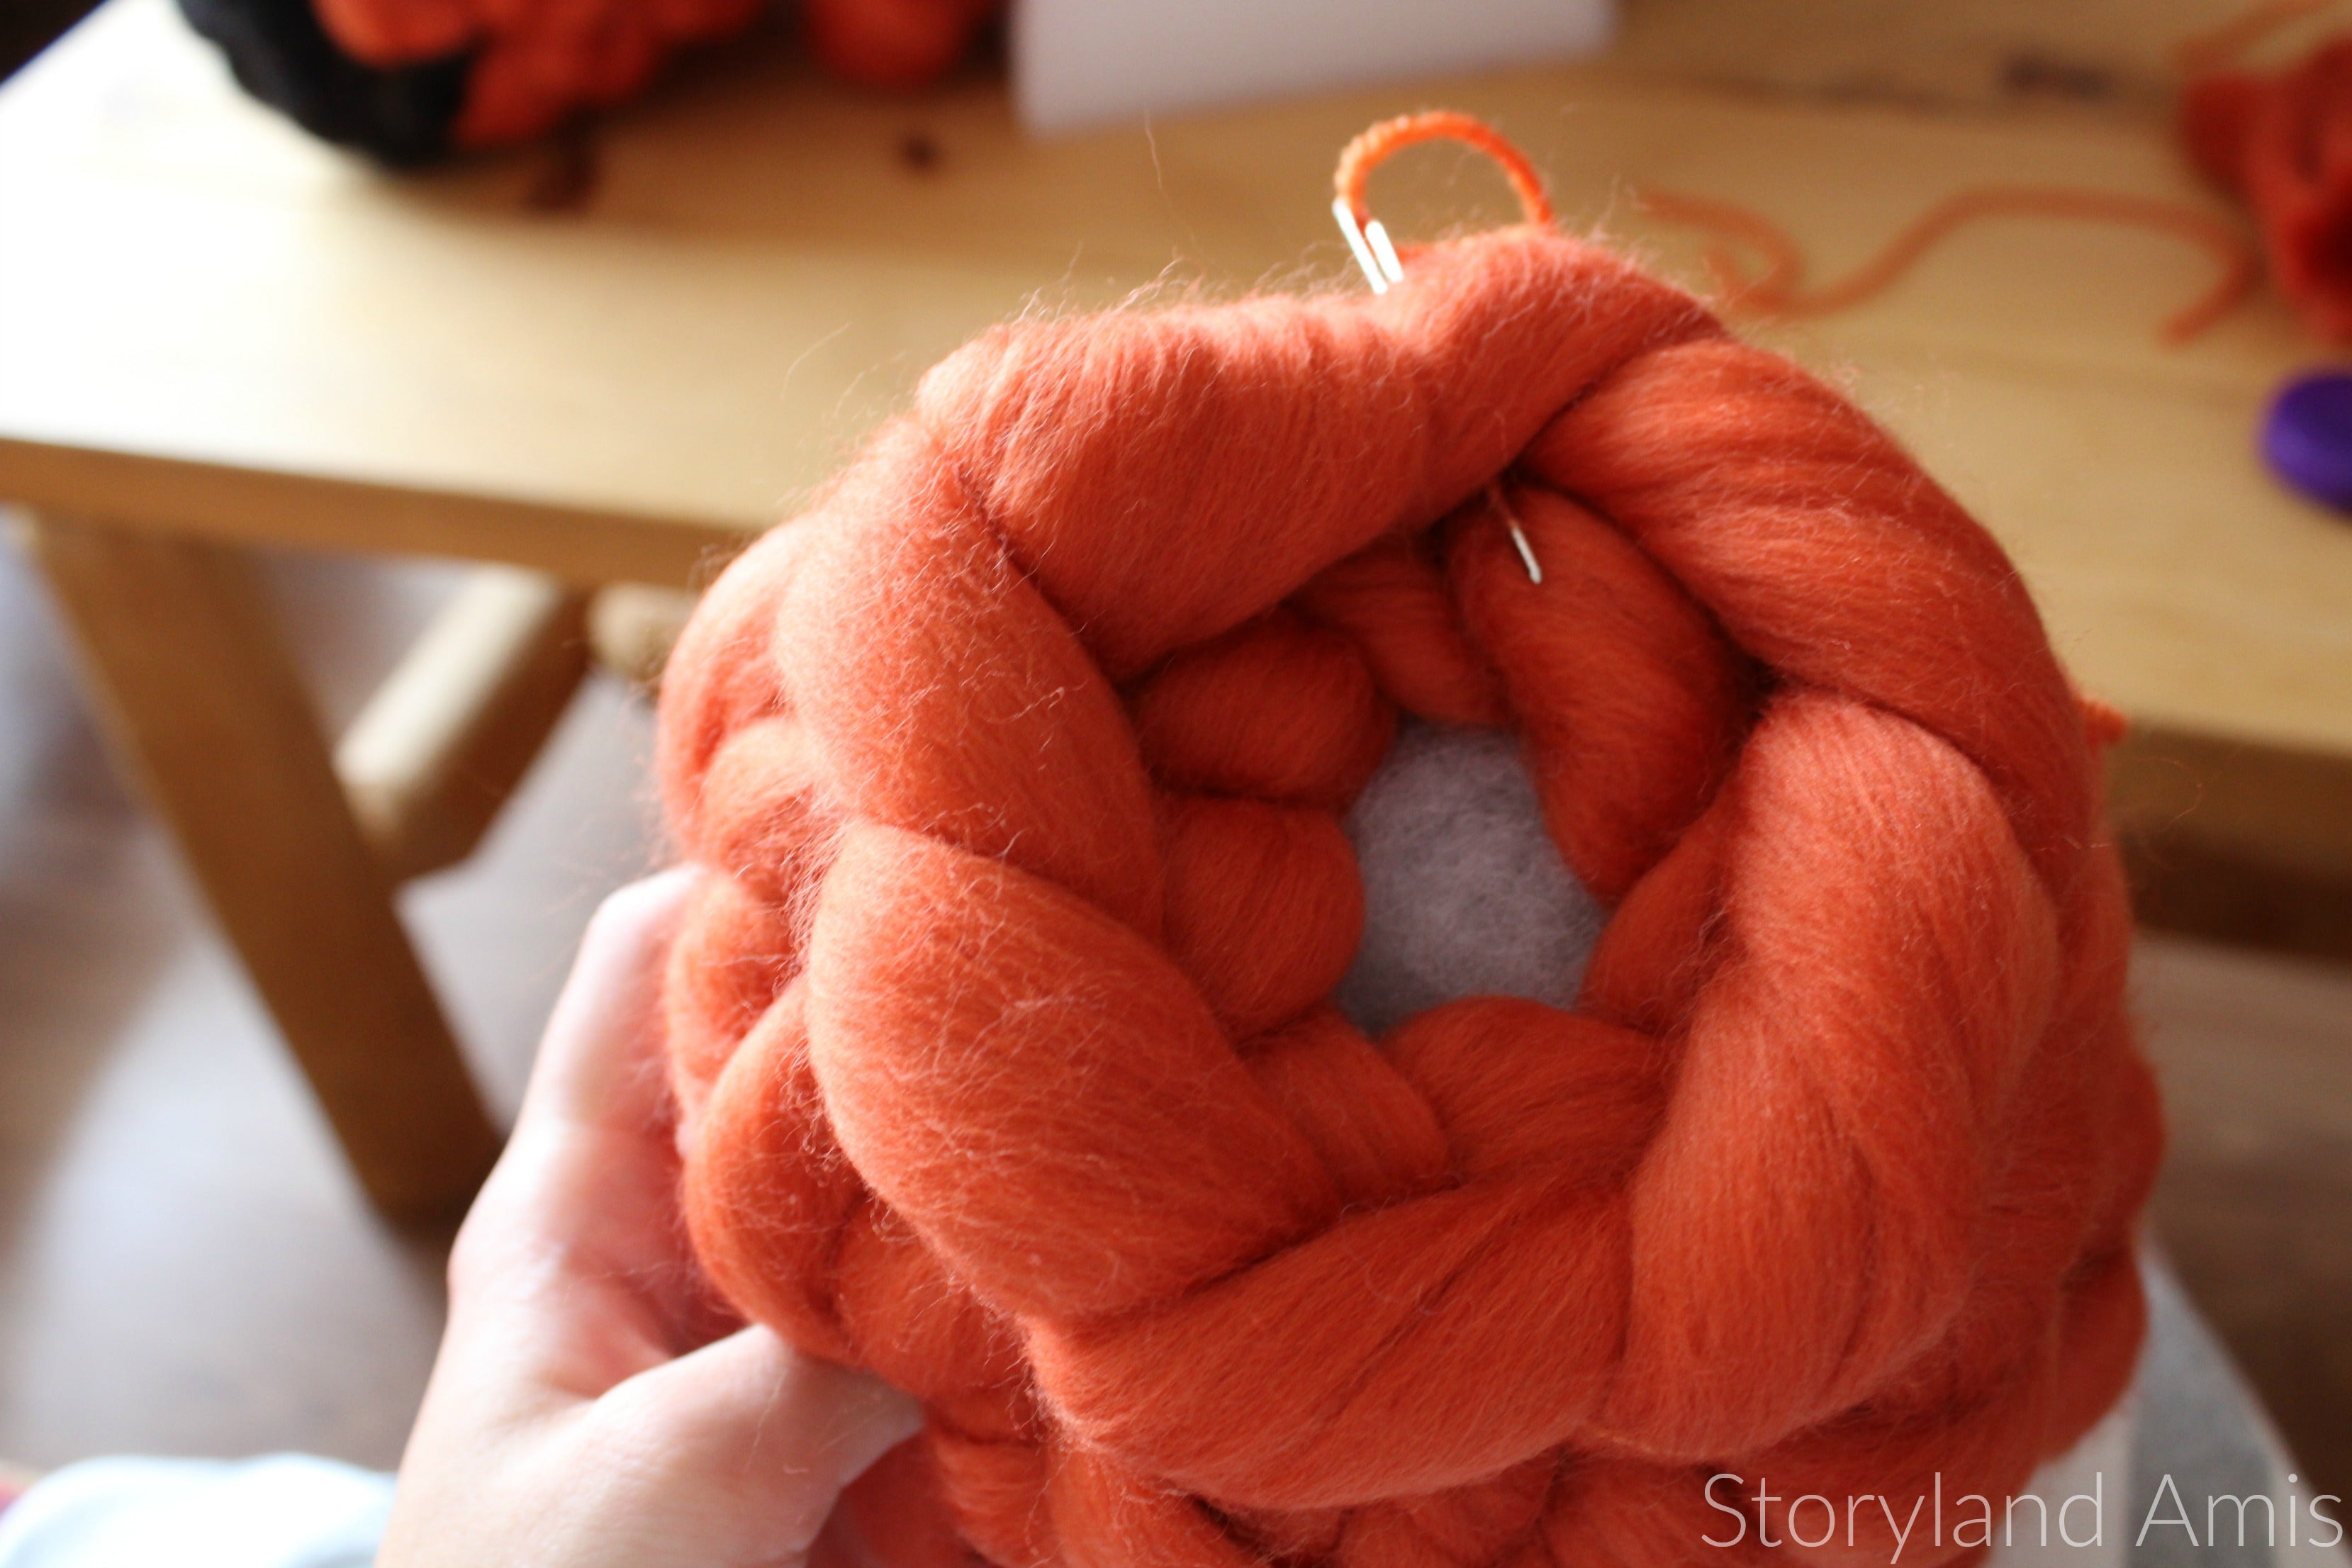
 Assembly: Now that we have all our pieces made, it’s time to put them all together!
First, we will sew the muzzle to the head. Take about 32 in. of cream colored worsted weight yarn and thread your tapestry needle with it. Grab a good-sized clump on the underside of the first stitch of the muzzle and sew it down to the head. Do this twice for every stitch around. (Twice, because each stitch is so large and this will help add extra security to it.) Tie a knot to secure it when finished.
Assembly: Now that we have all our pieces made, it’s time to put them all together!
First, we will sew the muzzle to the head. Take about 32 in. of cream colored worsted weight yarn and thread your tapestry needle with it. Grab a good-sized clump on the underside of the first stitch of the muzzle and sew it down to the head. Do this twice for every stitch around. (Twice, because each stitch is so large and this will help add extra security to it.) Tie a knot to secure it when finished.
 Now sew the ears on the same way as the muzzle. You’ll need about 32 in. of orange worsted weight yarn for each ear. Sew them to R3-5 of the head. Secure with a knot. I also needle felted all the way around the ears to add extra security. This is optional, but I highly recommend it.
 Now sew the body to the head using about 42 in. of orange worsted weight yarn. It will be easiest if you set him on his head to sew it on. Secure with a knot.
 Next sew the arms to the sides of the body, just below the head. You’ll need less than 15 in. of orange yarn for each arm. Secure with a knot.
 If you want his paws to be stuck together like mine, then needle felt the tips together.
 Lastly, sew the tail to the back of the body using about 15 in. of orange yarn. Make sure you sew it on very securely, going around twice if necessary. Secure with a knot. I also needle felted around the whole tail for extra security.
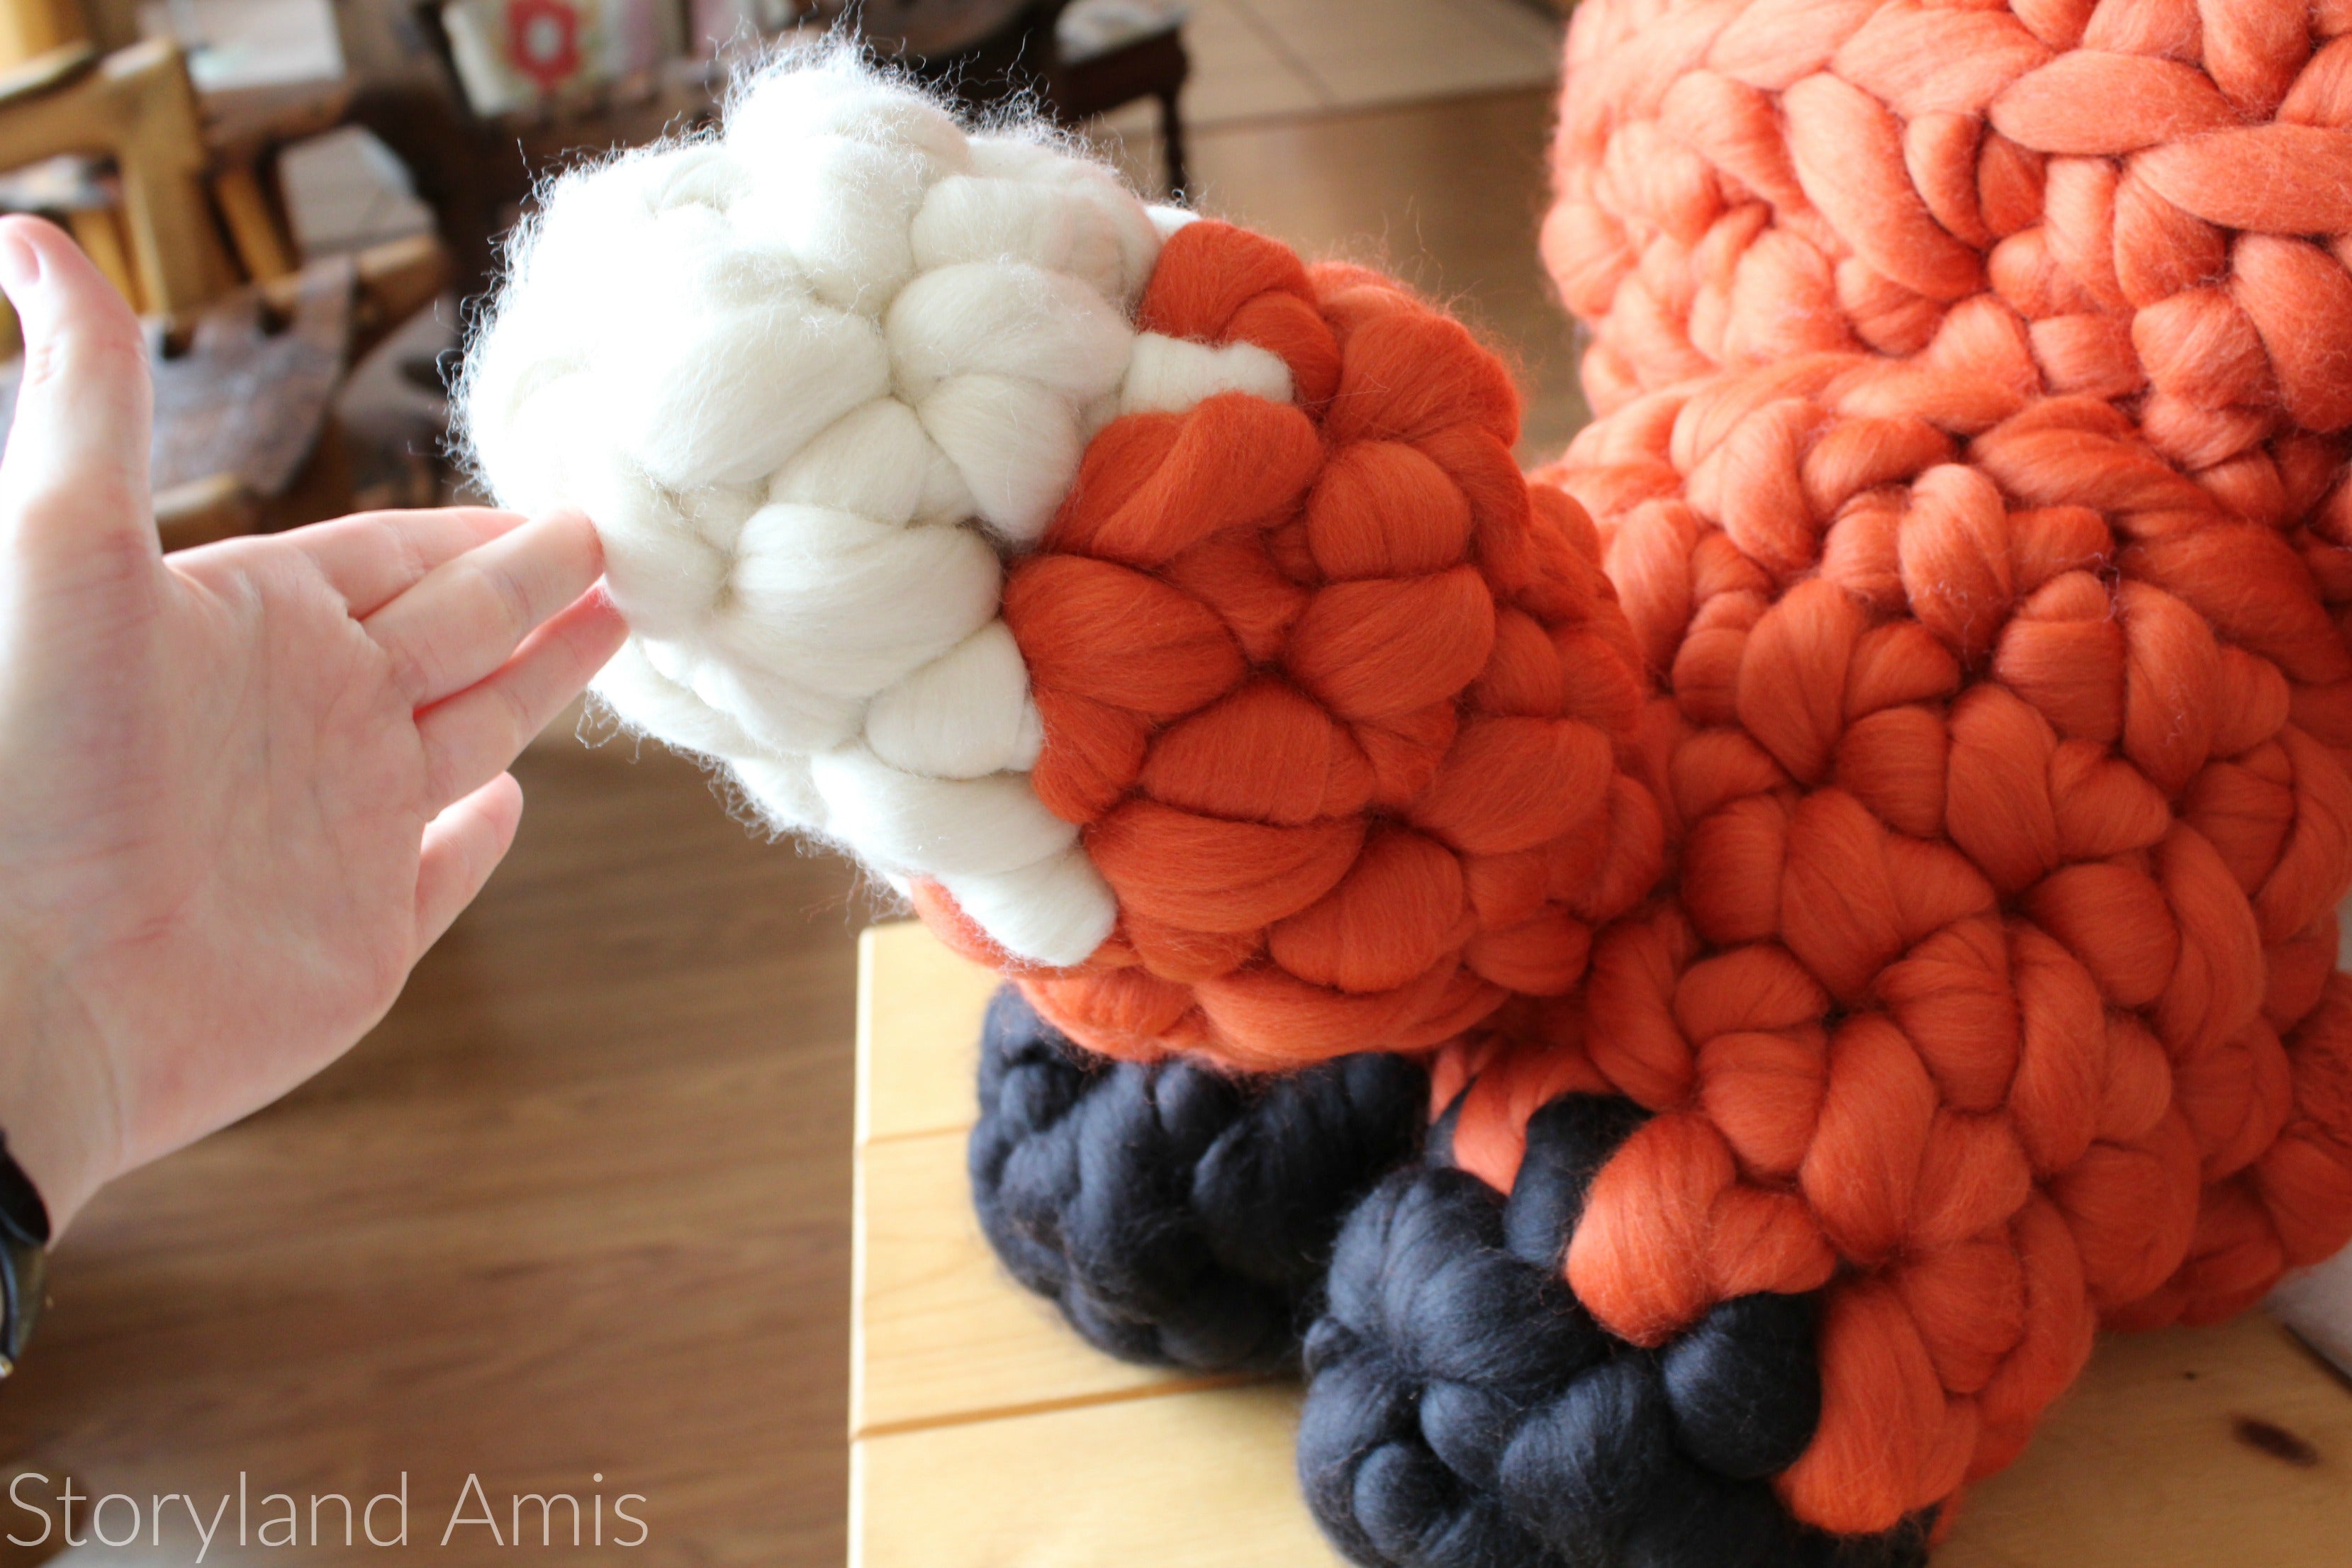 And you’re done! I hope you had fun making him! Don't forget to check out my first post on him for more in depth discussion.
 Also, please consider buying the kit HERE, and don't forget to use the coupon at checkout.
Please share pictures of your project with me through Instagram, Facebook, or email (storylandamis@gmail.com). I love seeing what you create!
~Holly :)
This pattern is an original design by Storyland Amis. This written pattern is for personal use only. Please do NOT sell or redistribute this pattern in part or in whole. If you wish to share this pattern you may link to this post, but please do not claim it as your own.
You MAY sell the finished product, but please credit Storyland Amis as the designer. If you sell your finished items online I would appreciate it if you’d link back to my blog! You may not mass-produce items made from this pattern. Thank you for your understanding and respect.
Disclaimer: The wool for this project was provided by Claire of Wool Couture, but all opinions expressed are 100% my own! :) This post contains Etsy and Amazon affiliate links.
]]>
Also, please consider buying the kit HERE, and don't forget to use the coupon at checkout.
Please share pictures of your project with me through Instagram, Facebook, or email (storylandamis@gmail.com). I love seeing what you create!
~Holly :)
This pattern is an original design by Storyland Amis. This written pattern is for personal use only. Please do NOT sell or redistribute this pattern in part or in whole. If you wish to share this pattern you may link to this post, but please do not claim it as your own.
You MAY sell the finished product, but please credit Storyland Amis as the designer. If you sell your finished items online I would appreciate it if you’d link back to my blog! You may not mass-produce items made from this pattern. Thank you for your understanding and respect.
Disclaimer: The wool for this project was provided by Claire of Wool Couture, but all opinions expressed are 100% my own! :) This post contains Etsy and Amazon affiliate links.
]]>
 Shortly after I designed my extreme sloth, I was contacted by Claire of Wool Couture who offered to give me all the wool I needed if I would be willing to upsize my Freddy Fox. I, of course, said yes!
Claire sent me three beautiful colors of wool that were unbelievably perfect colors for my fox. She sent me 7 lbs. of the orange and a little over 2 lbs. of both the white and the black. HERE is the wool I received. Altogether, over 11 lbs. of soft, luscious wool! Once finished, Freddy weighed a whopping 10 lbs.! I used a 40mm crochet hook that you can purchase here on Claire's Etsy shop as well. It's still unbelievable to think that they have 50mm and 60mm ones available too! Can you imagine?
It took me quite a while to finally start working on him since I was so afraid that I wouldn't have enough wool to finish him, especially of the orange. But procrastinating won't make yarn magically multiply, so off I went!
The first thing I made was the head. One thing to remember when making amigurumi and working with super chunky yarns is that you must think small if you want to achieve big things! When I made my extreme sloth, I thought that if I used my miniature Zippy Sloth pattern it would work up just fine. But, in reality, I had to downsize the pattern even more so that it wouldn't be ridiculously big and make me broke with the amount of wool I would've had to buy. The same thing happened with the fox. I made a tiny fox prototype out of regular worsted weight yarn, but when I actually got around to making the extreme fox, it became clear to me that I would need to make the head pattern even smaller than I had originally planned. It's the wool and hook size that makes it big, not the stitch count.
Here is the head just before I started the decreases.
Shortly after I designed my extreme sloth, I was contacted by Claire of Wool Couture who offered to give me all the wool I needed if I would be willing to upsize my Freddy Fox. I, of course, said yes!
Claire sent me three beautiful colors of wool that were unbelievably perfect colors for my fox. She sent me 7 lbs. of the orange and a little over 2 lbs. of both the white and the black. HERE is the wool I received. Altogether, over 11 lbs. of soft, luscious wool! Once finished, Freddy weighed a whopping 10 lbs.! I used a 40mm crochet hook that you can purchase here on Claire's Etsy shop as well. It's still unbelievable to think that they have 50mm and 60mm ones available too! Can you imagine?
It took me quite a while to finally start working on him since I was so afraid that I wouldn't have enough wool to finish him, especially of the orange. But procrastinating won't make yarn magically multiply, so off I went!
The first thing I made was the head. One thing to remember when making amigurumi and working with super chunky yarns is that you must think small if you want to achieve big things! When I made my extreme sloth, I thought that if I used my miniature Zippy Sloth pattern it would work up just fine. But, in reality, I had to downsize the pattern even more so that it wouldn't be ridiculously big and make me broke with the amount of wool I would've had to buy. The same thing happened with the fox. I made a tiny fox prototype out of regular worsted weight yarn, but when I actually got around to making the extreme fox, it became clear to me that I would need to make the head pattern even smaller than I had originally planned. It's the wool and hook size that makes it big, not the stitch count.
Here is the head just before I started the decreases.
 Next, I created the muzzle. For his black nose, I took about 8 inches of leftover wool roving, spliced it in two and needle felted it down over the center of the nose with my Clover Amour needle felter.


 This needle felter was a life saver, and although I didn't use it as much with the fox as I did with the sloth, I still couldn't have done it without it. You can buy one here.
 Ears were next, and these were not easy to get right. I wanted to make sure they were proportionally right and I had a hard time finding the appropriate stitch count for them.
Next was the body, then the arms, and finally the tail (which was another difficult challenge).
Here is the finished body. (Later on, I ended up adding one more round to it.)
Ears were next, and these were not easy to get right. I wanted to make sure they were proportionally right and I had a hard time finding the appropriate stitch count for them.
Next was the body, then the arms, and finally the tail (which was another difficult challenge).
Here is the finished body. (Later on, I ended up adding one more round to it.)
 The first thing to go on were the eyes. Once again, I bought 40mm black safety eyes from Stacey's website, Fresh Stitches as they are the perfect size! You can read all about Fresh Stitches here. I knew I wouldn't be able to actually attach the safety eyes using the backings because the head was way too thick to allow for that. So instead, I used this special glue, Speed Sew, specially created for crafts and fabric! You can purchase it here or on Amazon here.
As you can see, I generously applied the glue to the back of the eye. (Warning: This glue smells like a stinky fish!)
The first thing to go on were the eyes. Once again, I bought 40mm black safety eyes from Stacey's website, Fresh Stitches as they are the perfect size! You can read all about Fresh Stitches here. I knew I wouldn't be able to actually attach the safety eyes using the backings because the head was way too thick to allow for that. So instead, I used this special glue, Speed Sew, specially created for crafts and fabric! You can purchase it here or on Amazon here.
As you can see, I generously applied the glue to the back of the eye. (Warning: This glue smells like a stinky fish!)

 I sewed the muzzle on with matching worsted weight yarn (I used acrylic in case you were wondering), making sure not to grab the entire stitch, just a good-sized clump near the bottom. This way it was hardly noticeable that I had used this method at all! I did the same thing for the ears, but I also needle felted them down a bit so that they would look more like a part of the head.


 It was such a privilege to be able to make this extreme fox and I'm so glad I did it! Though I think I'll take a little break before beginning work on any more extreme creations. After exploring one extreme to the other, I definitely prefer the in between! Still, it was an experience that I wouldn't have wanted to miss.
Please be sure and check out Claire's Etsy shop here or her website here as she has some wonderful supplies (and lots of DIY kits) available!
Will YOU be trying extreme crocheting with anything? Maybe bulkier yarns with amigurumi? I'd love to see if you do!
~Holly :)
Disclaimer: The wool for this project was provided by Claire of Wool Couture, but all opinions expressed are 100% my own! :) ]]>
It was such a privilege to be able to make this extreme fox and I'm so glad I did it! Though I think I'll take a little break before beginning work on any more extreme creations. After exploring one extreme to the other, I definitely prefer the in between! Still, it was an experience that I wouldn't have wanted to miss.
Please be sure and check out Claire's Etsy shop here or her website here as she has some wonderful supplies (and lots of DIY kits) available!
Will YOU be trying extreme crocheting with anything? Maybe bulkier yarns with amigurumi? I'd love to see if you do!
~Holly :)
Disclaimer: The wool for this project was provided by Claire of Wool Couture, but all opinions expressed are 100% my own! :) ]]>
 The wool came tightly packaged up in plastic.
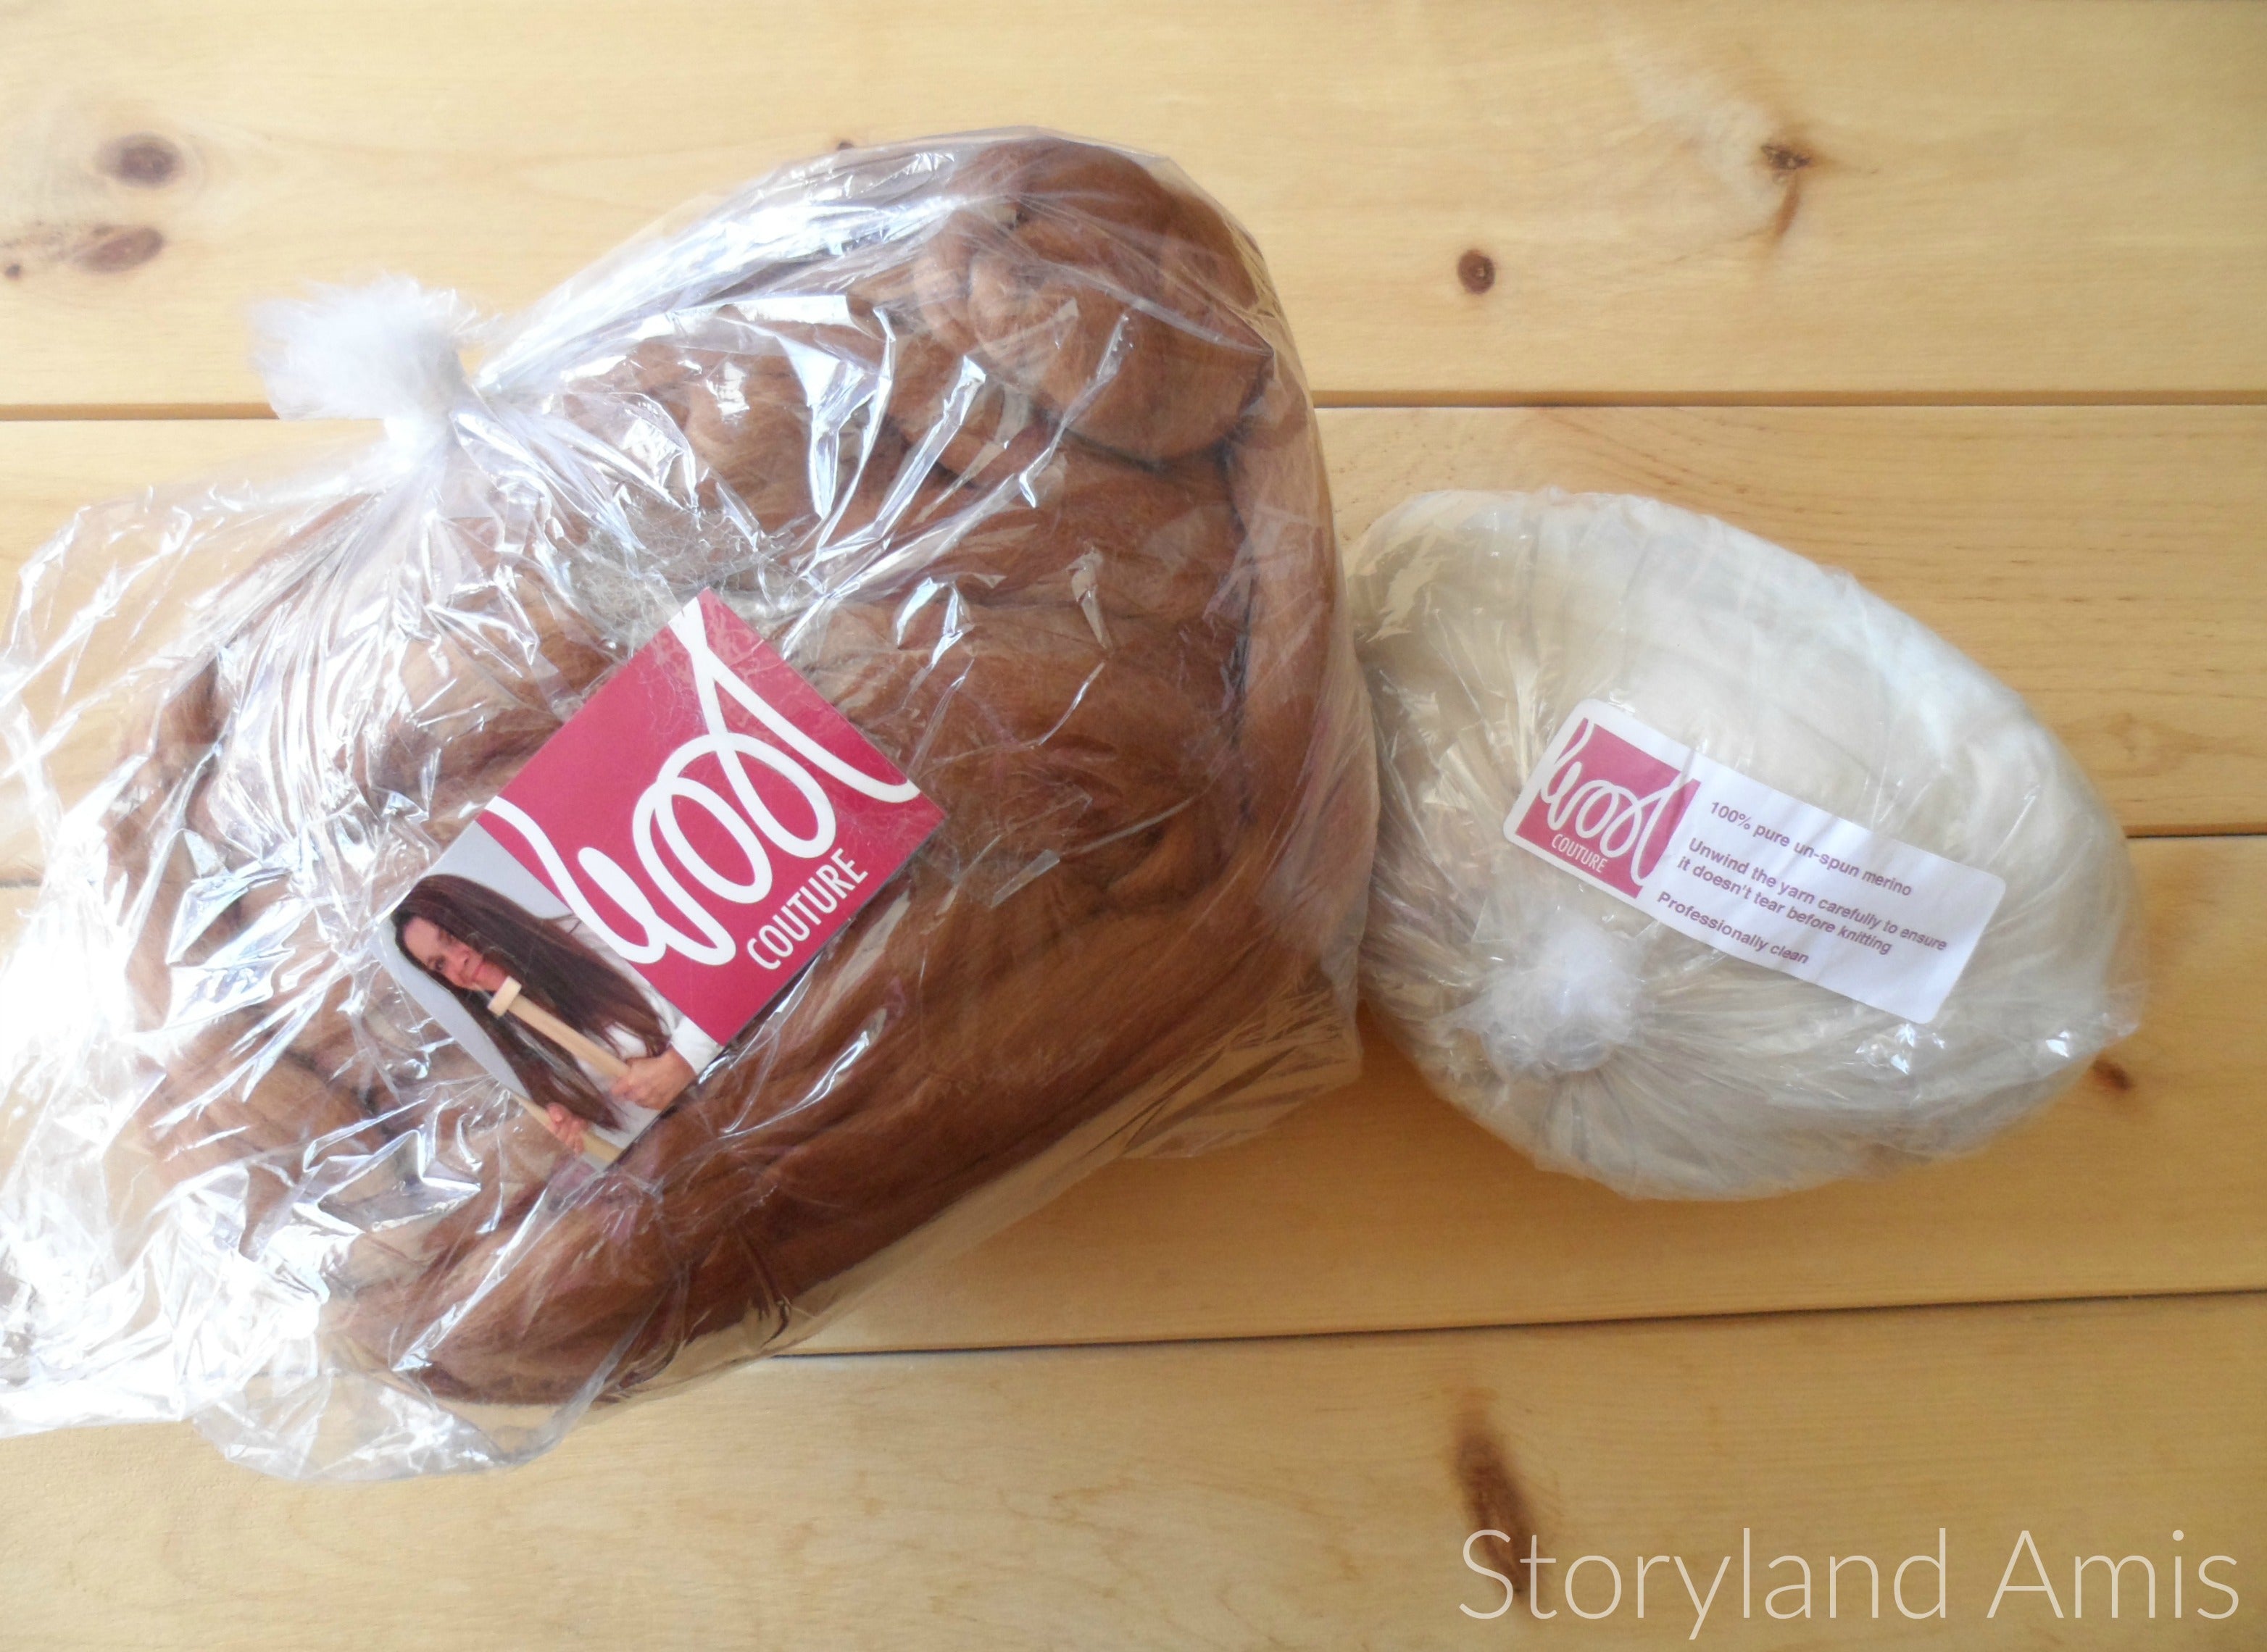 It's so soft and luxurious!
 You almost forget how to crochet when you first start working with it because each step is so deliberate. It's not a mindless, repetitious action like crocheting normally is. And it's actually exhausting if you do too much of it at a time!
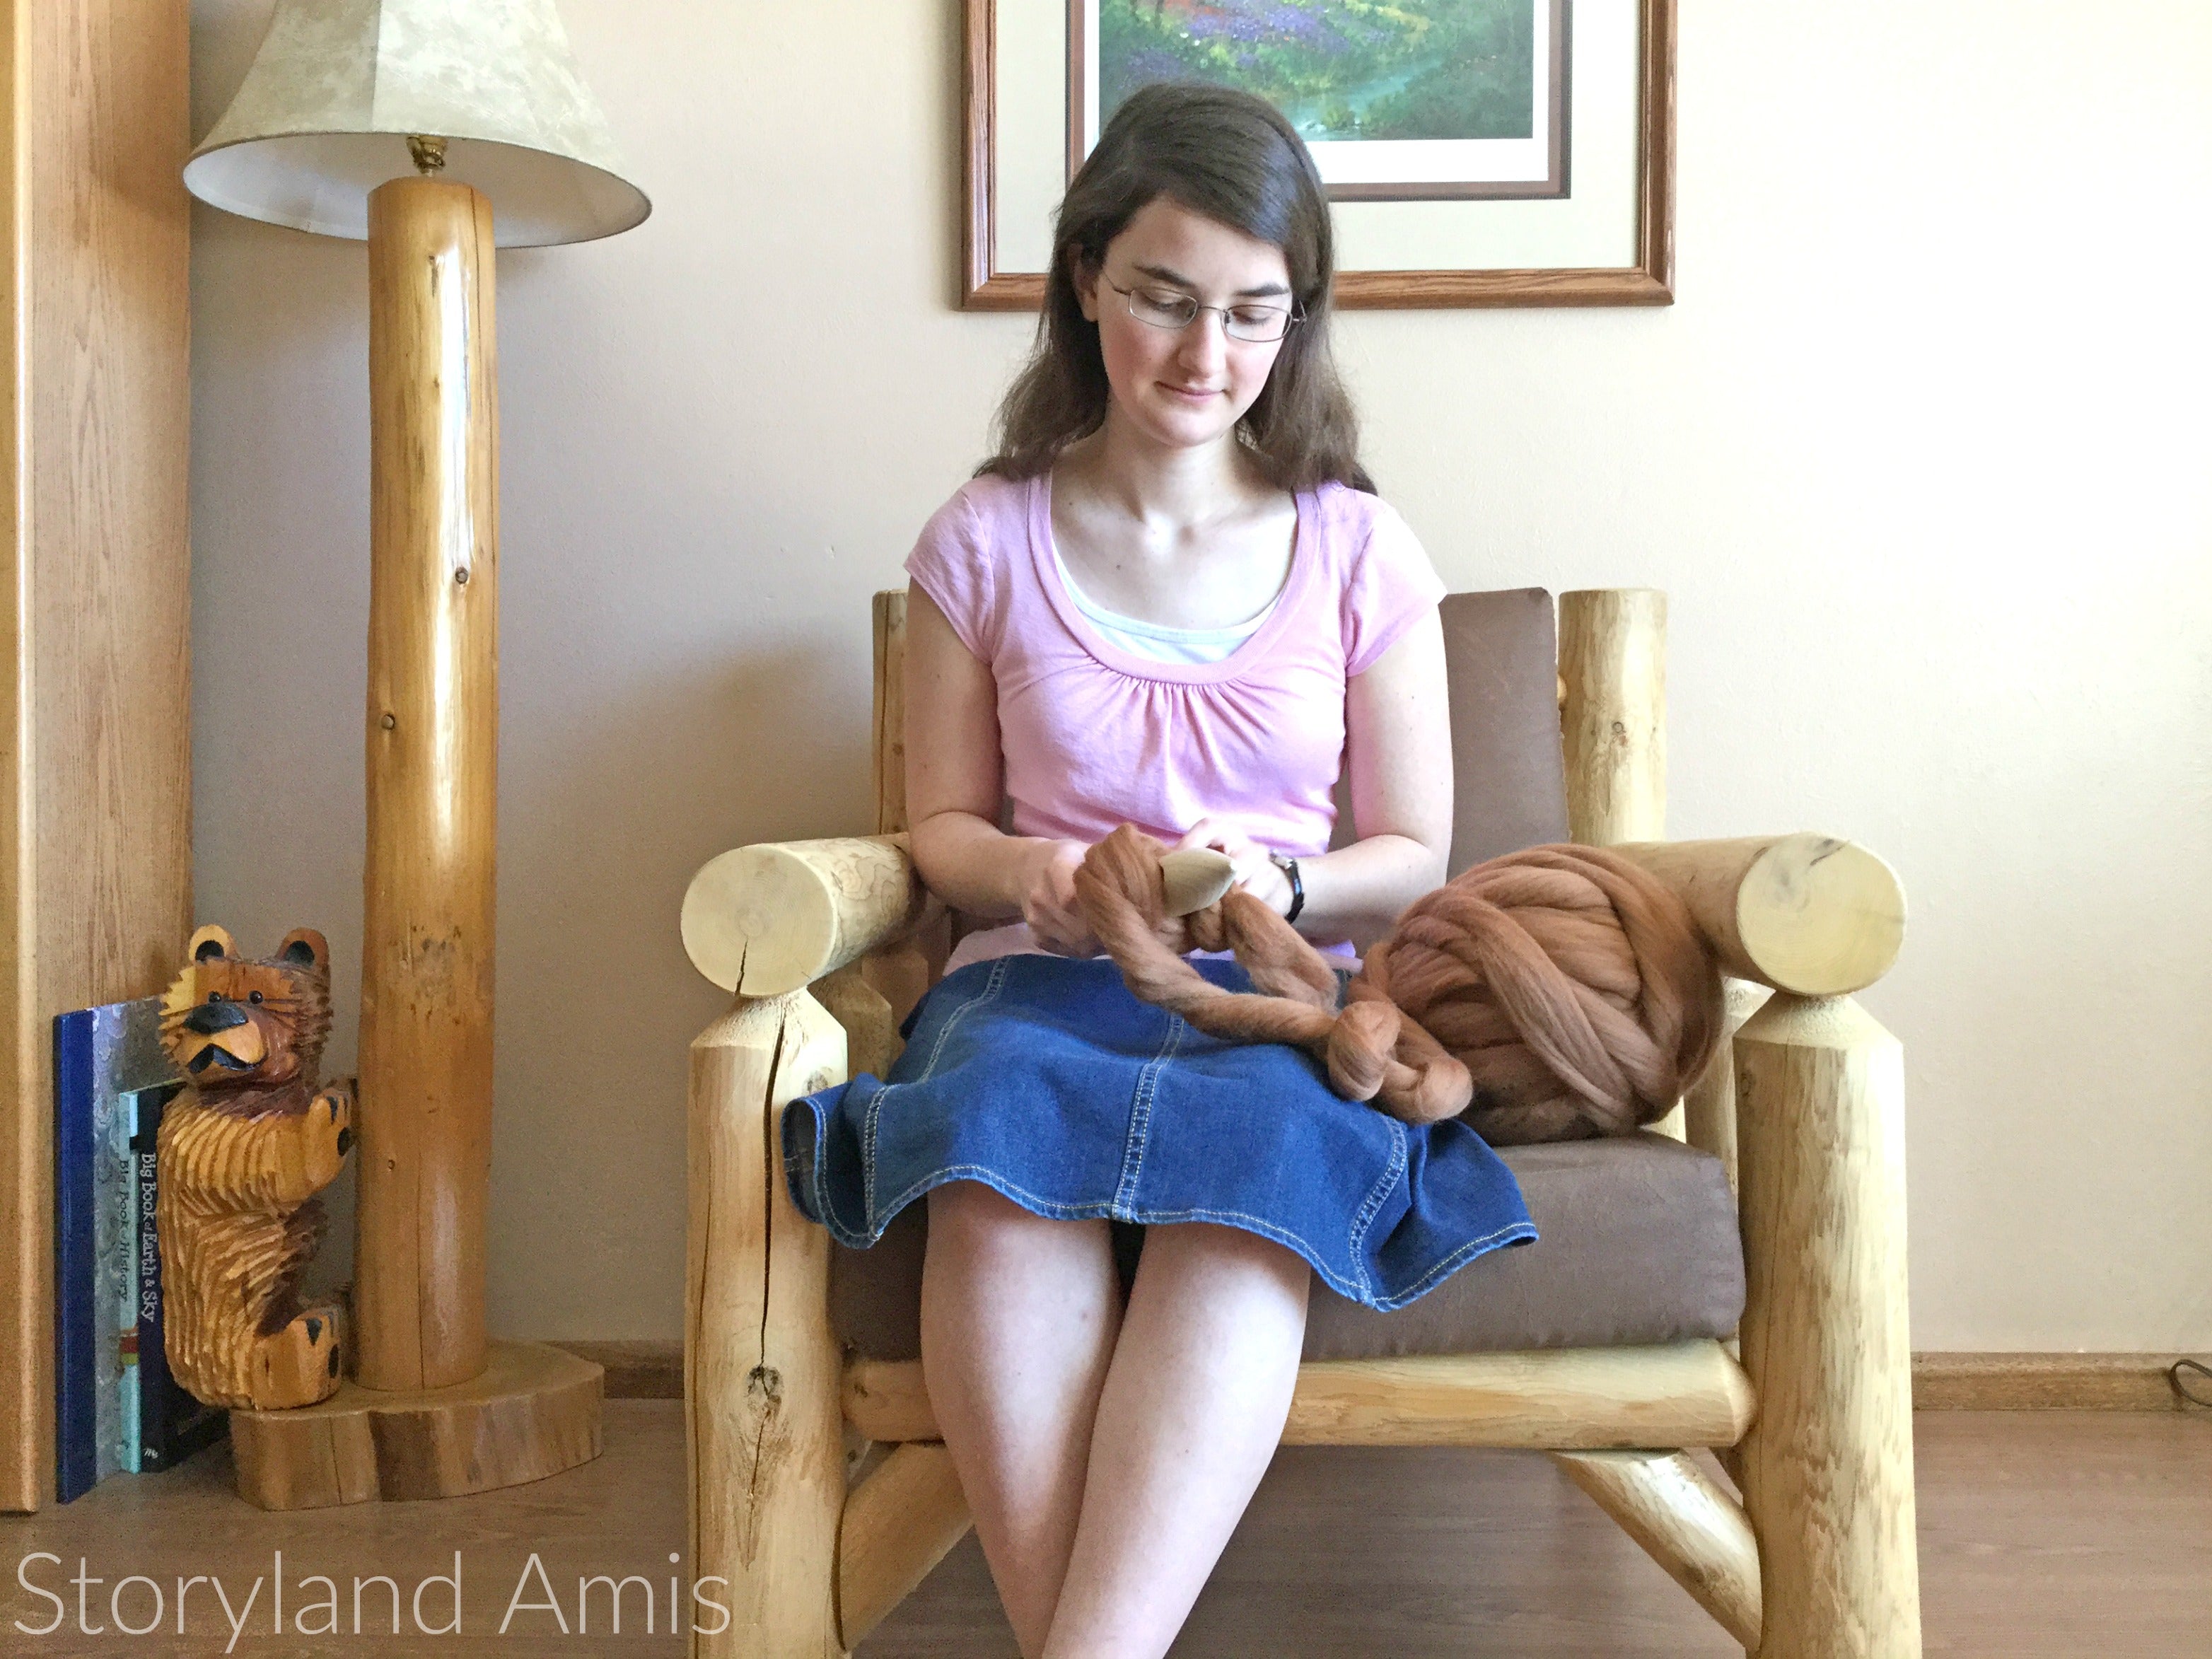 When I posted pictures of my finished extreme sloth on my social media accounts everyone wanted to know how long it took me to make. I think that most people were thinking that it must have taken me forever because of the huge size! But using a crochet hook and "yarn" this big makes for a very quick project because it works up really quickly. I actually just used the same pattern I used for my miniature Zippy the Baby Sloth to make this giant sloth (with some slight modifications). But because the yarn and hook are so big, it, of course, comes out very large. In any case, if I was to calculate the time it took me to make him from start to finish (assuming there were no breaks), it would be around 5-6 hours.
I also got a lot of people asking me what I stuffed him with. Actually, I just used PolyFill. Hehe, if I ever did this again I don't think I would do that. I think a pillow form would be a better option, at least for the head.
Here's some of the mess I was making during this time. You can see my cuddle-sized Zippy Sloth to the right side of the sofa!
When I posted pictures of my finished extreme sloth on my social media accounts everyone wanted to know how long it took me to make. I think that most people were thinking that it must have taken me forever because of the huge size! But using a crochet hook and "yarn" this big makes for a very quick project because it works up really quickly. I actually just used the same pattern I used for my miniature Zippy the Baby Sloth to make this giant sloth (with some slight modifications). But because the yarn and hook are so big, it, of course, comes out very large. In any case, if I was to calculate the time it took me to make him from start to finish (assuming there were no breaks), it would be around 5-6 hours.
I also got a lot of people asking me what I stuffed him with. Actually, I just used PolyFill. Hehe, if I ever did this again I don't think I would do that. I think a pillow form would be a better option, at least for the head.
Here's some of the mess I was making during this time. You can see my cuddle-sized Zippy Sloth to the right side of the sofa!
 After finishing the crocheting part, it was time to add the eyes and the nose. I wanted my sloth to look as much like an amigurumi as possible and that meant I didn't really want to have to use buttons or felt for his eyes. So naturally, I was thrilled when I found out that Stacey Trock of Fresh Stitches sells 40mm safety eyes here! Have you ever seen such huge eyes!
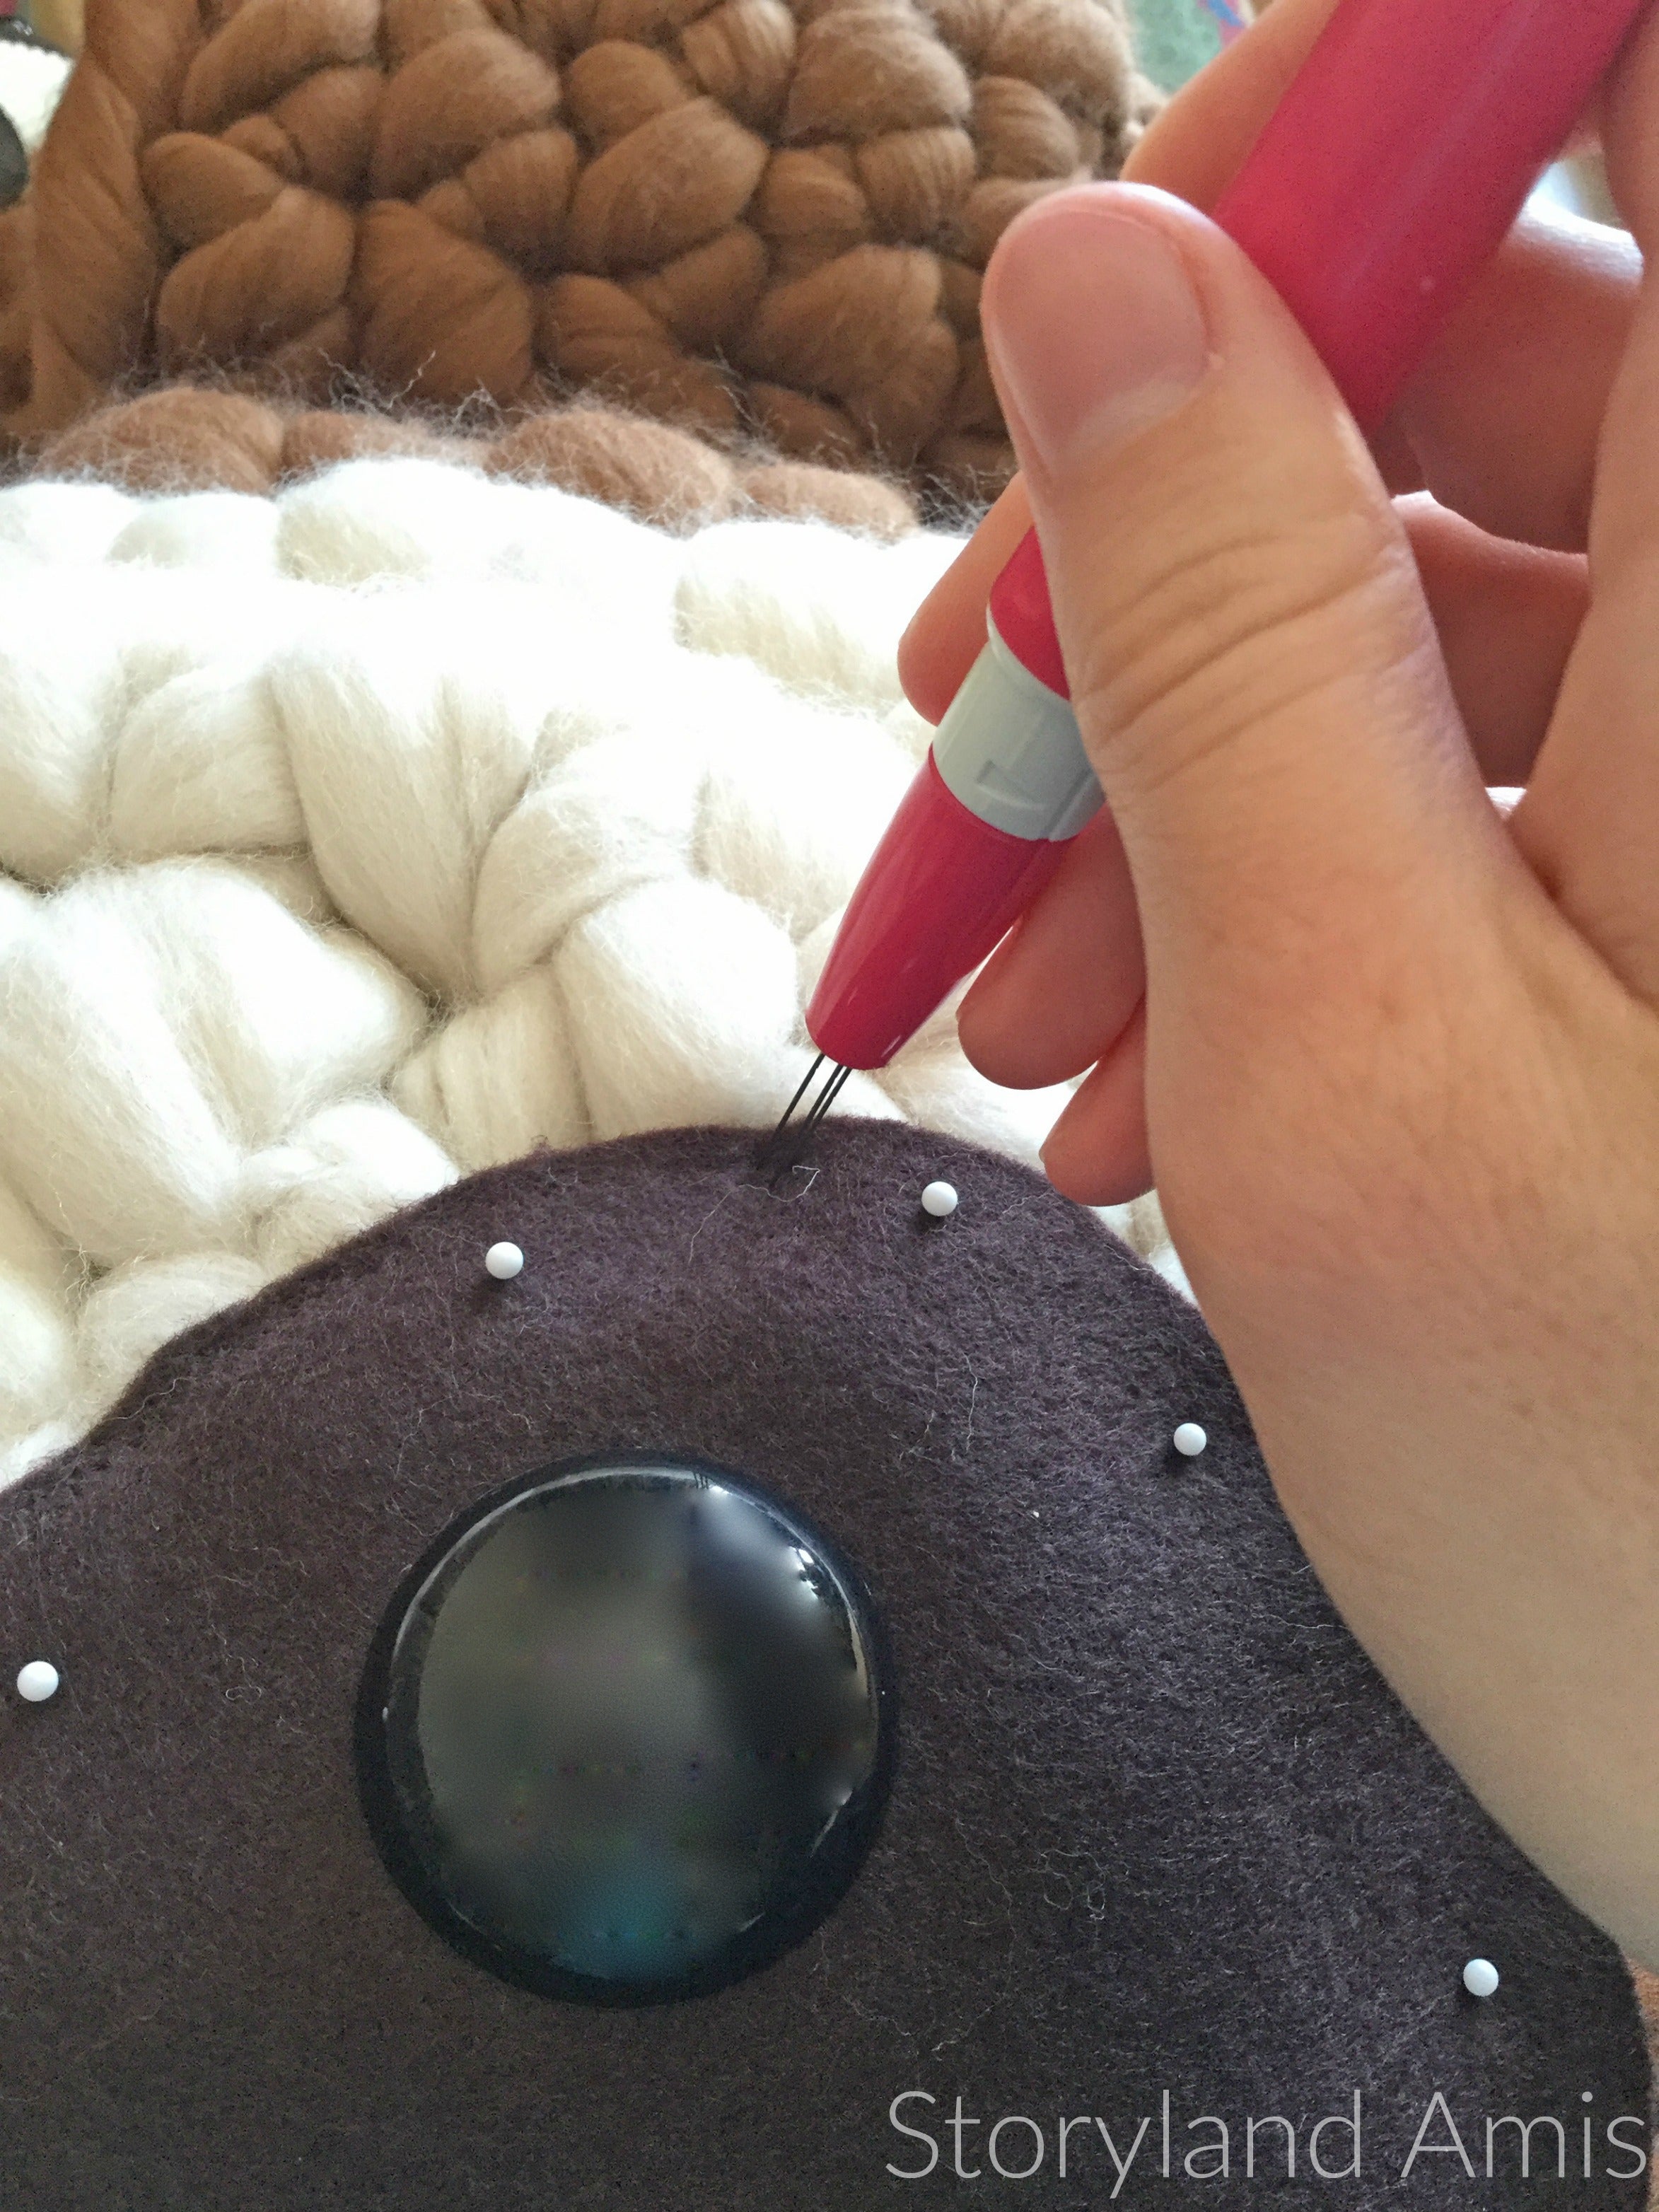 I purchased some 100% wool felt from Felt on the Fly to use for the backings on his eyes. I cut out large ovals and then attached the safety eyes to the felt. It would have been impossible to attach them to the head because of the thickness, that's why I could finish the head and stuff it before doing the eyes. Since Zippy is made entirely out of wool (except for the stuffing), I was able to needle felt the felt onto the head instead of having to sew it on. This worked out great! I used my Clover Amour needle felting tool that I bought on Amazon here. This is actually how I attached all the body parts together. I'm no expert on wool or needle felting, so if there's a better way to do it, I haven't heard of it yet. Anyway, it worked for me, although it did take some time. I used some black wool yarn for his nose and felted that down as well.
I was proud of my little needle felting tool for not breaking during all the heavy felting.
I purchased some 100% wool felt from Felt on the Fly to use for the backings on his eyes. I cut out large ovals and then attached the safety eyes to the felt. It would have been impossible to attach them to the head because of the thickness, that's why I could finish the head and stuff it before doing the eyes. Since Zippy is made entirely out of wool (except for the stuffing), I was able to needle felt the felt onto the head instead of having to sew it on. This worked out great! I used my Clover Amour needle felting tool that I bought on Amazon here. This is actually how I attached all the body parts together. I'm no expert on wool or needle felting, so if there's a better way to do it, I haven't heard of it yet. Anyway, it worked for me, although it did take some time. I used some black wool yarn for his nose and felted that down as well.
I was proud of my little needle felting tool for not breaking during all the heavy felting.
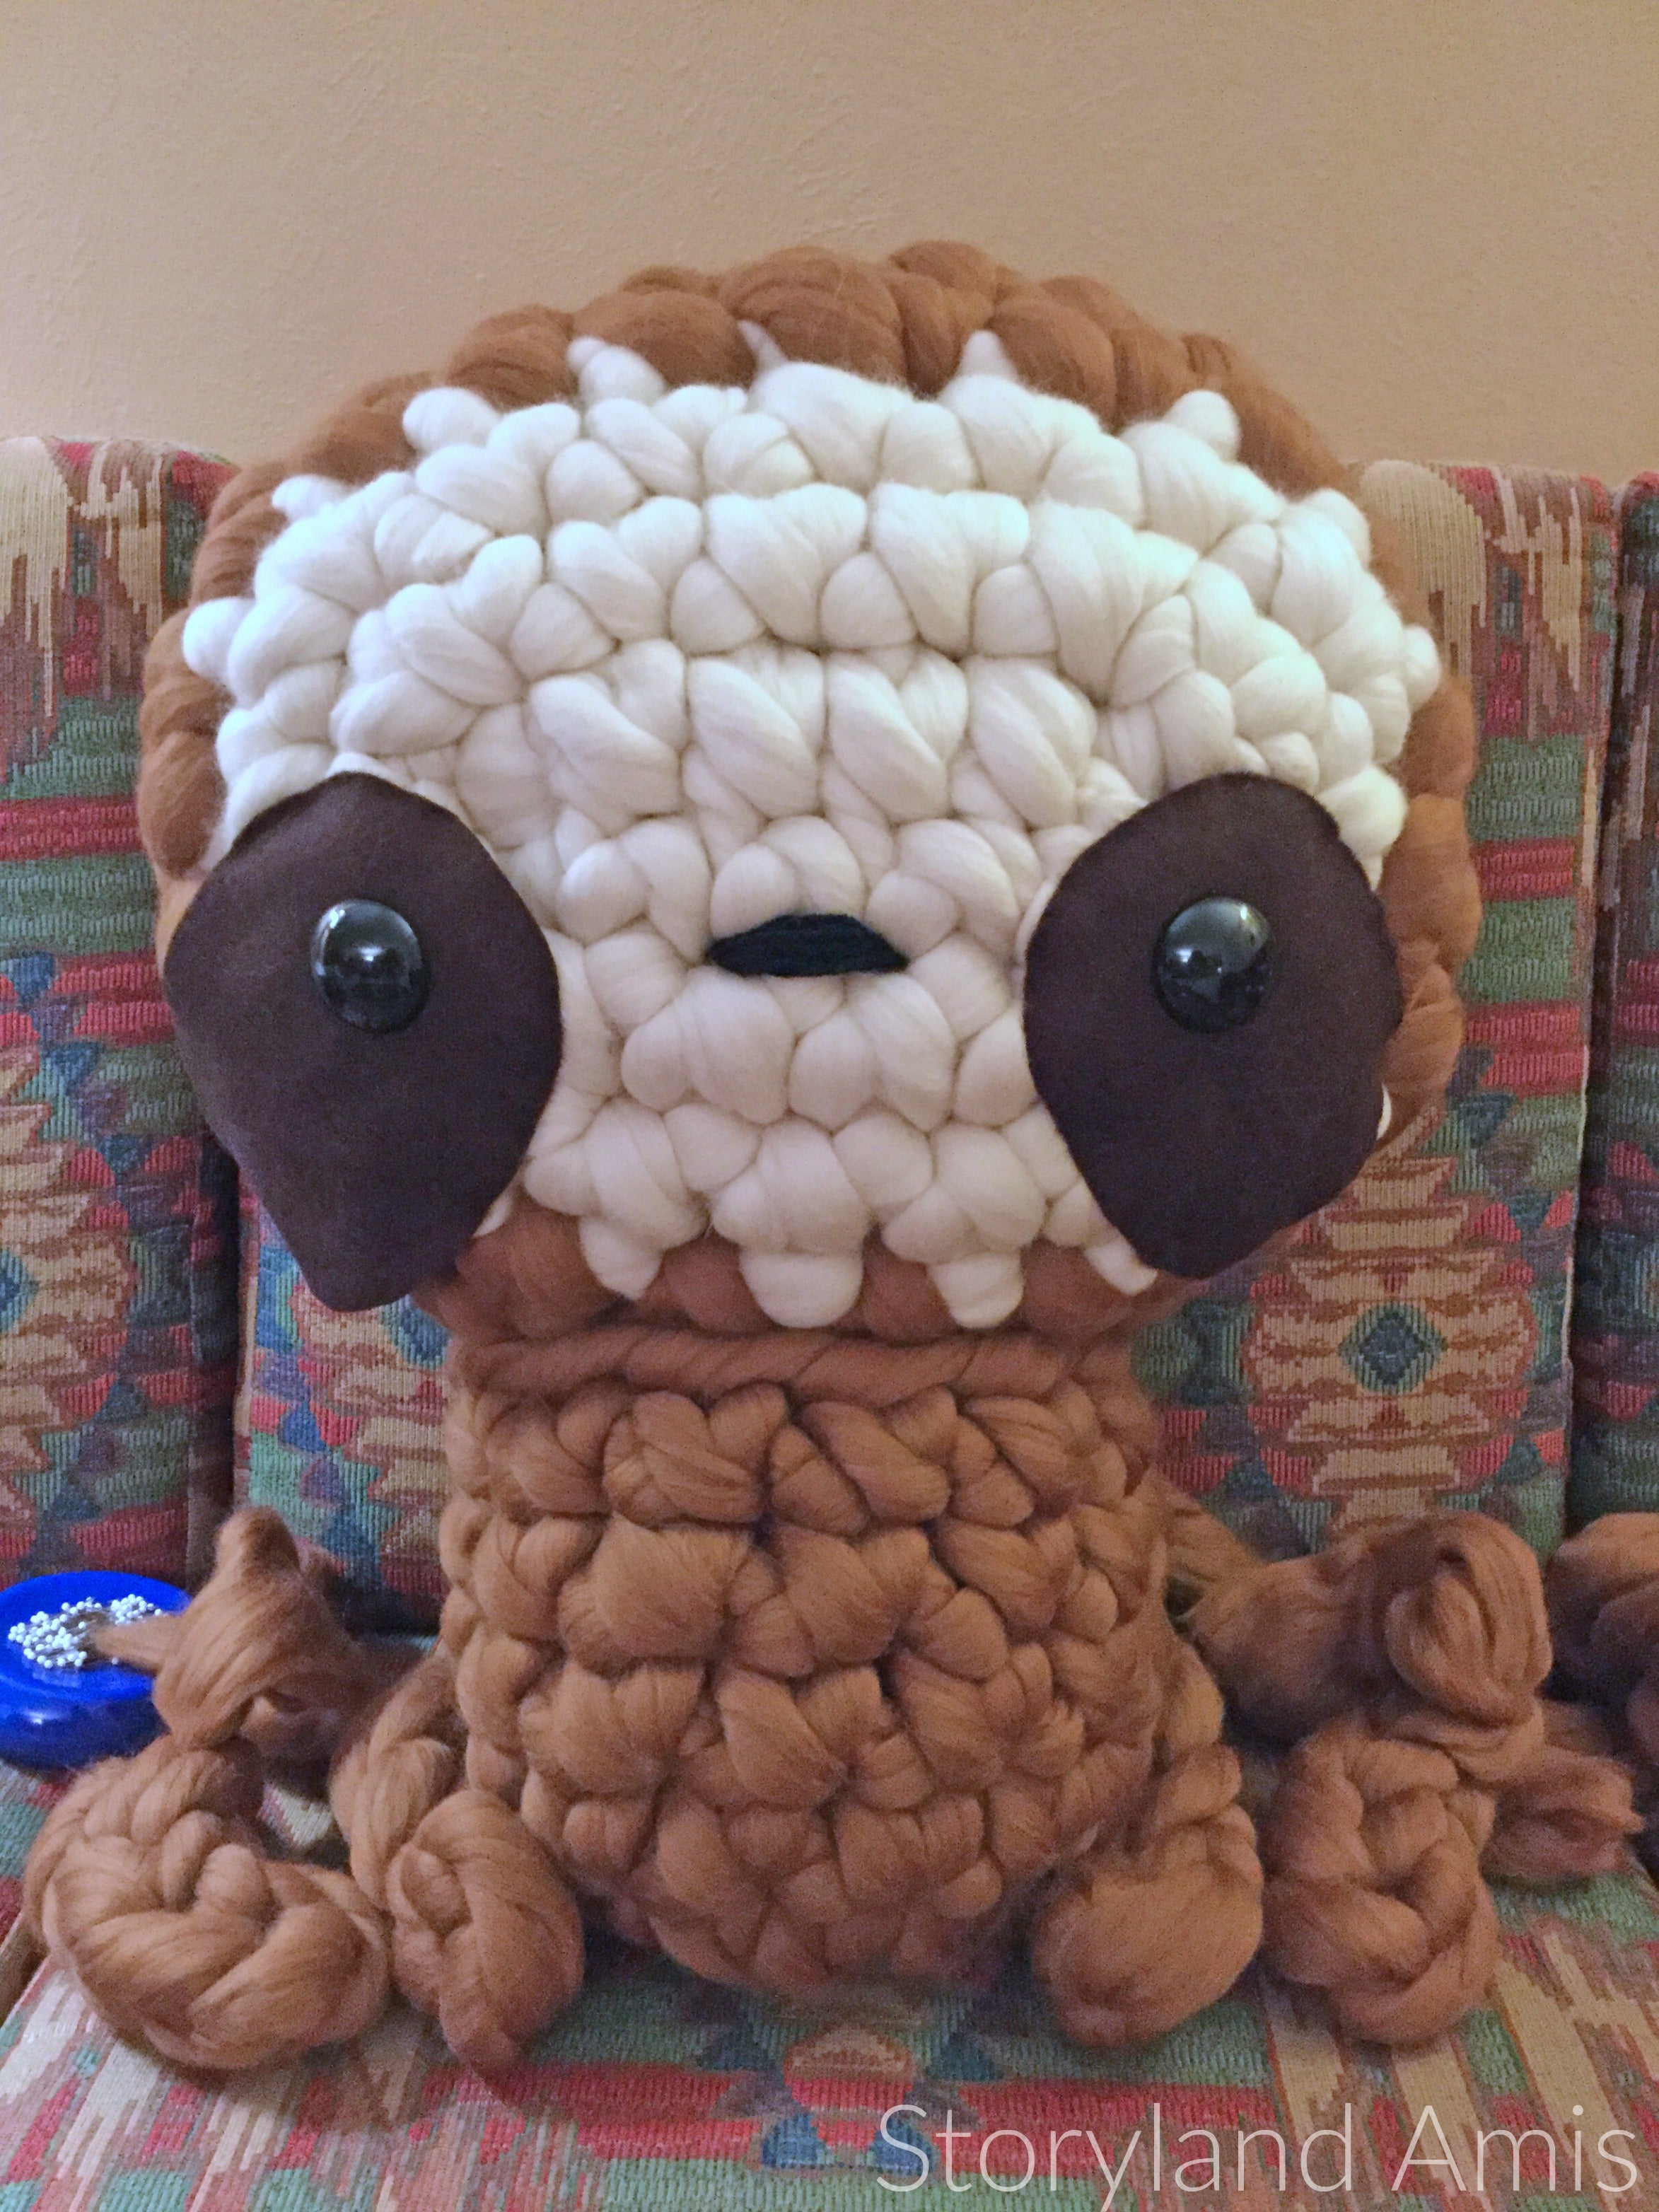 After needle felting all his body parts together, he was finished!
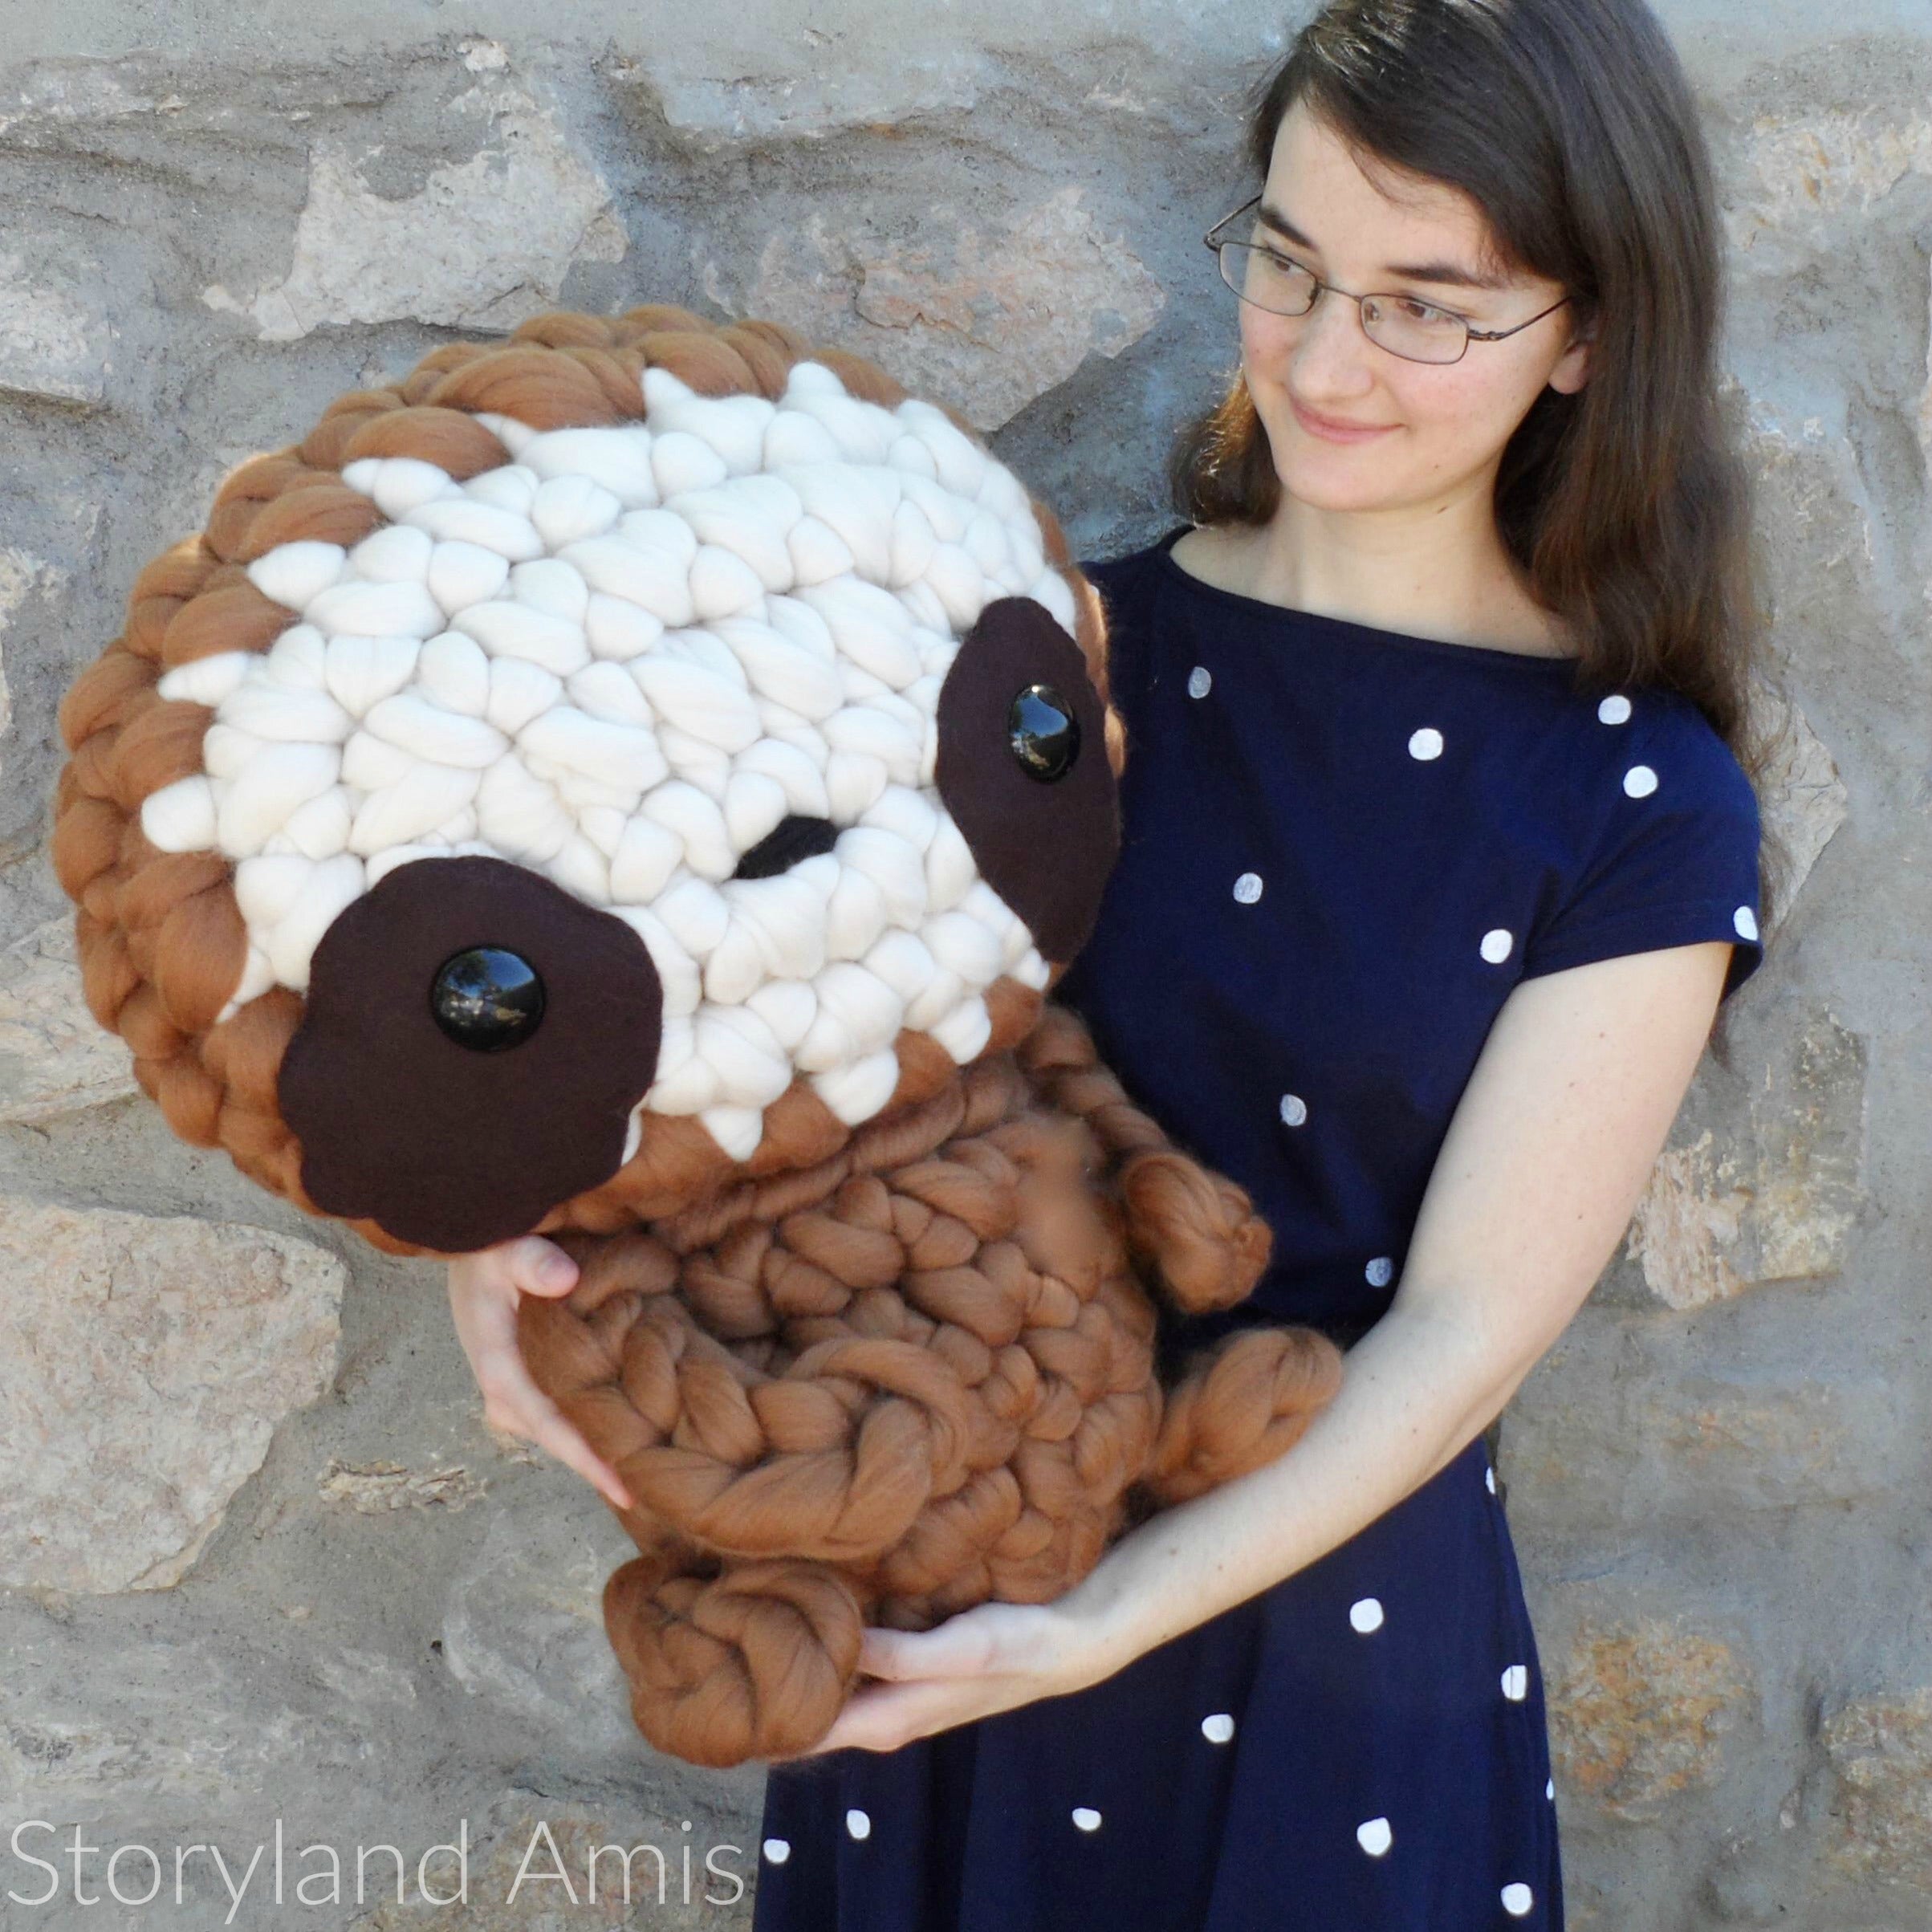 As someone said, "Sloth hugs for days!" He's certainly cuddly and huggable! But you don't want to be standing up holding him for long. This "little" guy is two feet tall and weighs around 7 pounds! I know, right!

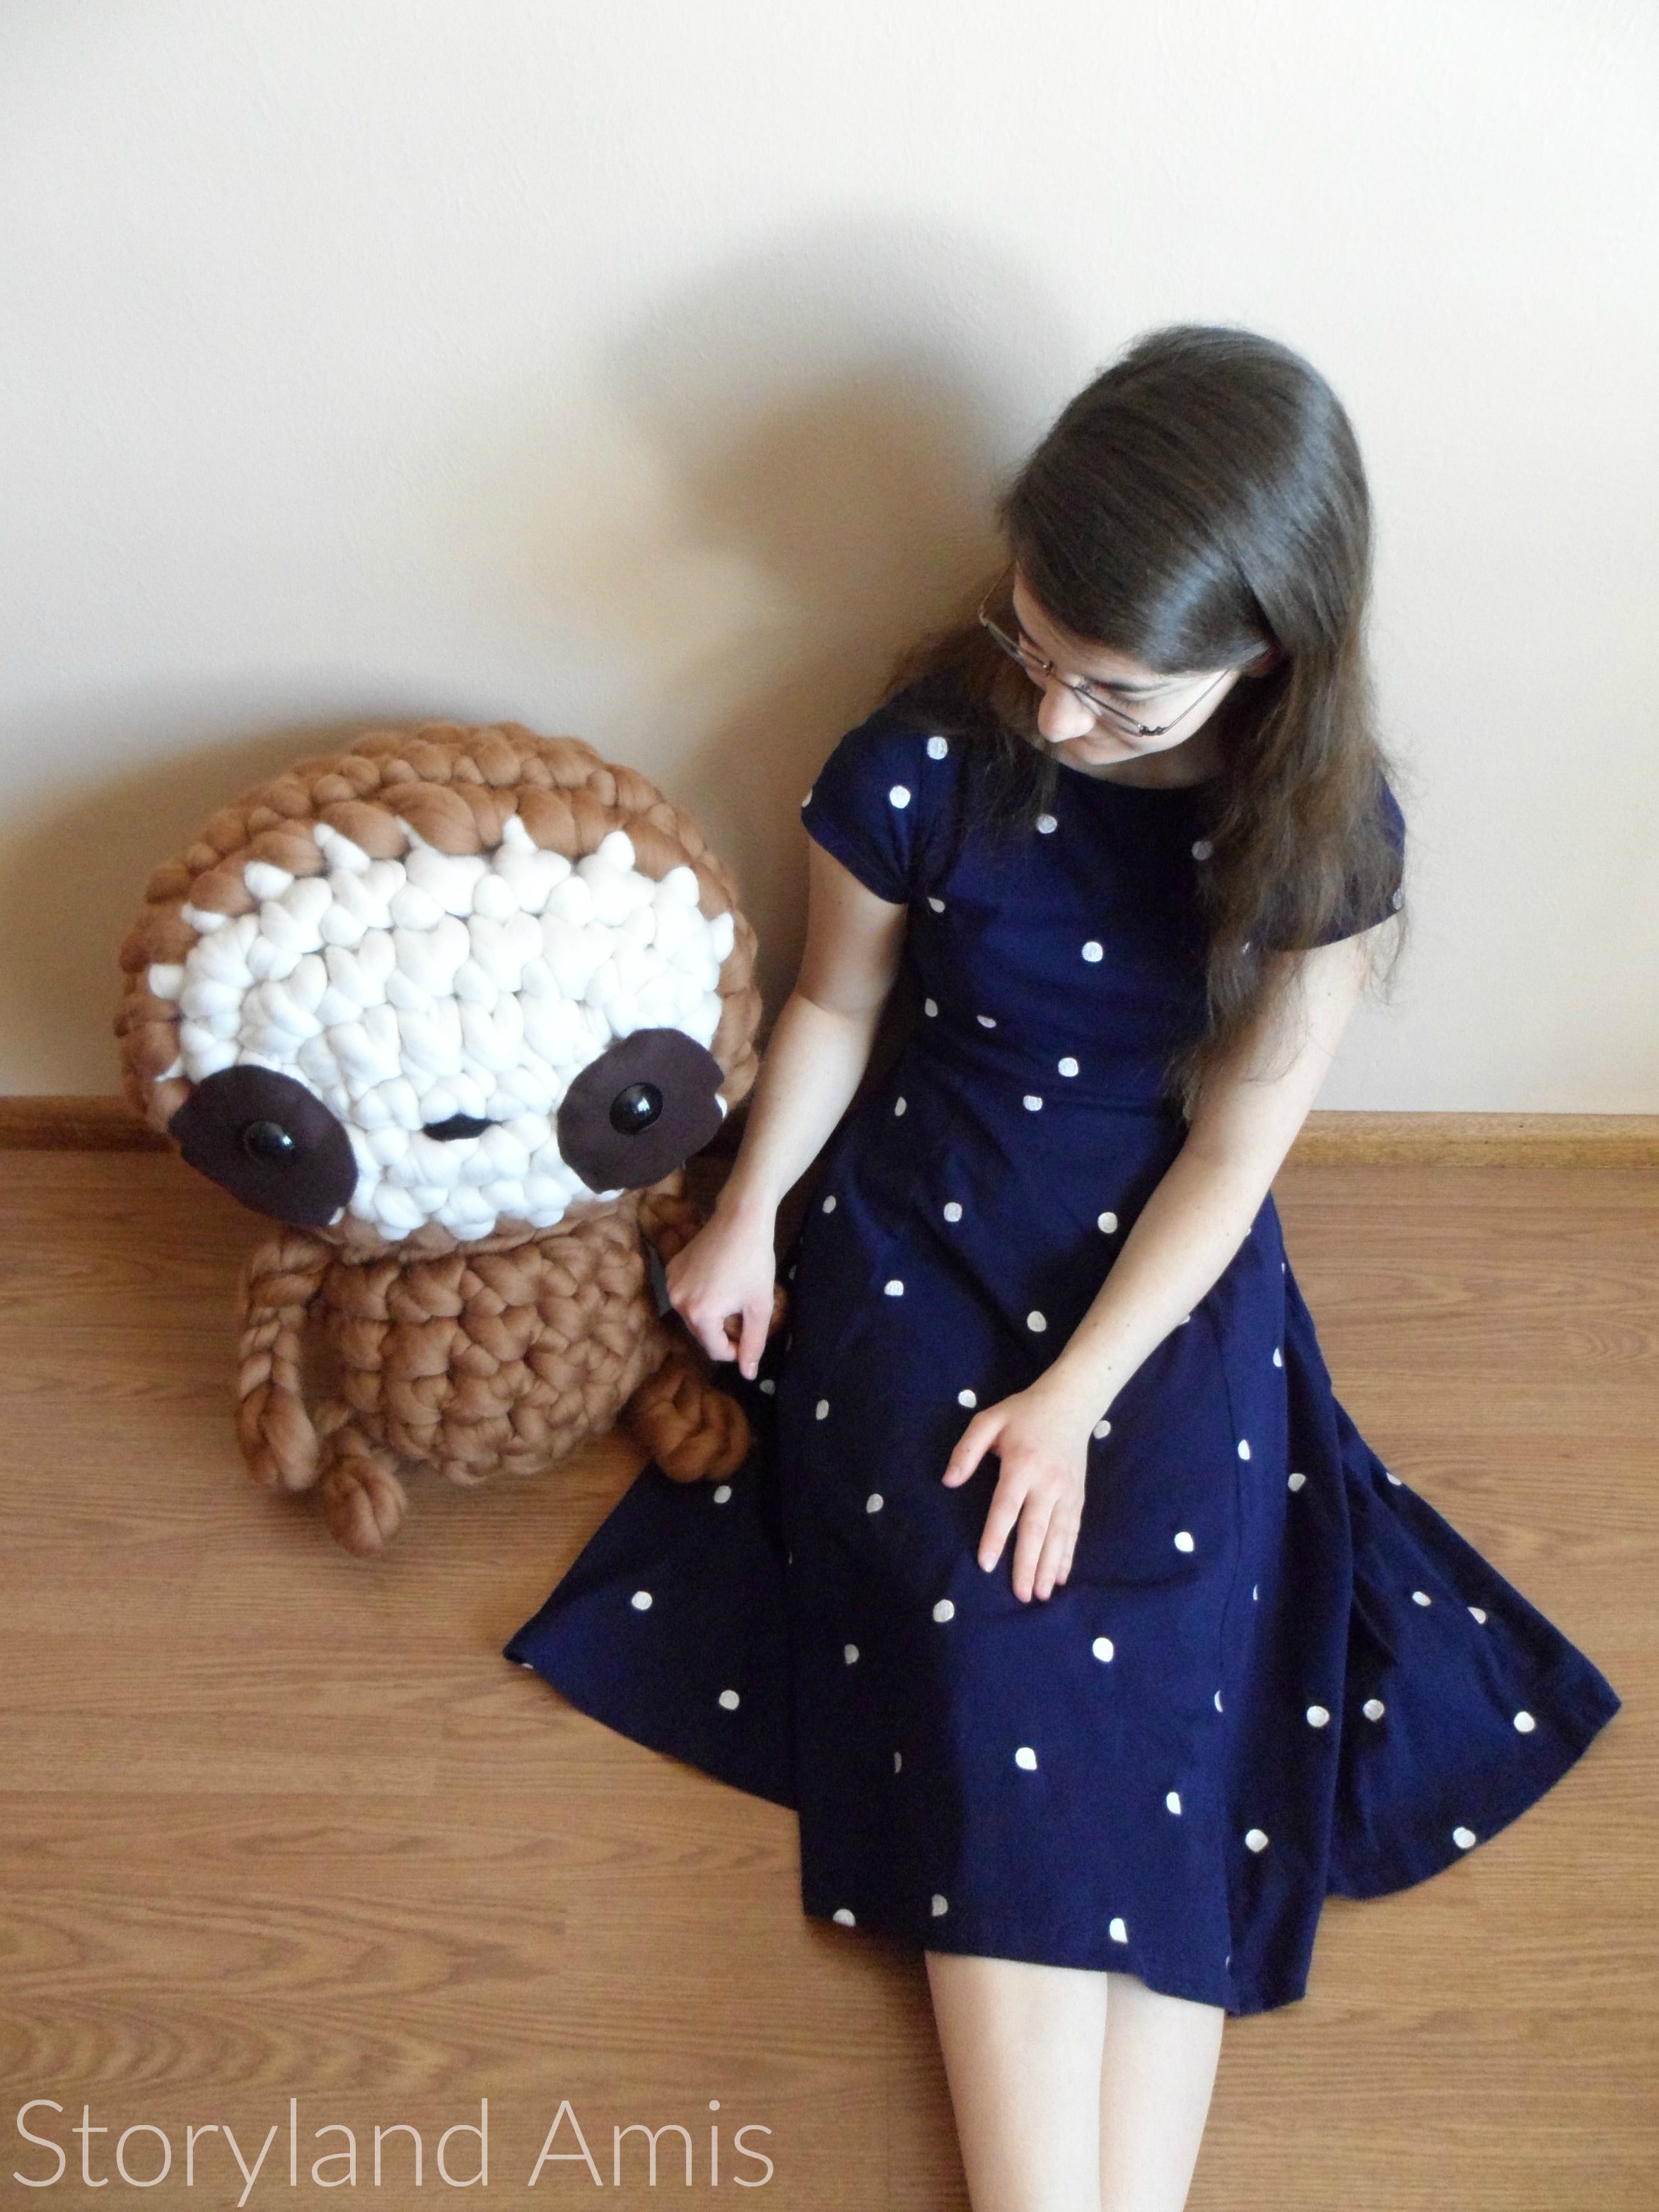 And last but not least, here are Jumbo Zippy, Cuddle-sized Zippy, and Baby Zippy!
 So would I do this again? Probably not, just because it was so expensive. I'm definitely going to be trying out some chunkier amigurumi in the future though, even if they're not so extreme! It was an amazing experience though, and I'm so glad I did it!
What about you? Are YOU going to try extreme amigurumi? I hope you do!
~Holly :)]]>
So would I do this again? Probably not, just because it was so expensive. I'm definitely going to be trying out some chunkier amigurumi in the future though, even if they're not so extreme! It was an amazing experience though, and I'm so glad I did it!
What about you? Are YOU going to try extreme amigurumi? I hope you do!
~Holly :)]]>


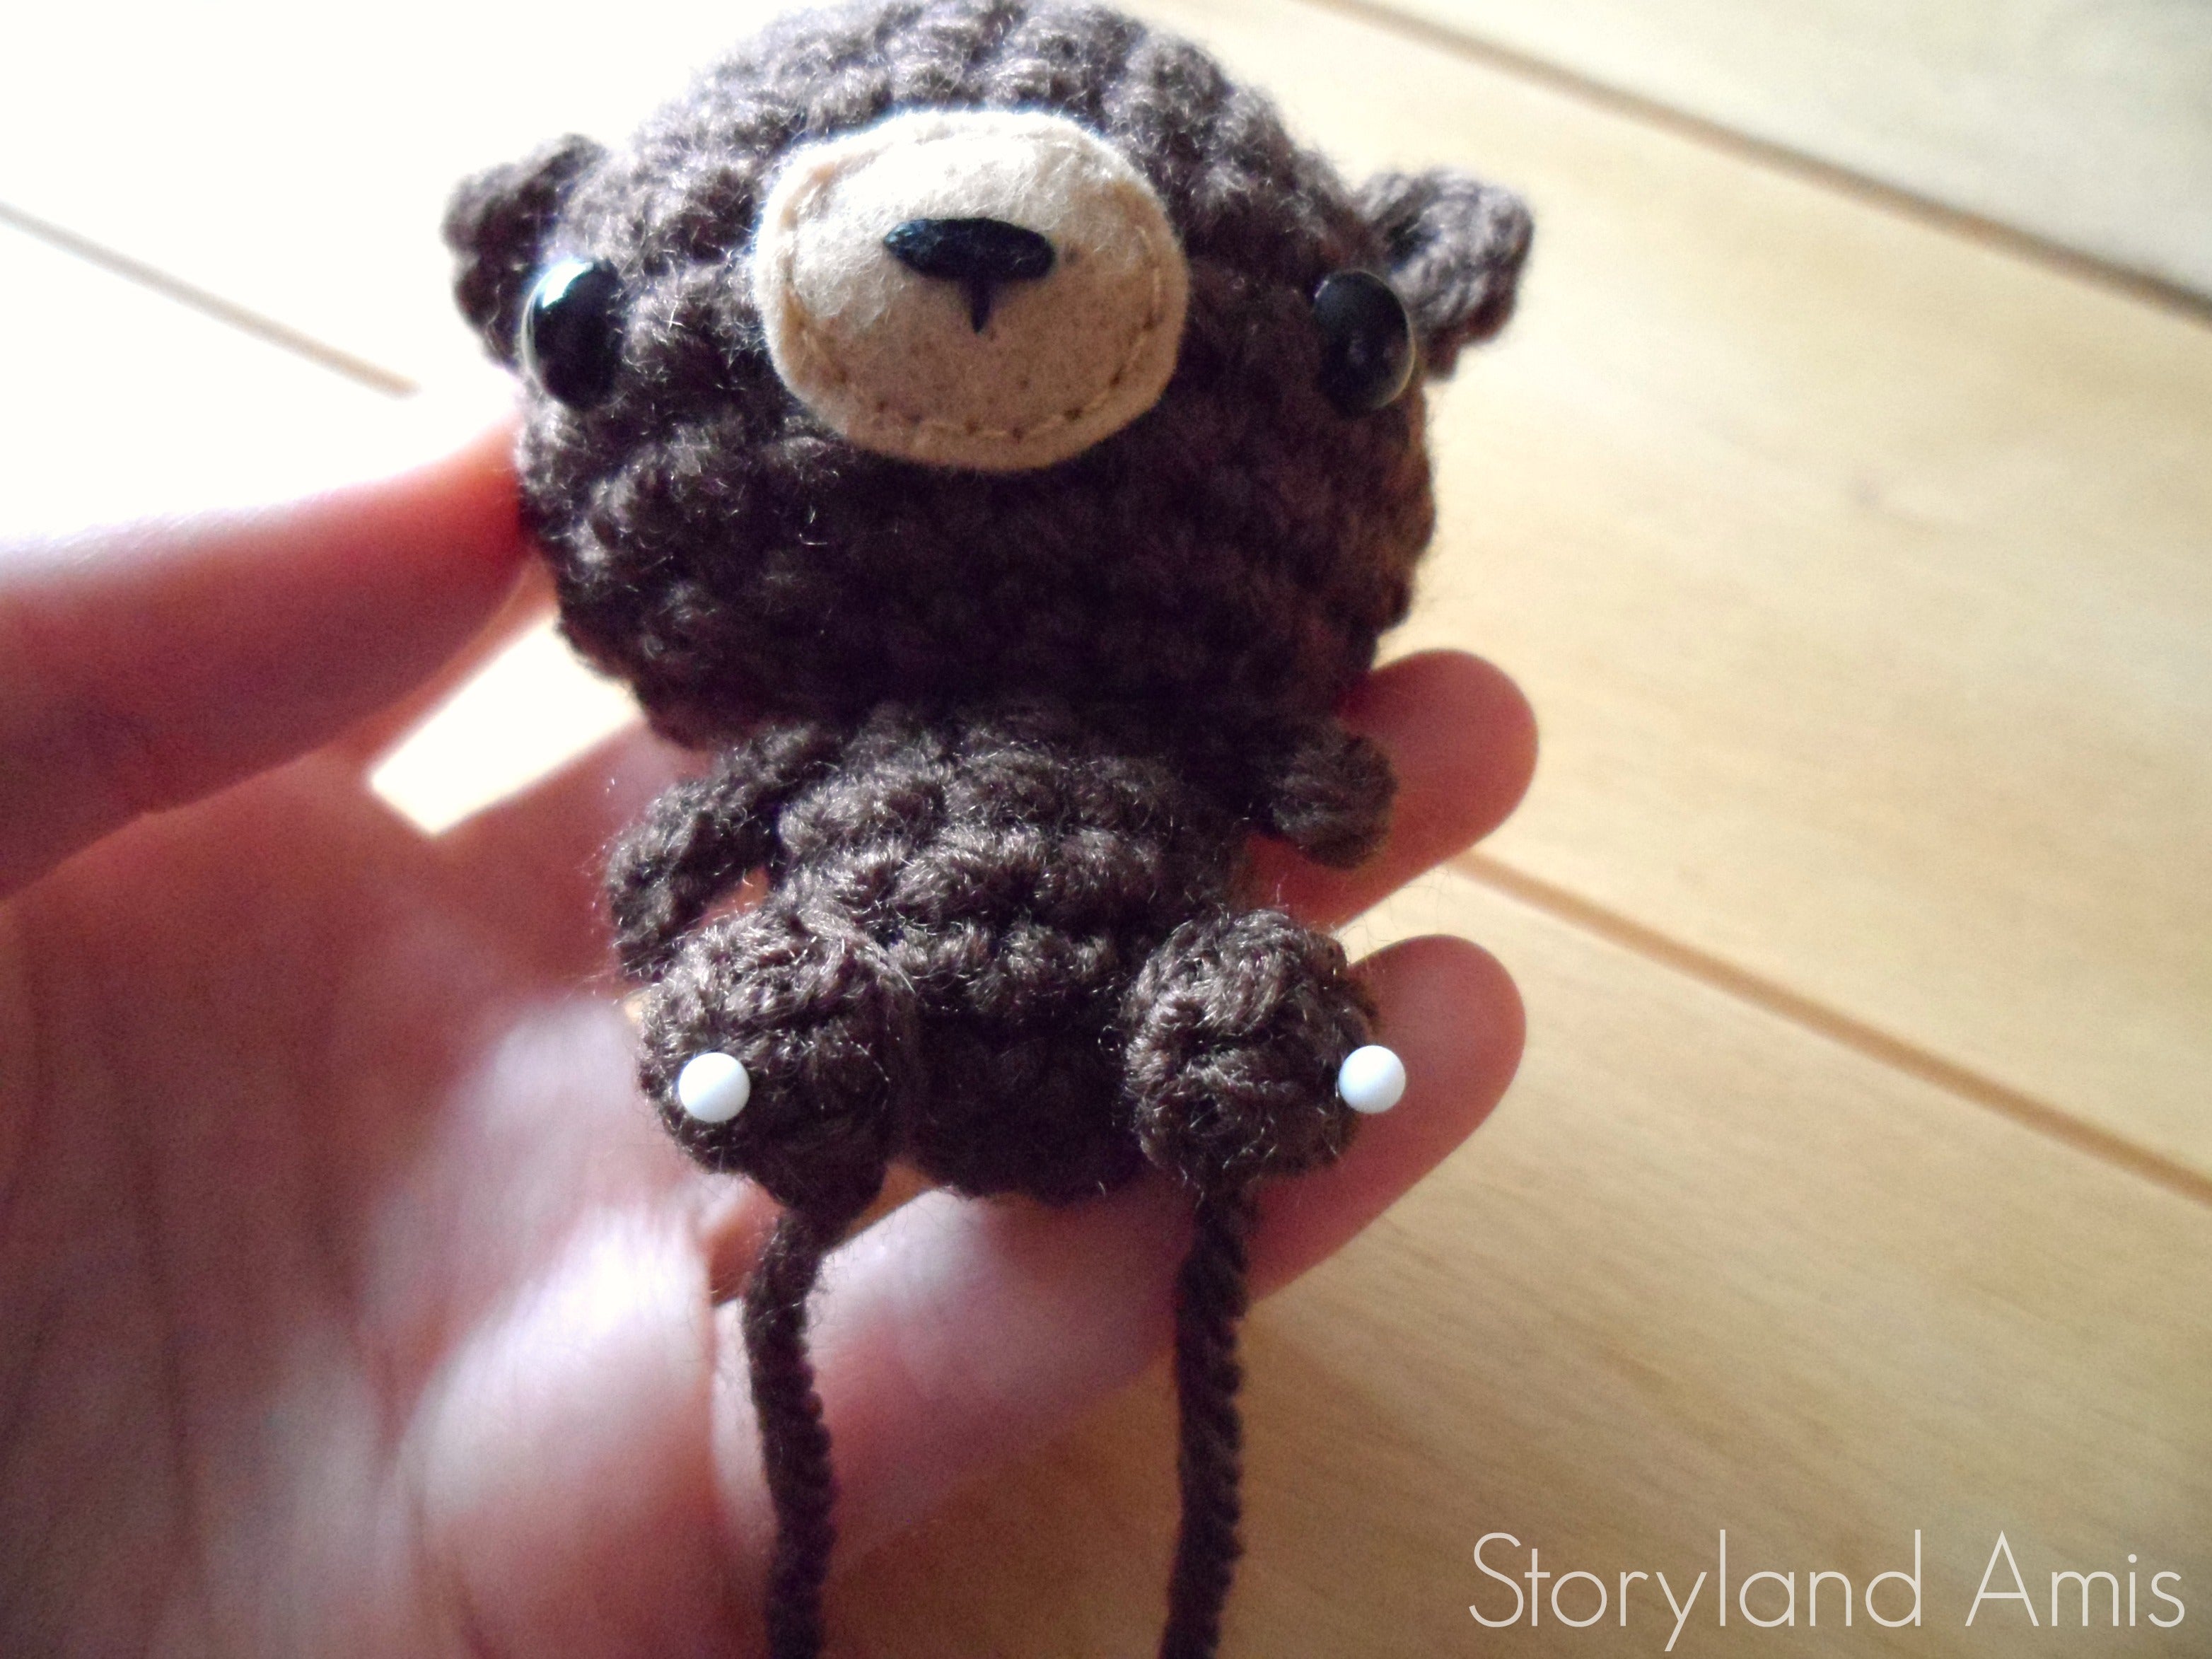
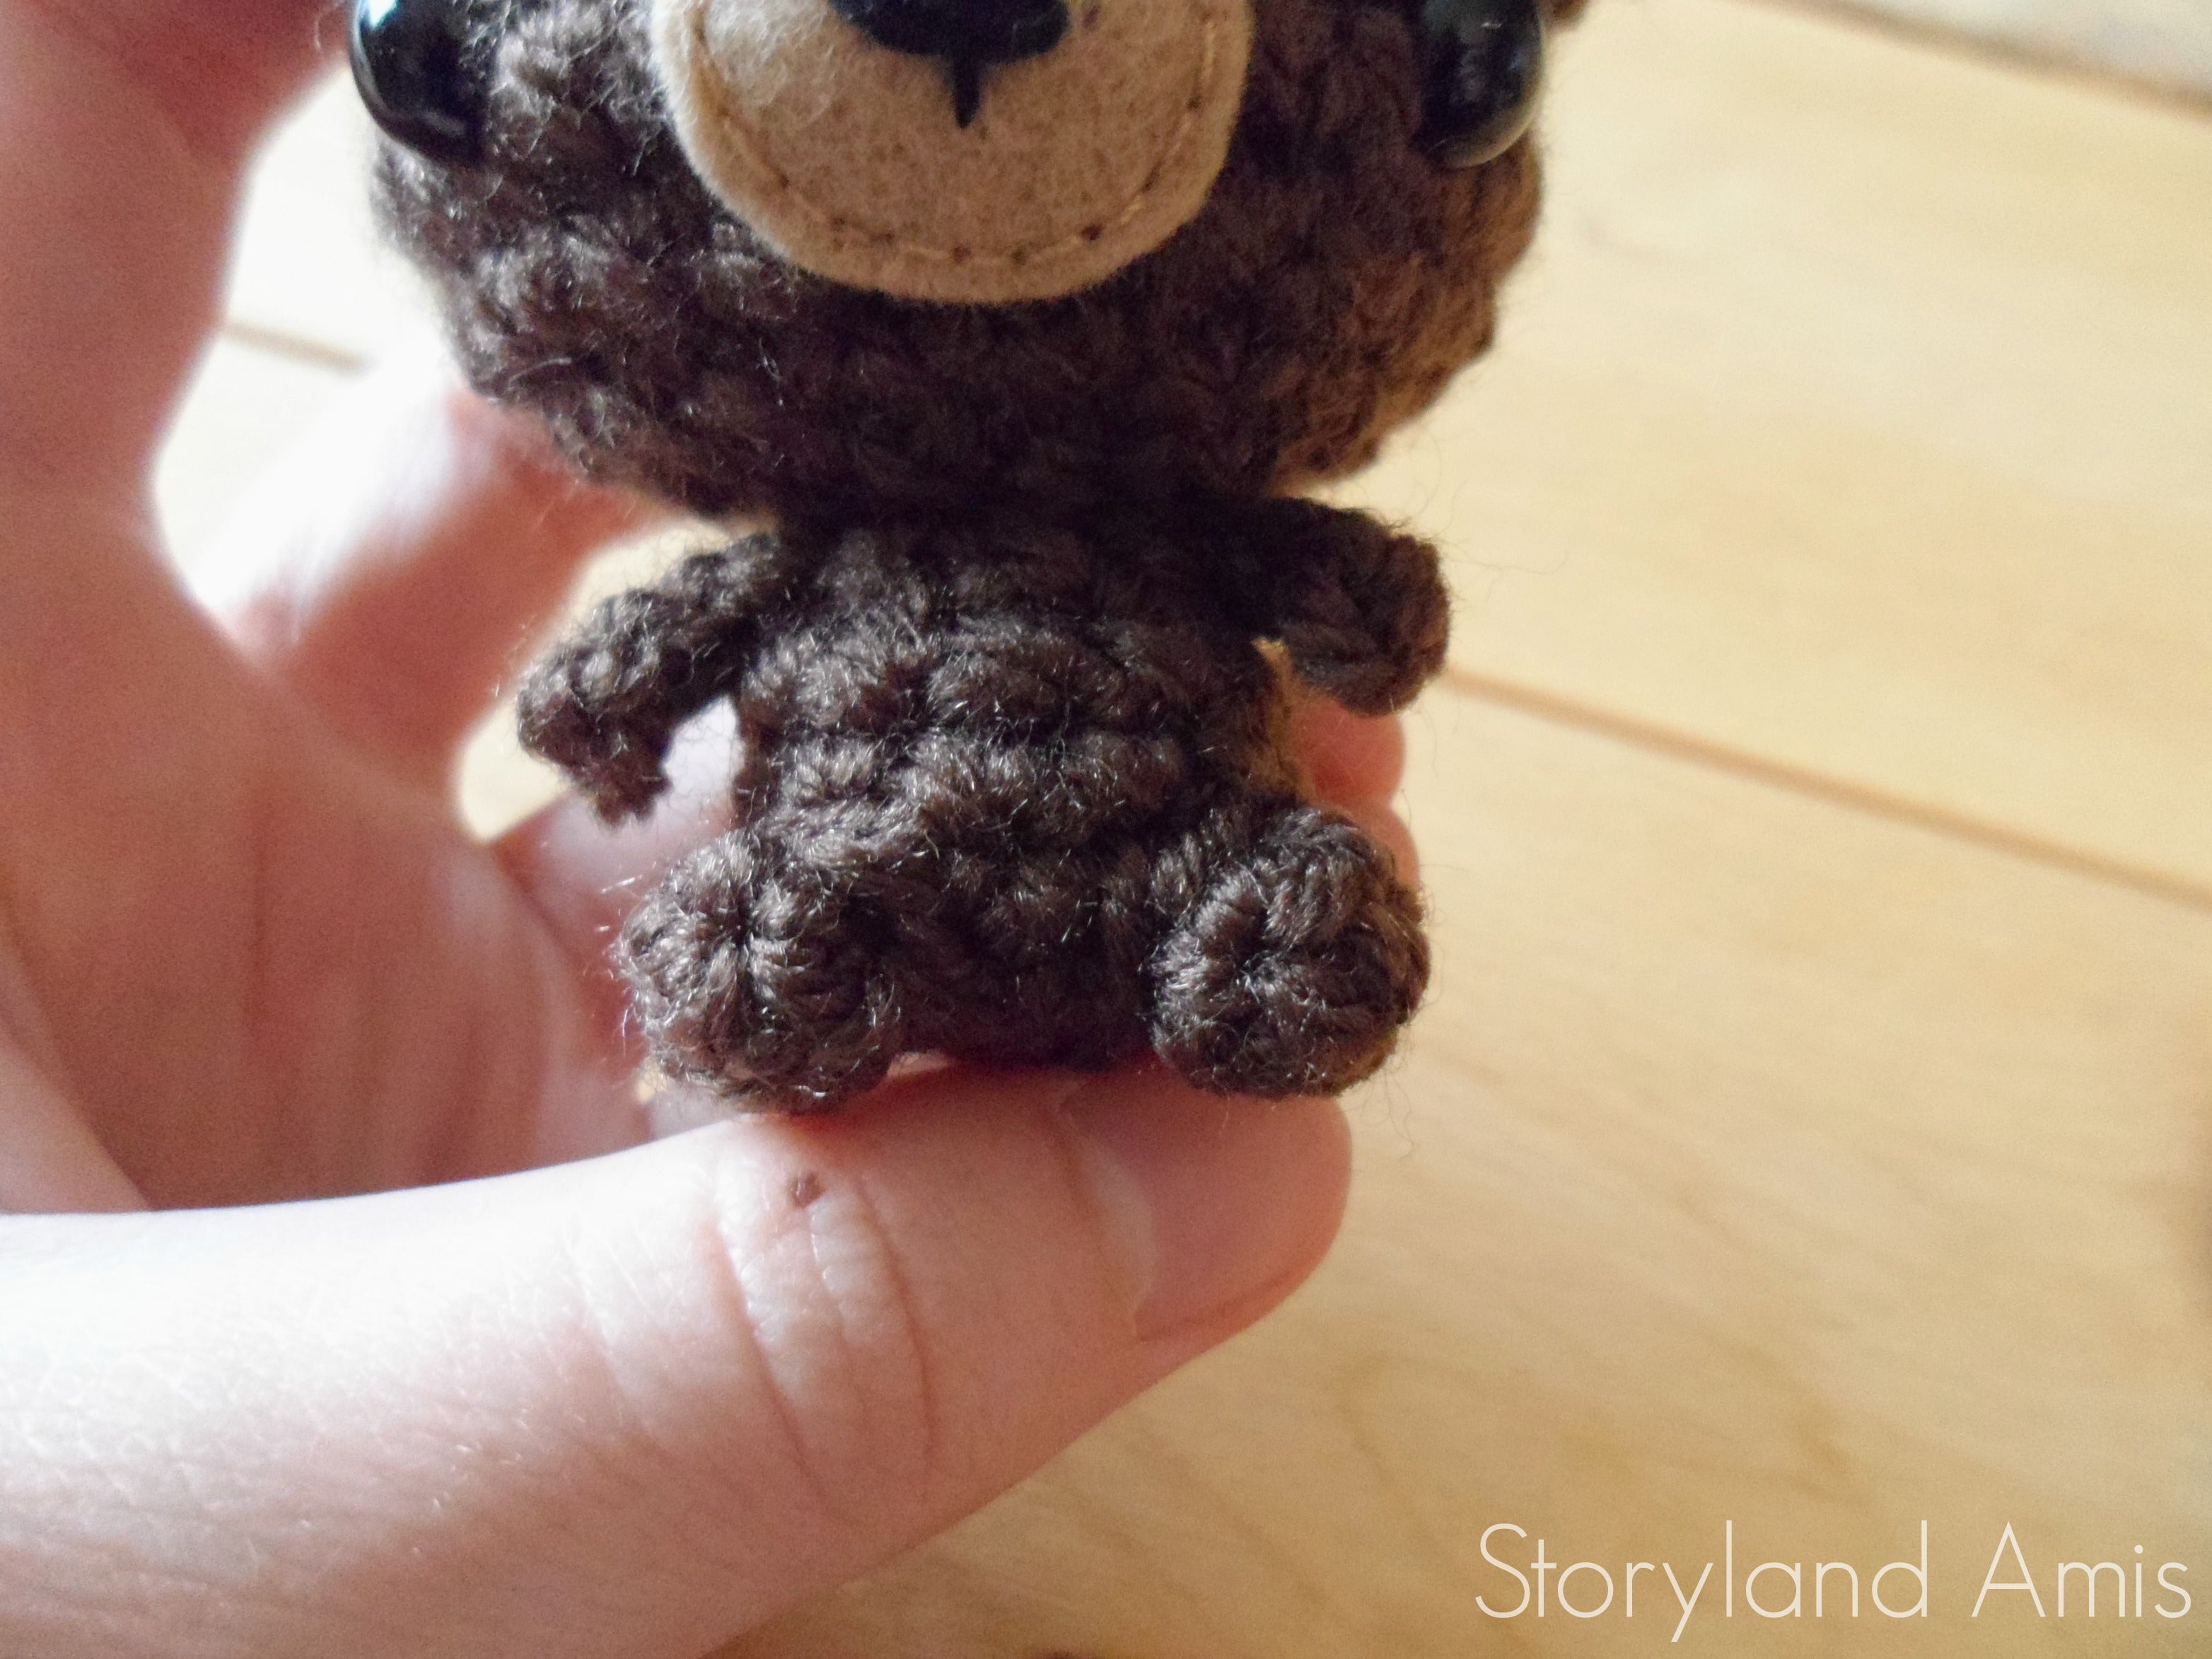


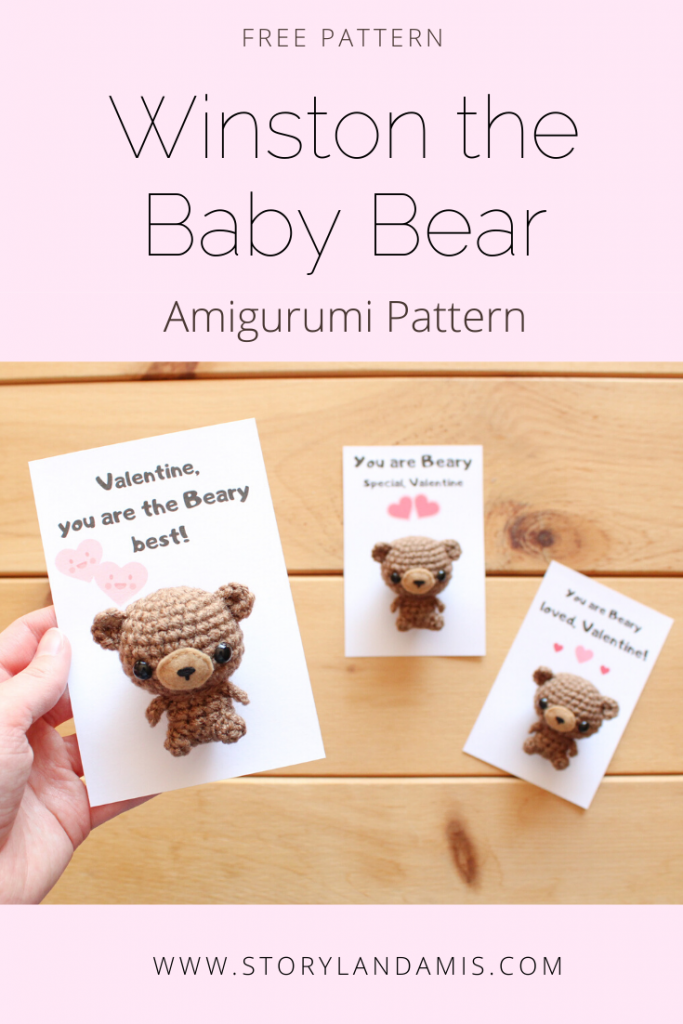
 Those fabulous and amazingly talented people inspired me to start my Etsy shop, Storyland Amis and ultimately, this blog.
So why am I here? I'm truly passionate about what I do and I want to share my passion with others and inspire them to do what they love. Because I know how important it is to be inspired and encouraged, my desire is to be able to do the same for others while encouraging them at the same time to stay true to their own unique style. I'm here because of you, whether you were the one who inspired me or the one I hope to inspire.
I'm so thankful to God for giving me this creative outlet! He has blessed me beyond my wildest dreams and I still can't believe all the amazing people I've been able to connect with over the past year or all the opportunities He's given me.
God has given each of us talents that we can and should use for His glory and I sincerely believe that that is possible no matter what that talent is.
"Therefore, whether you eat or drink, or whatever you do, do all to the glory of God." - 1 Cor. 10:31
I'm so very excited to start this blog and I can't wait to share with you all my projects and patterns!
Thanks for reading!
~Holly
Follow my blog with Bloglovin]]>
Those fabulous and amazingly talented people inspired me to start my Etsy shop, Storyland Amis and ultimately, this blog.
So why am I here? I'm truly passionate about what I do and I want to share my passion with others and inspire them to do what they love. Because I know how important it is to be inspired and encouraged, my desire is to be able to do the same for others while encouraging them at the same time to stay true to their own unique style. I'm here because of you, whether you were the one who inspired me or the one I hope to inspire.
I'm so thankful to God for giving me this creative outlet! He has blessed me beyond my wildest dreams and I still can't believe all the amazing people I've been able to connect with over the past year or all the opportunities He's given me.
God has given each of us talents that we can and should use for His glory and I sincerely believe that that is possible no matter what that talent is.
"Therefore, whether you eat or drink, or whatever you do, do all to the glory of God." - 1 Cor. 10:31
I'm so very excited to start this blog and I can't wait to share with you all my projects and patterns!
Thanks for reading!
~Holly
Follow my blog with Bloglovin]]>